Quick Answer: How Do You Replace a Recessed Medicine Cabinet?
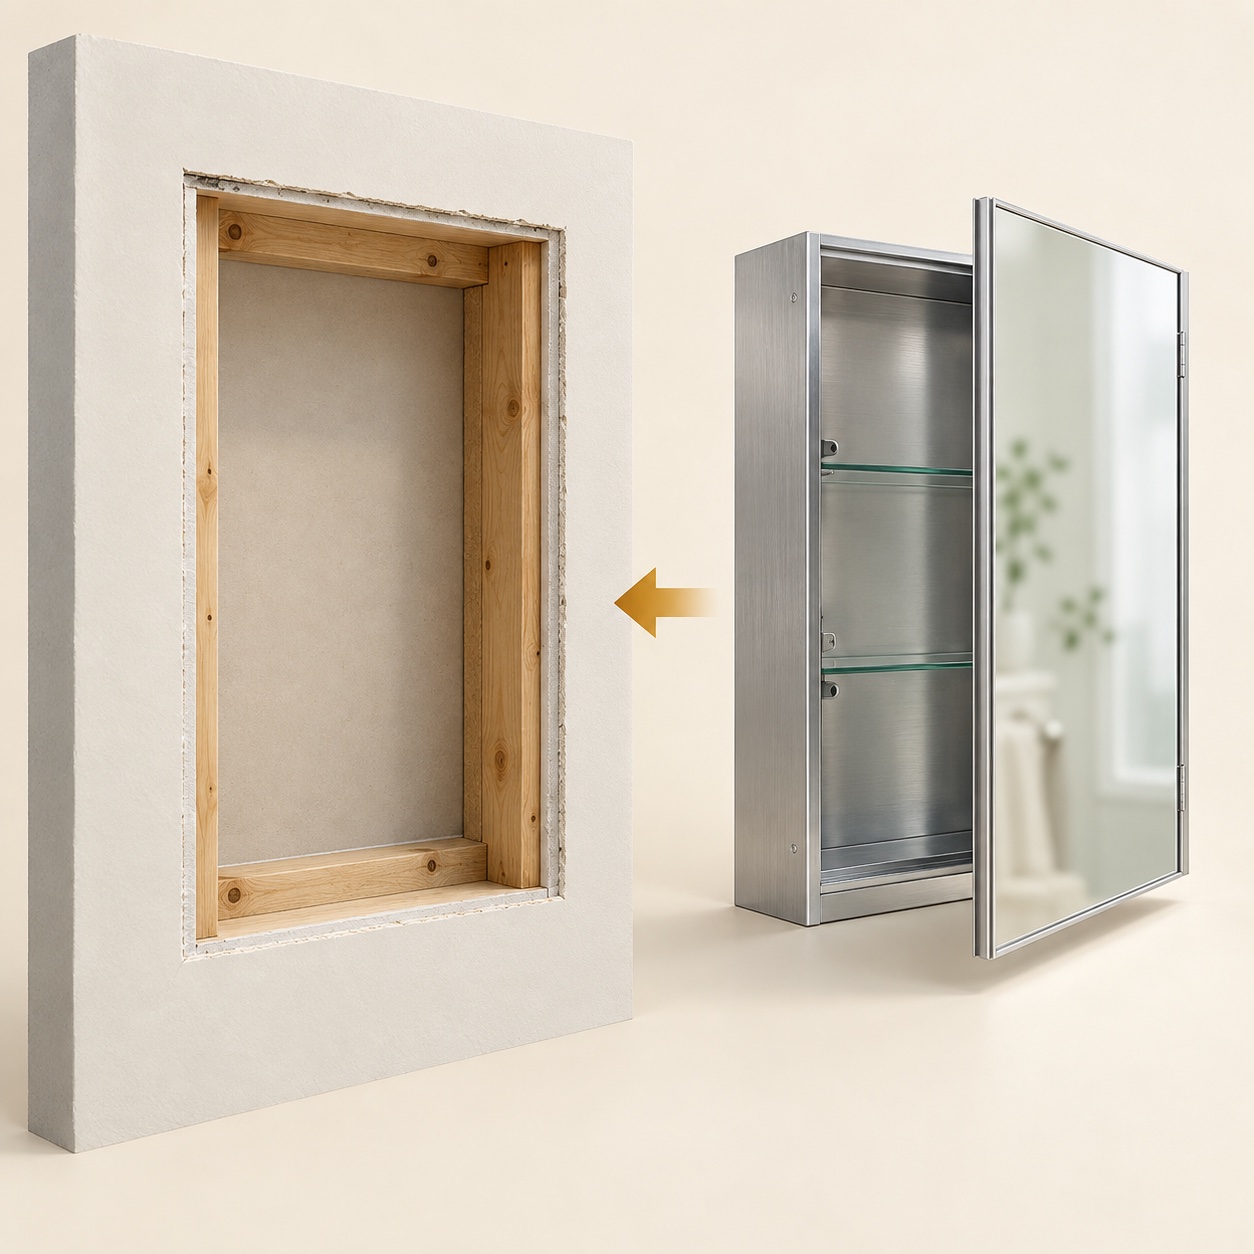
First have any electrical connection made safe. Empty the cabinet, remove detachable parts as instructed, and support the body while releasing its fixings and perimeter seal. Measure the exposed opening’s width, height, and usable depth; compare them with the replacement drawing. Dry-fit, check alignment and door clearance, then secure and reassemble. Stop for professional assessment if you find concealed services, structural changes, or damaged wall material.
Can you keep the existing opening?
Yes—if the exposed opening and selected cabinet are compatible. Check usable depth, sound support, fixings, face or trim coverage, door movement, and any electrical arrangement against the model’s requirements. If a condition does not match, choose a different cabinet, have the wall change assessed, or consider a suitable surface-mounted option.
The visible mirror size alone cannot confirm fit. Compare the exposed opening with the exact replacement model’s drawing, not just the old cabinet’s face dimensions.
In this guide
- Quick Answer: How Do You Replace a Recessed Medicine Cabinet?
- Project Overview: Difficulty, Time, and Tools
- Before You Start: Check the Wall and Power
- Prepare the Documents, Tools, and Work Area
- Step 1: Document the Existing Cabinet
- Step 2: Empty the Cabinet and Remove Loose Parts
- Step 3: Release the Old Cabinet From the Wall
- Step 4: Inspect and Measure the Exposed Opening
- Step 5: Compare the Opening With the Replacement Drawing
- Which Replacement Path Fits Your Wall?
- Step 6: Repair or Reframe Only After the Wall Is Assessed
- Step 7: Dry-Fit the Cabinet and Check the Clearances
- Step 8: Secure the Cabinet as Its Manual Specifies
- Step 9: Reinstall the Door, Shelves, and Accessories
- Step 10: Finish the Wall and Inspect the Completed Installation
- Troubleshooting a Replacement That Does Not Fit
- What Affects Replacement Cost?
- Replacing Cabinets Across Multiple Rooms
- Frequently Asked Questions
- Need a Replacement Medicine Cabinet That Fits Your Existing Opening?
Project Overview: Difficulty, Time, and Tools
Published by OJMirror · Originally published: October 12, 2026.
Swipe sideways to read all columns →
| Project factor | Planning guidance |
|---|---|
| Difficulty | Intermediate for a compatible, non-electrical swap; assess your ability to handle heavy glass and identify the mounting system. |
| Time allowance | Allow a few hours for an uncomplicated swap. This is a planning allowance, not a completion promise. |
| Extra time | Wall repair and finish drying, new framing, electrical work, and ordering a different cabinet can require separate visits. |
| Main decision | Can the new body, flange, depth, mounting system, and door work with the existing wall? |
| Help needed | Arrange a helper for handling; use qualified trades for electrical, plumbing, structural, or significant wall work. |
Tools & Materials for a Typical Replacement
Swipe sideways to read all columns →
| Item | What it is for |
|---|---|
| Tape measure, pencil, and room worksheet | Record the opening and match measurements to the correct room. |
| Level and flashlight | Inspect visible mounting points and check cabinet alignment. |
| Screwdriver or suitable driver bit | Release the identified fixings; use the replacement’s specified hardware when installing. |
| Utility knife | Release an accessible paint or caulk seam with a shallow, controlled cut where safe. |
| Protective gloves and safety glasses | Protect against sharp edges and debris; they do not make electrical work safe. |
| Padded covering and a protected staging area | Protect the basin, countertop, removed door, and shelves. |
| Specified fasteners and permitted shims | Secure and align the selected cabinet without distorting it. |
These are preparation items, not a universal installation kit. Check the cabinet manual before buying fixings or removing components.
Before You Start: Check the Wall and Power
A cabinet with no electrical connection may be a straightforward swap if it fits an intact, properly supported opening. Use the exact model’s drawing and installation manual throughout this guide: they define the required opening, fixing method, and clearances. Electrical and wall alterations must also meet local requirements.
For a powered cabinet, have a qualified electrical professional make the old unit safe and check the new connection requirements before removal.
Older blade-disposal slots: If the old cabinet has an unidentified slit, use our medicine cabinet razor blade slot guide to distinguish it from shelf openings. Alert the installer that loose blades may be present behind the unit before removal.
Prepare the Documents, Tools, and Work Area
Before removal, locate the current installation manual and dimensional drawing for each replacement model under consideration. Check the model number and drawing revision. Find the specified rough opening, cabinet-body dimensions, mounting points, fasteners, door-removal instructions, and any cable-entry requirements. A retailer listing or front-view product image is not an installation drawing.
Visible cabinet measurements and photos can narrow the shortlist, but they cannot confirm the concealed opening. After the old unit is safely removed, compare the exposed opening, usable depth, and support with the selected model’s current drawing before confirming the replacement. If removal is not possible before procurement, mark the fit as unverified and agree how the opening will be checked during a site survey or sample-room mock-up. Do not assume the old face size is sufficient.
Set up the tools and protected staging area listed above before loosening the first fixing.
Step 1: Document the Existing Cabinet
Before taking it apart, photograph the cabinet from the front and inside, along with its attachment points and any visible wiring. Record the door handing, cabinet face dimensions, surrounding wall finish, faucet and light locations, and any damage around the perimeter. These details can help identify a compatible replacement and explain differences after the cabinet is removed.
For a hotel, apartment, or other multi-room replacement, label each room and keep its photos and measurements together. Similar room layouts do not guarantee identical wall openings or concealed conditions.
Step 2: Empty the Cabinet and Remove Loose Parts
Remove stored items and take out removable shelves. If the door is removable, follow the manual and support it while releasing the hinges. Mirrored doors can be heavy and fragile; do not leave a door hanging from one hinge.
If the cabinet is powered, do not touch wiring or remove electrical components until the electrical professional has isolated and verified the supply and made the unit safe to remove.
Step 3: Release the Old Cabinet From the Wall
How to Remove a Recessed Medicine Cabinet With Less Wall Damage
Cover the basin and countertop with a padded protective layer and set aside a stable, padded place for the old cabinet. Do not rest its metal edge or a mirrored door directly on porcelain, stone, or tile.
Inspect the frame-to-wall seam. If paint or caulk bridges the frame and wall, carefully separate the accessible seam with a shallow utility-knife cut, keeping your free hand clear of the blade. Do not push the blade into the cavity or lever against tile. A seal released cleanly is less likely to pull away the surrounding finish, but old paint, adhesives, and weak drywall can still need repair.
Older finishes: Before disturbing paint in a pre-1978 US home, check the lead-paint risk and appropriate lead-safe procedure. Do not turn an unknown coating into sanding dust. See the EPA’s lead-safe renovation guidance.
With loose shelves out, use a flashlight to inspect the inside sides, top, bottom, and any accessible mounting rail or clips. Locate the actual retaining hardware before loosening it; shelf pins and hinge screws are not necessarily wall fixings. There is no universal four-screw pattern.
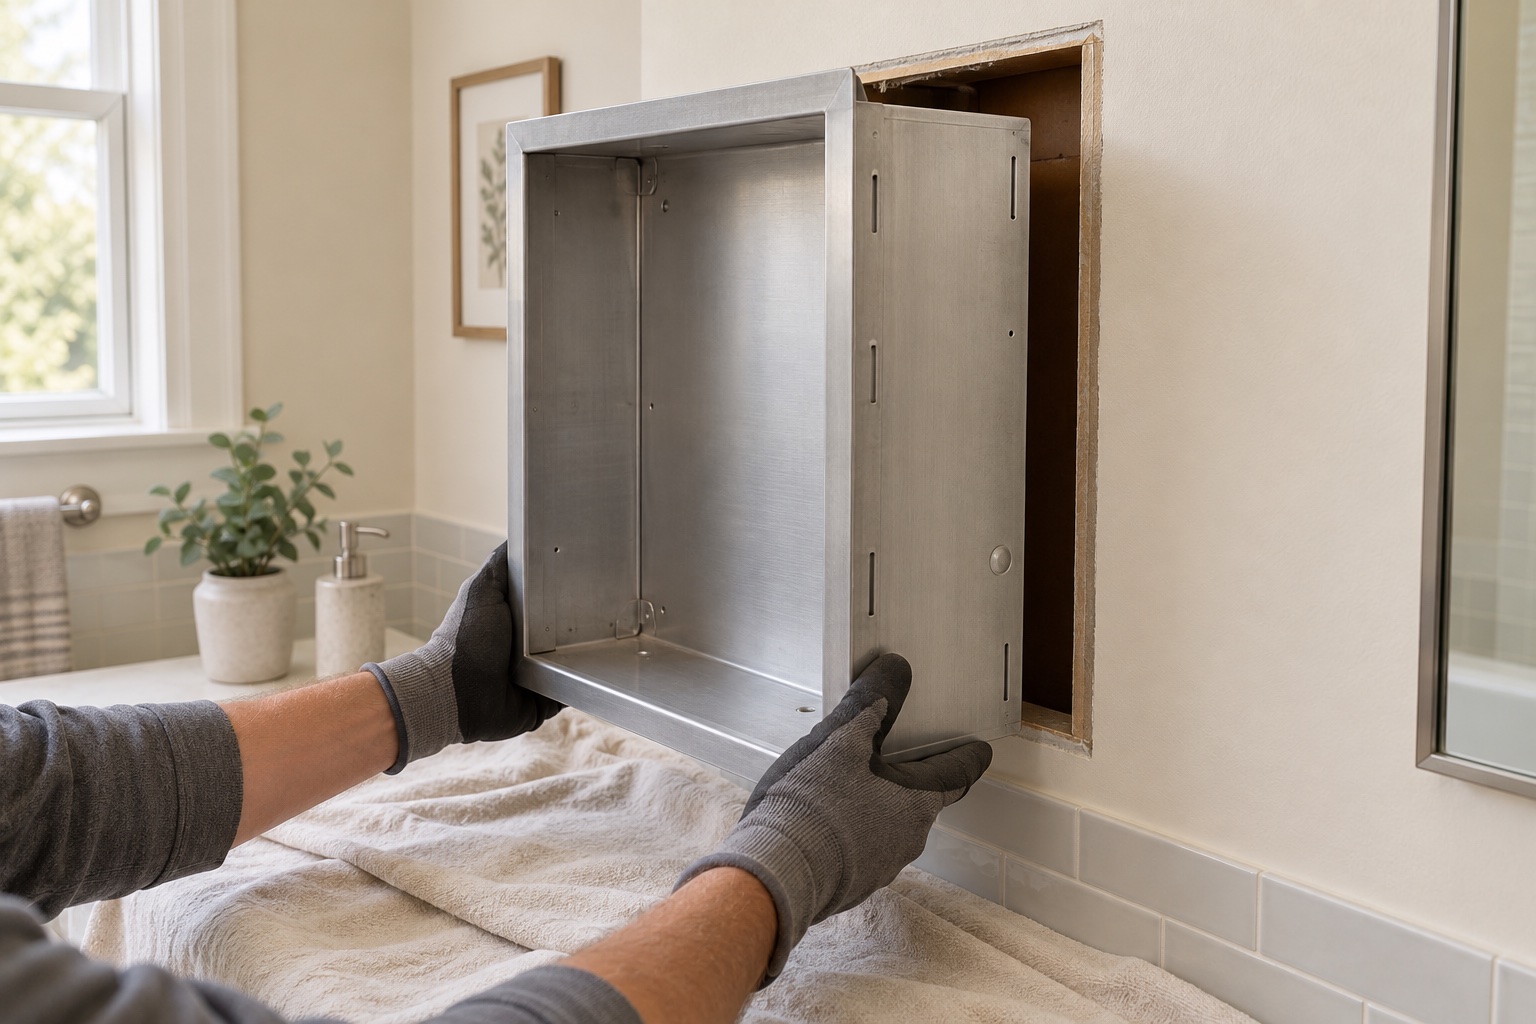
Support the cabinet while you locate and remove its fasteners. If a second person is available, have one person hold the cabinet while the other works on the fixings. Move slowly as the cabinet comes forward. It may be secured through the cabinet body, by a separate mounting bar, or with another model-specific arrangement.
Do not force the cabinet out if it catches. Check for a missed fastener, an attached trim piece, or an adhesive bond. If a cable is still attached, stop for electrical help. Avoid prying against tile or finished wall surfaces where the force could crack or loosen them.
Step 4: Inspect and Measure the Exposed Opening
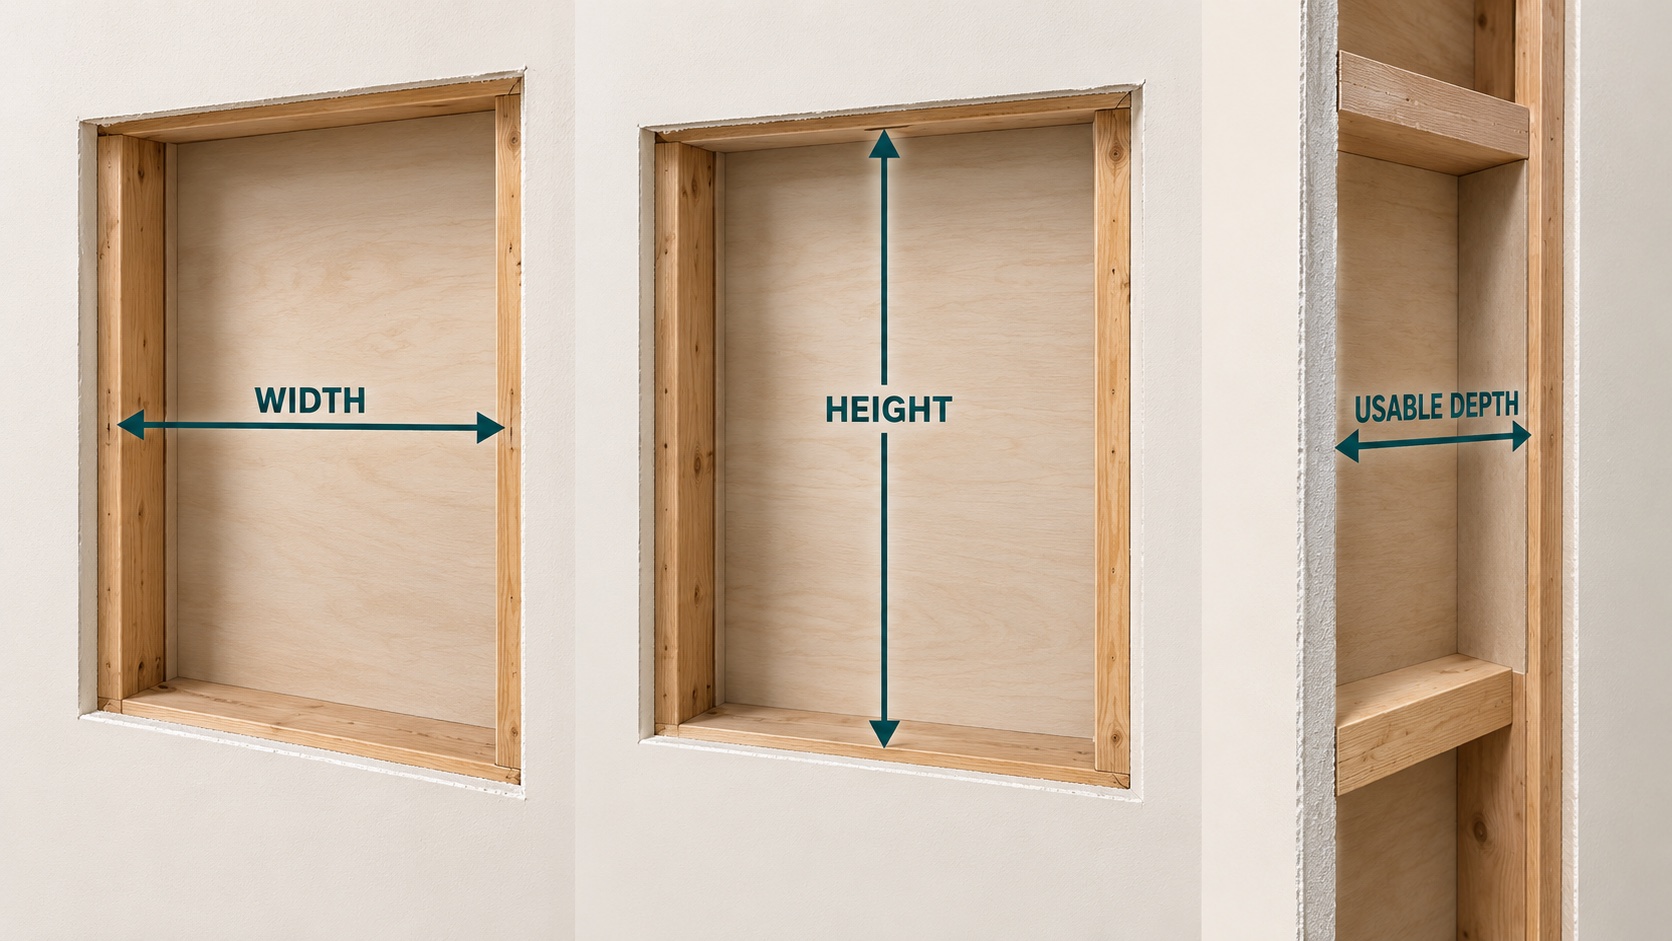
Once the cabinet is safely out, inspect the opening before selecting an installation path. Record its width, height, and clear depth at several points; use the smallest reliable width and height and the shallowest usable depth for the fit comparison. Note whether the opening is square, whether the supporting edges are sound, and how much of the old cutout the new cabinet’s flange or trim will cover.
Look for damp or soft material, mold, damaged framing, wires, pipes, vents, insulation, and obstructions behind the cabinet. If you uncover any of the conditions in the safety checkpoint above, pause the replacement for review.
For the full measuring method, see How to Measure for a Medicine Cabinet. The key replacement distinction is that the old cabinet’s face size, cabinet body, and exposed wall opening are separate measurements.
Replacement Measurement Checklist
Before ordering, record:
- Opening: width × height × usable depth, measured at several points.
- Cabinet body: width × height × depth from the replacement drawing.
- Face/flange coverage: outside dimensions and coverage of the existing cutout.
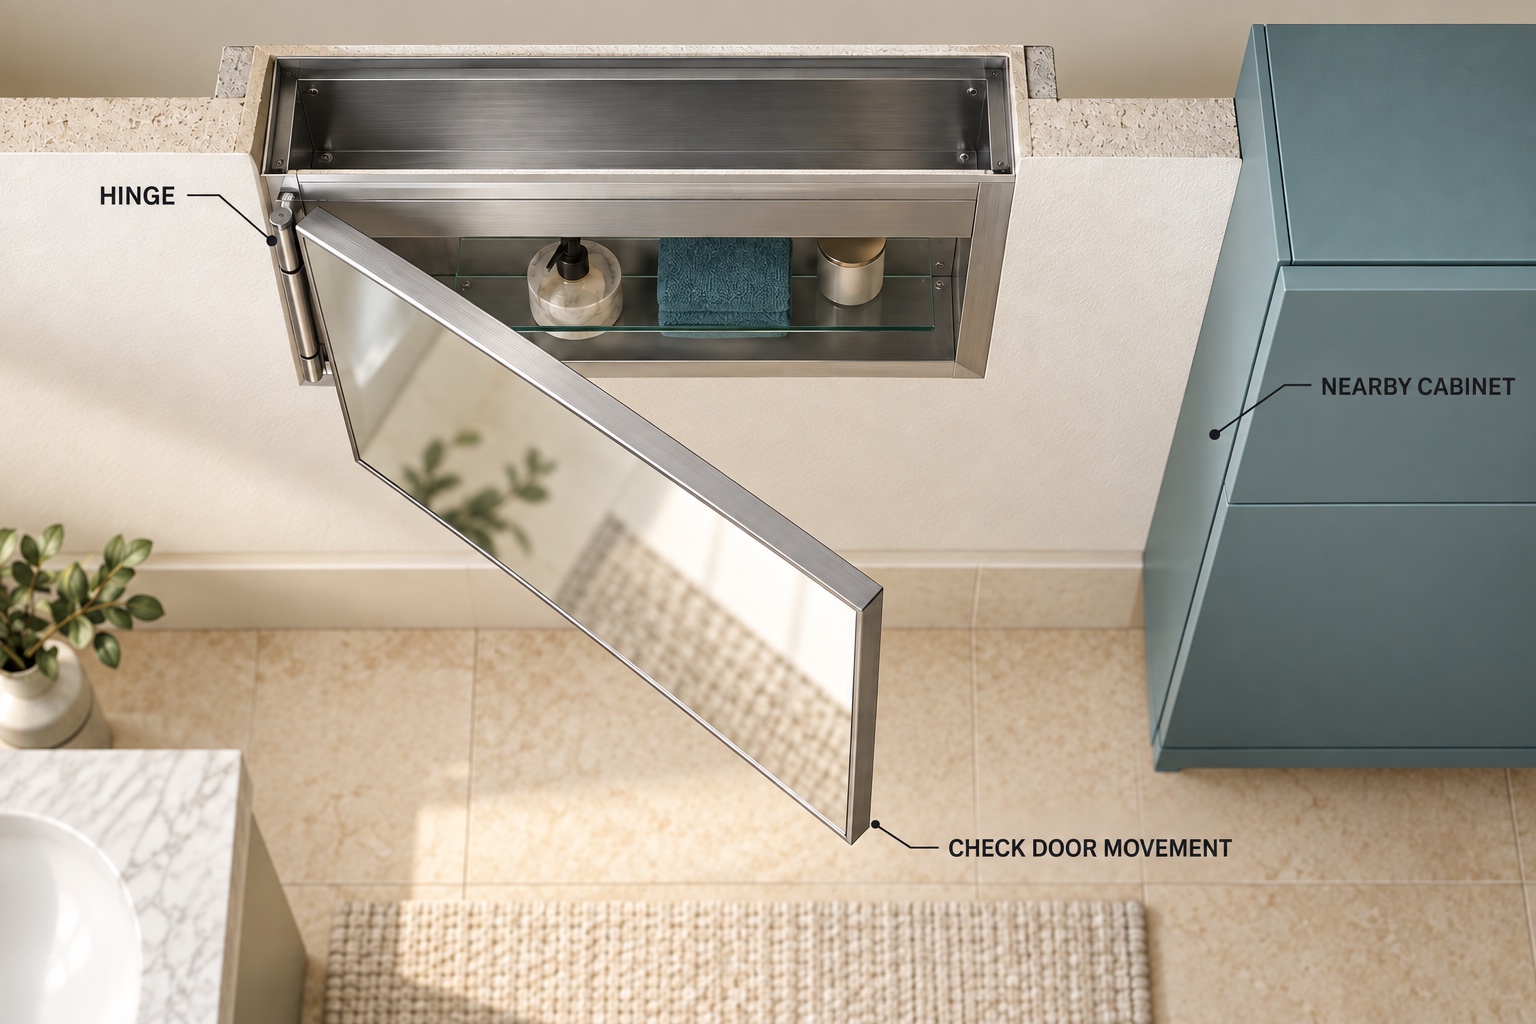
- Hinge side / door swing: handing and space for the full opening path.
- Nearby clearances: faucet, light, outlet, side wall, and adjacent cabinet.
- Power entry: location and connection requirements, if applicable.
- Wall type: construction, finish, and visible support or obstructions.
- Quantity / room ID: link each opening to its photos and room schedule.
Fit status: Verified / Unverified. Mark concealed or unmeasured items as unverified until the site survey or mock-up confirms them.
Record each room separately using the printable Replacement Measurement Worksheet. Keep photos and the selected model’s drawing with the record; a completed form is not an installation approval.
Step 5: Compare the Opening With the Replacement Drawing
Before buying a replacement recessed medicine cabinet, confirm the exposed wall opening—not just the old mirror size. Compare your checklist with the replacement drawing to decide which path fits the wall.
Can You Replace a Medicine Cabinet Using the Existing Wall Opening?
Yes, if the opening, usable depth, sound fixing support, face coverage, and door clearance meet the new model’s requirements. The same advertised mirror size does not establish a like-for-like replacement. If the old cabinet is still in place, treat concealed measurements as unverified—not as a confirmed fit.
If the cutout or wall depth is uncertain, use the Medicine Cabinet Rough Opening and Wall Depth Guide alongside the selected model’s drawing.
Swipe sideways to read all columns →
| Site and cabinet comparison | Likely next step | What to confirm |
|---|---|---|
| Opening, depth, support, and installation method are compatible | Dry-fit the cabinet and check the face, fixings, and clearances | Exact model instructions and sound support around the opening |
| Replacement cabinet is smaller than the existing opening | Repair or reframe the opening, or select a suitable cabinet or mounting method that covers it | Secure fixing, finished-wall repair, and trim coverage; do not rely on caulk to bridge a large gap |
| Replacement cabinet is larger than the opening | Have the wall and services assessed before enlarging the opening | Studs, load path, pipes, wiring, vents, insulation, and required framing |
| Available cavity depth is insufficient or obstructed | Consider a compatible shallower, semi-recessed, or surface-mounted option | Projection, side finish, door swing, wall support, and the new mounting instructions |
| Electrical configuration differs | Have wiring and model compatibility reviewed before ordering or installation | Input, grounding, protection, cable entry, service access, and local requirements |
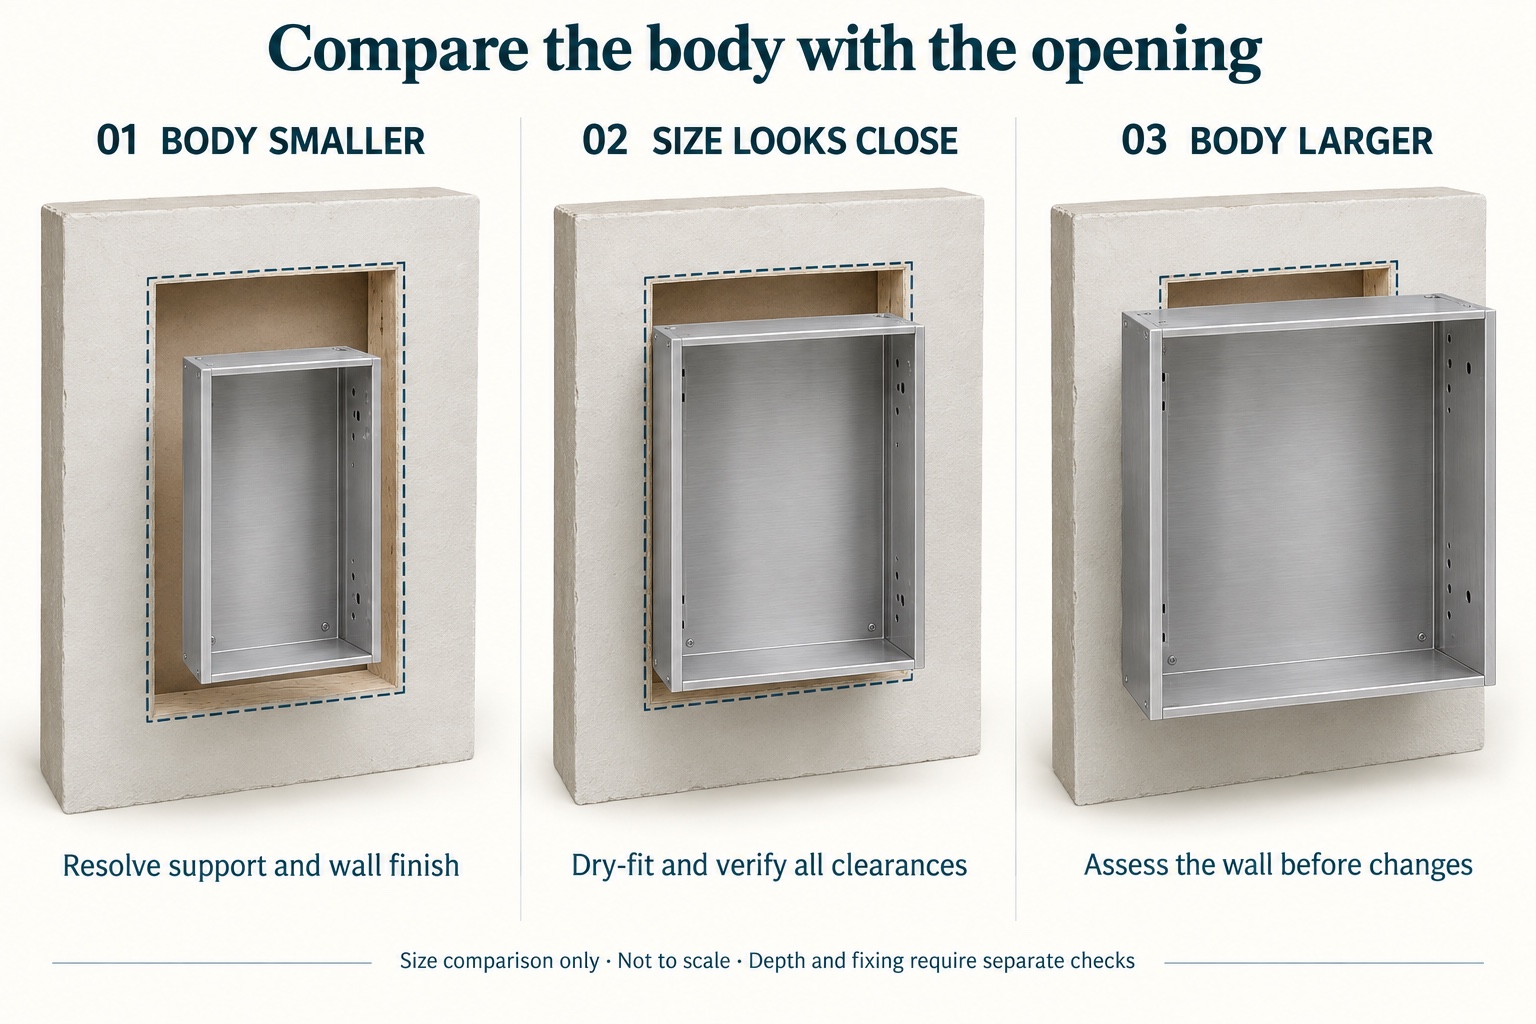
The required opening belongs to the selected model. A familiar nominal size does not tell you the body size or the exact cutout. If you are still choosing an outside size, use the Medicine Cabinet Sizes guide before returning to this fit check.
Worked Fit Check: When Width and Height Are Not Enough
Record the cabinet body, required opening, face coverage, and usable depth separately. Then compare the drawing with the actual wall; matching two dimensions is not a complete fit check.
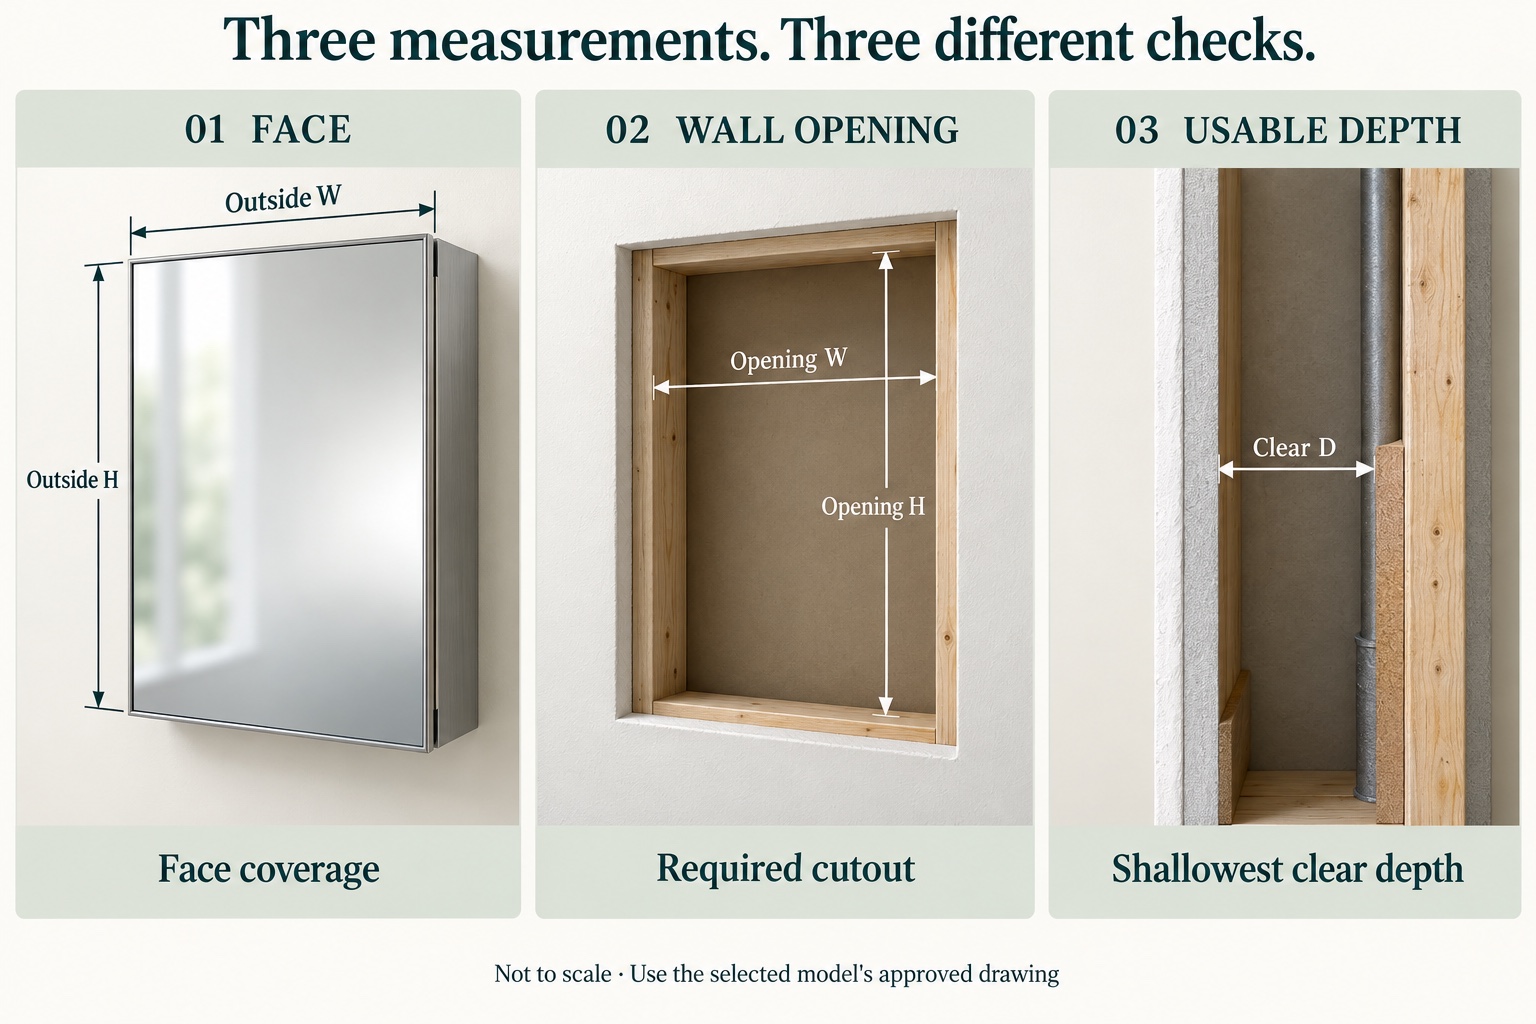
Planning example, not a surveyed room: If a confirmed model requires 4¾ in of usable depth but the site provides only 3½ in, it is short by 1¼ in. Matching opening width and height would not resolve that depth conflict. Review another approved mounting option or model; do not force the cabinet into the wall.
For a project shortlist, review our recessed medicine cabinets alongside the completed fit worksheet, rather than choosing from mirror-face size alone.
Which Replacement Path Fits Your Wall?
Like-for-Like
The existing opening and support meet the selected model’s requirements.
Dry-fit, check clearances, then secure the cabinet.
Resize and Reframe
The opening can be changed after the wall and services are assessed.
Approve framing and finish work before cutting.
Surface Mount
Recessing is impractical because of limited depth, obstructions, or an opening that cannot be safely adapted.
Resolve the old opening, wall fixing, projection, side finish, and door swing.
If surface mounting is the practical route, review our surface-mount medicine cabinets while planning a safe finish for the old opening.
Step 6: Repair or Reframe Only After the Wall Is Assessed
Separate cosmetic damage from a support problem. Small finish defects outside an otherwise sound opening may need local patching, priming, and a finish matched to the surrounding wall. Complete and dry those finishes as their product instructions require before covering them with the new flange.
Broken opening edges, missing backing at a fixing point, loose tile, or a substantially oversized cutout need a repair plan before installation. Filling the visible gap does not restore fixing support. Enlarging the opening is a different job again: identify framing and services first, then agree the support and finish details. Do not use the new cabinet to conceal moisture damage.
If the wall contains a pipe or wire in the way, do not press it behind the cabinet or cut it to make room. If the cabinet needs more depth than the cavity provides, evaluate another mounting method or a different cabinet depth. Exterior-wall insulation and moisture-control layers should remain part of the wall review.
Step 7: Dry-Fit the Cabinet and Check the Clearances
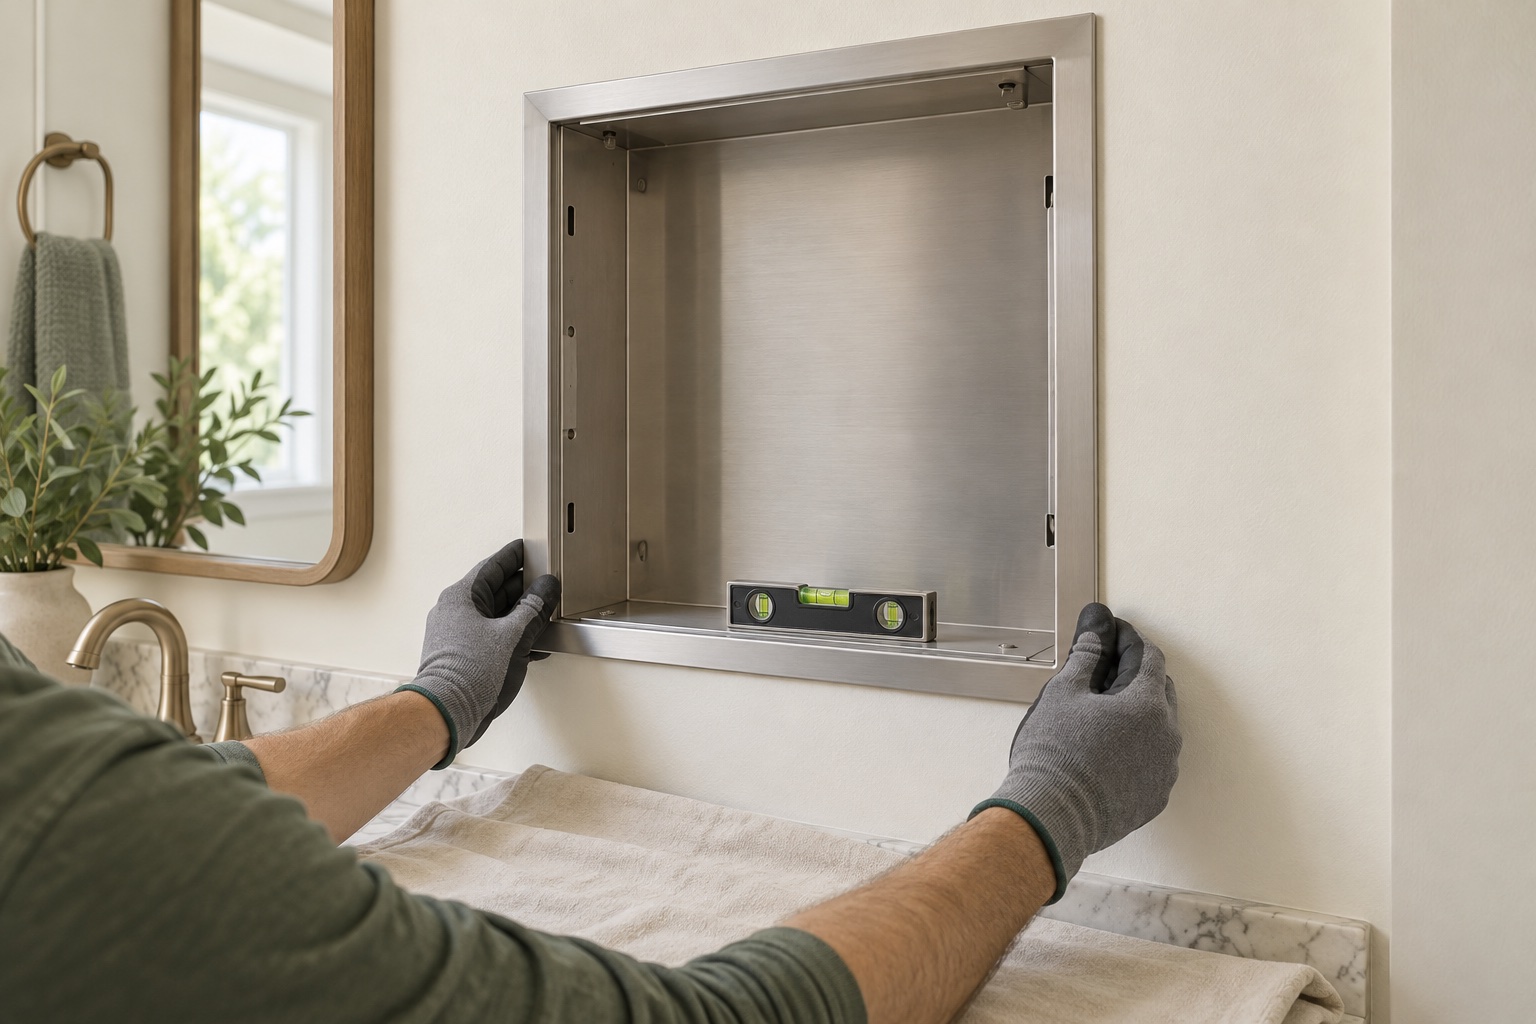
Remove the door or other components first if the manual recommends it. Place the cabinet body into the opening without fastening it. Confirm that it seats as intended and that its face or flange meets the finished wall correctly. Check level, plumb, and square, and make sure the cabinet is not twisted by an uneven opening or misplaced shim.
Check the door’s full opening path before final fixing. If the door was removed for handling, use a safe temporary fit or the manufacturer’s template to assess its swing. Check the faucet, light fixture, side wall, adjacent cabinet, and outlet against the model’s minimum clearances.
For a powered model, check that the planned cable entry and service access remain unobstructed.
Step 8: Secure the Cabinet as Its Manual Specifies
Use the designated mounting points and specified fasteners. The wall or framing must provide the support required for the cabinet’s weight and installation method. If shims are permitted, use them to correct the fit without twisting the body. Recheck alignment as the fasteners are tightened, and do not overtighten or substitute adhesive for specified mechanical support.
Do not carry over the old cabinet’s mounting bar, clips, or anchors unless they are specified for the replacement. Keep the installation instructions with the project record.
Step 9: Reinstall the Door, Shelves, and Accessories
Reattach the door and hinges in the order given by the manufacturer. Adjust the door so it sits evenly and opens and closes without rubbing. Reinstall shelves and accessories in their intended positions. Check that each shelf is seated on its supports and that the door closes without contacting stored items or wiring.
Do not load the cabinet until the installation is secure and complete. Follow the product’s shelf-load and care information rather than assuming all cabinets have the same capacity.
Step 10: Finish the Wall and Inspect the Completed Installation
Repair exposed wall damage using a finish appropriate to the surrounding surface. Use caulk or other sealant only where the cabinet instructions and wall detail call for it. Keep fixing points, wiring access, ventilation, and other service areas accessible as designed.
Before handover, confirm that:
- The cabinet is securely fixed and does not move.
- The body is level and not twisted.
- The door is aligned, operates smoothly, and clears nearby fixtures.
- Shelves and accessories are installed and seated correctly.
- The electrical professional has checked any powered functions.
- The perimeter finish is complete and there is no new wall damage.
- For a multi-room project, the room ID, model, drawing revision, exceptions, and completion photos are recorded.
Troubleshooting a Replacement That Does Not Fit
Swipe sideways to read all columns →
| What happens | What to check next |
|---|---|
| Old cabinet will not come forward | Recheck retaining hardware, bonded trim, perimeter seals, and attached services. Stop instead of adding force. |
| New body stops before the flange reaches the wall | Recheck usable depth, out-of-square edges, protruding fixings, and concealed obstructions. Do not push wiring or pipes aside. |
| Body fits but the old cutout remains visible | Compare face/flange coverage with the actual opening; plan a suitable wall repair or another cabinet. |
| Cabinet rocks or twists | Check bearing surfaces, opening shape, and permitted shimming; tightening harder is not the correction. |
| Door rubs or hits a nearby fixture | Recheck cabinet alignment, hinge adjustment, handing, and the full door path before final fixing. |
| Fixings cannot engage sound support | Stop and resolve the backing or mounting detail. A filled gap or bead of sealant is not structural support. |
What Affects Replacement Cost?
Ask for the cabinet supply and site work to be priced separately. A compatible non-electrical swap has a different scope from a replacement that needs opening alterations or tile repair. Avoid comparing quotations that leave different work out.
Swipe sideways to read all columns →
| Replacement scenario | Budget for | Main cost uncertainty |
|---|---|---|
| Verified like-for-like, non-electrical replacement | Cabinet, protected removal, disposal, installation, and minor finishing | Concealed damage or an incompatible fixing system can change the scope. |
| Different-size replacement | Cabinet and installation, plus assessed opening alterations, support, and wall repair | Framing, services, tile matching, and finish-drying time. |
| Lighted or powered replacement | Cabinet and installation, plus electrical assessment and any required connection work | Existing supply, protection, cable entry, and local electrical requirements. |
These scenarios describe work scope, not quoted prices or a guarantee that one option is cheaper. A powered replacement can also require opening alterations.
- Cabinet supply: model, size, door layout, finish, accessories, and any powered features.
- Removal and disposal: handling, access, bonded finishes, and disposal arrangements.
- Opening and wall repair: support, reframing, drywall or tile work, finishing, and drying time.
- Electrical or plumbing work: assessment and any approved modifications by the appropriate trade.
- Project logistics: room access, occupied rooms, protection, delivery, and repeat visits.
Request a written allowance or approval process for concealed conditions discovered after removal. For repeated rooms, separate the first mock-up from the repeat-room scope and record exceptions. No single price range is reliable without a location and a defined scope of work.
Replacing Cabinets Across Multiple Rooms
For hotels, apartments, or other repeated-room projects, survey each opening instead of ordering from a single “typical” room. Keep a schedule with room ID, opening width, height and depth, wall finish, cabinet handing, nearby fixtures, power requirements, photos, and exceptions.
Approve one mock-up against the actual wall before finalizing a repeated-room order or releasing the full installation. Freeze the model and drawing revision, record the accepted fixing and finish details, and give the installation team a clear exception process. This reduces the chance that a room with a different opening or concealed service becomes an on-site redesign.
Frequently Asked Questions
Where are the mounting screws on a recessed medicine cabinet?
Inspect inside the cabinet along the sides, top, and bottom, and check for a rail or clip arrangement. Their location depends on the mounting system. Remove loose shelves for visibility, identify the retaining hardware, and support the body before releasing it; do not assume every visible screw fixes the cabinet to the wall.
How long does it take to replace a medicine cabinet?
Allow a few hours for a compatible, uncomplicated non-electrical swap. Wall repairs, finish drying, reframing, trade visits, or discovering that the new cabinet does not fit can extend the job beyond one visit. Confirm the opening and work scope before scheduling completion.
Can I remove the old cabinet without damaging the drywall?
Careful removal can reduce damage, but cannot guarantee a repair-free wall. Protect the work area, release accessible paint or caulk bonds, find all retaining hardware, and keep the body supported. Stop if it catches; old adhesives or weak wall finishes may still need repair.
Can I replace a recessed medicine cabinet without opening the wall further?
Yes, when the existing opening, usable depth, support, clearances, and mounting method meet the replacement model’s requirements. Check the model drawing after the old cabinet is removed.
Should I measure the old cabinet or the wall opening?
Record both the old cabinet and the exposed opening. Then compare the site measurements with the replacement model’s body dimensions and required opening. The mirror face size is not a substitute for the rough opening.
What if the replacement cabinet is smaller than the opening?
The opening may need repair or reframing, or you may choose a cabinet or mounting method that can cover it while still providing approved support. Do not use caulk as the structural fix for a large gap.
Can I replace a medicine cabinet with a different size?
Yes, if the wall can accommodate the new model. A smaller cabinet may need added support and wall repair; a larger one may require a reviewed change to the opening. Compare the exact cabinet drawing with the exposed wall condition before ordering.
Can I enlarge the opening for a larger recessed cabinet?
Possibly, but first identify the framing, wall type, and concealed services. A professional should assess any change involving studs, a potentially load-bearing wall, plumbing, wiring, venting, or exterior-wall construction.
Can I replace a recessed cabinet with a surface-mounted cabinet?
Often this is an option when recessing is impractical, but the old opening still needs a safe, finished treatment. Check wall support, cabinet projection, side panels, door swing, and the new model’s mounting instructions.
Do I need an electrician to replace a lighted medicine cabinet?
If the unit is hardwired or the work involves wiring, grounding, circuit protection, or changes to the electrical connection, use a qualified person as required by local rules. Follow the exact cabinet instructions; electrical configurations differ by model and market.
How can I tell whether the wall is load-bearing?
A visual guess from the bathroom is not enough to approve cutting a wall member. If the replacement requires cutting or altering framing and the wall’s role is uncertain, have a qualified contractor or structural professional assess it.
Need a Replacement Medicine Cabinet That Fits Your Existing Opening?
Replacing cabinets across a hotel, apartment, or commercial property? Send OJMirror your opening measurements, candidate cabinet dimensions, mounting requirements, and quantity for a project fit review. Include the measurement units, location, lighting or power needs, and room-to-room exceptions. Mark anything still concealed as unverified.
Use the Replacement Measurement Worksheet to organize the brief. Mention available photos and drawing revisions in your inquiry; arrange file sharing with the team rather than assuming the form accepts attachments. Final compatibility requires the model drawing and site checks, not just a front-view photo.
Request a Replacement Fit Review
If the brief includes internal power, the medicine cabinets with outlets page explains the extra cabinet and electrical coordination. Final product feasibility and supply details follow the selected project specification.