How to Antique a Mirror: 3 DIY Methods for an Aged Look
To make a mirror look antique, first decide whether you are changing an existing mirror or creating a mirror-like finish on clear glass. Those are different jobs, with different materials and results. This guide compares three DIY routes, lists what each needs, and explains the checkpoints that help you avoid ruining a useful reflection. It also shows when a multi-panel project is better specified as professionally made antique mirror glass.
Kris Chou · Product Manager
Published September 30, 2026 · Updated October 13, 2026
Quick answer: You can antique a mirror by distressing its reflective backing, applying a mirror-effect coating to clear glass, or adding a decorative finish to the front. Back-distressing is permanent. A separate clear-glass sample lets you explore a coating without stripping your existing mirror, but still requires product-specific safety and curing instructions. A front finish changes the viewing surface and may scratch. Never experiment on a valuable historic mirror.
Compare methods · Materials checklist · Read safety first
This is a method-selection and process guide, not a tested chemical recipe. Follow the selected product system's label and Safety Data Sheet (SDS).
In this guide
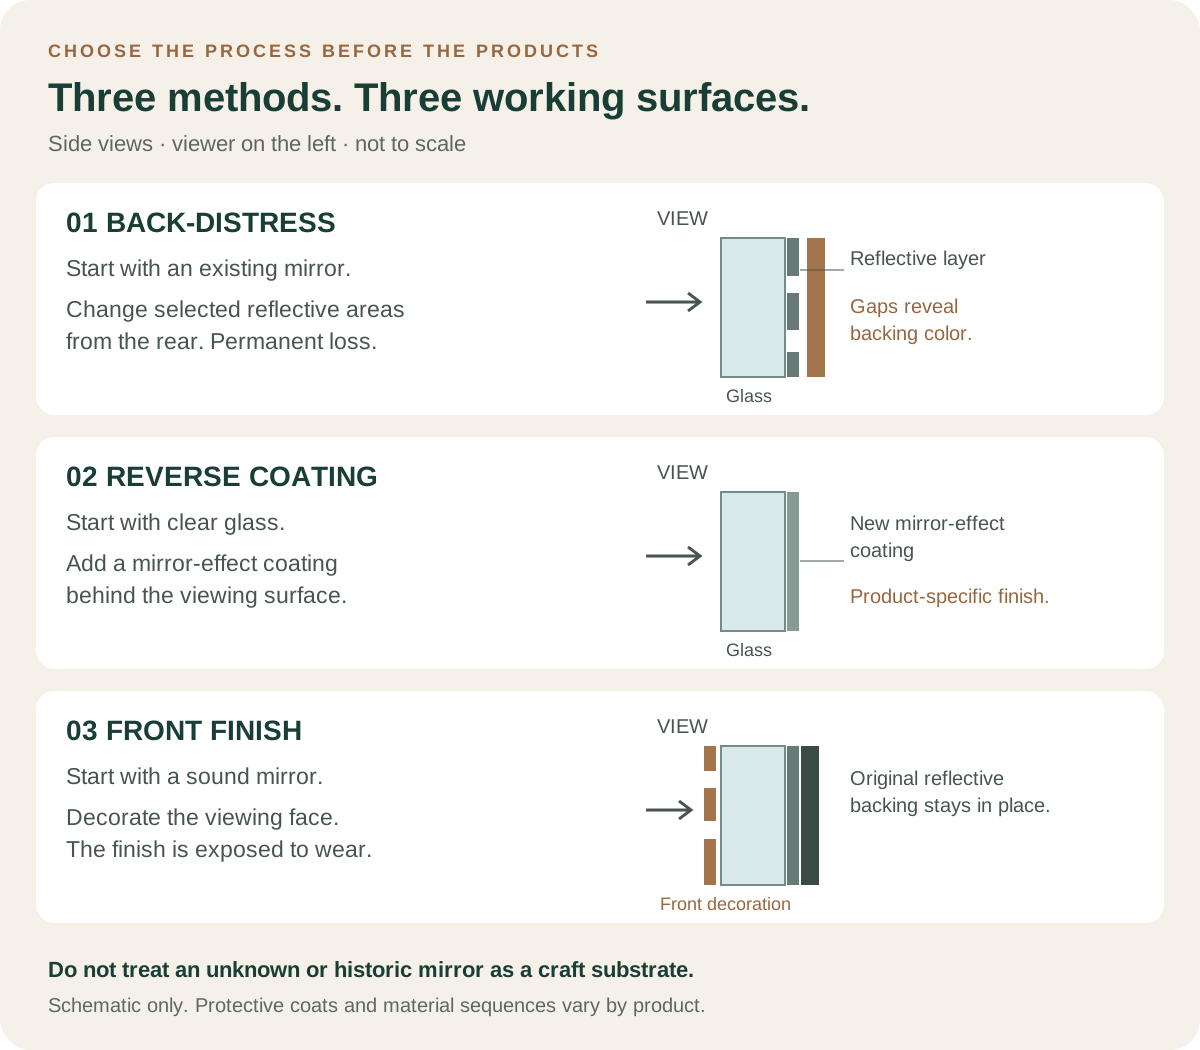
3 Ways to Make a Mirror Look Antique
| Method | Starting material | Practical difficulty | What changes? |
|---|---|---|---|
| Back-distress an existing mirror | Small, replaceable mirror with accessible backing | Advanced: removal, material identification and compatible treatment | Reflective material is lost permanently |
| Coat clear glass | Separate clear glass approved for the coating | More approachable for a small decorative trial; still product-dependent | A new mirror-like coating is added to the reverse |
| Apply a front-surface faux finish | Sound mirror with a compatible viewing surface | Decorative application; adhesion and wear still need testing | Marks sit on the front and may not be removable |
These are relative planning judgments, not tested difficulty ratings. If the only thing you want to age is the frame, work on the frame separately and protect the glass.
Materials and Tools Needed to Antique a Mirror
Buy for one route, not a mixture of online tutorials. A test piece from the same material is more useful than a spare bottle of stronger cleaner.
Shared preparation
- A small, replaceable test piece and a reference image.
- A clean, flat, protected work surface and a suitable support for the glass.
- Lint-free cloths, masking and applicators compatible with the chosen products.
- The eye, skin and respiratory protection, ventilation, waste containers and disposal arrangements required by the label and SDS. Do not improvise protection if those requirements are unclear.
- A camera and a notebook to record the product names, sequence and observations.
Method 1: existing mirror
Use a mirror with removable fixings and identified backing materials. Obtain a backing-removal product, antiquing treatment and backing finish documented as compatible with that mirror system. Use only the tools specified for those products. If you cannot establish compatibility, choose another route rather than assembling your own chemical combination.
Method 2: clear glass
Use clear glass, a mirror-effect coating approved for it, the specified preparation materials, and any protective or backing finish required by that coating system. Ordinary silver-colored paint is not interchangeable with a reverse-side mirror-effect product.
Method 3: front finish
Use a decorative coating approved for the glass surface, a compatible applicator, and frame protection. Check cleaning and wear requirements before selecting it. Adding an unapproved sealer can change the appearance or adhesion.
How much time and money should you allow?
There is no verified OJMirror DIY time or cost figure for these methods. Build an estimate from your selected products and local prices:
| Budget item | What to include |
|---|---|
| Active work | Safe removal, preparation, sample testing, application and assembly |
| Waiting time | Each product's recoat, drying and full-cure requirements; touch-dry is not necessarily ready to assemble |
| Materials | Glass or mirror, test piece, complete coating system, applicators and protective supplies |
| Possible rework | A failed sample or replacement mirror, plus disposal requirements |
Keep application time separate from elapsed project time. Do not promise a same-day result before reading every product's curing instructions.
Before You Begin: Inspect the Mirror and Plan a Test
Confirm that you can reach the back safely
Back-distressing requires access to the rear face. Check how the mirror is retained before prying at clips, backing boards or adhesive. Large glass is heavy and unforgiving; if removal requires force, special lifting equipment or work above floor level, use a qualified glass professional.
If the mirror is permanently bonded to a wall, the back-distressing route is not available without removing the glass. A front finish may be possible for a decorative installation, but it will have different wear and cleaning characteristics.
Identify the starting material
A mirror normally has glass, a reflective coating and protective layers. Clear glass has no reflective layer to distress. Existing silver and aluminum coatings may respond differently to a treatment. Check the mirror's product information rather than identifying the coating by color alone.
Test before committing to the full piece
Use a spare sample or an offcut from the same material. A hidden corner is a fallback only on a replaceable piece: the test itself may leave permanent damage. Keep a reference image nearby and record the products, sequence and result. A blogger’s timing is not a specification for your mirror.
Never alter a genuine antique, a collectible mirror or an unidentified historic backing. For maintenance rather than a new finish, see how to clean an antique mirror.
Safety Rules That Should Not Be Combined or Skipped
Never mix bleach with vinegar, acid, ammonia or other cleaners
The CDC warns against mixing bleach or disinfectants with other cleaners. Use good ventilation and the protective equipment required by the product label. Poison Control explains the toxic gas risk from mixing bleach with acids or ammonia.
Do not combine recipes, including products used in earlier steps. Unidentified residues also matter. A recommendation for household disinfection is not a mirror-antiquing recipe.
If incompatible products have already been mixed or irritating fumes develop, leave the exposure area and seek guidance from local emergency services or a poison-control resource. Do not try to neutralize an unknown mixture with another chemical.
Product instructions outrank a generic recipe
Concentration, coating chemistry, temperature, ventilation and substrate can change the result. This guide therefore does not give a universal chemical ratio or dwell time. Do not substitute stronger acids or industrial chemicals for products intended for the selected coating system. Follow the product instructions and test on disposable material first.
Method 1: Distress the Back of an Existing Mirror
This route changes the original reflective layer, so it can produce a convincing aged appearance. It is also irreversible. Use a small, replaceable mirror and a treatment system intended for its construction.
Before starting: Read the chemical safety rules, product labels and Safety Data Sheets. If you cannot meet the ventilation, protection or disposal requirements, do not proceed.
Step 1 — Remove and support the mirror safely
Photograph the frame fixings before taking them apart. Remove only accessible, removable backing boards and retainers, then support the mirror face down on a clean, flat, protected surface. Stop if adhesive, damaged edges or the weight of the glass makes removal unsafe. Leave bonded films and unfamiliar backing systems to a glass professional.
Step 2 — Test a small area of the backing
On the spare sample, test the backing-removal product specified for your chosen system. You are checking whether the protective paint releases without damaging the reflective layer. Inspect from the front once safe to handle. Scratches or unexpected loss of reflection are reasons to stop, not to use a stronger product.
Step 3 — Expose the reflective layer
Follow the tested process on the intended areas. Lift softened backing gently with the recommended tool; forcing stubborn patches can leave visible scratches. Complete the manufacturer's residue-removal procedure before the next stage. An unknown stripper residue and a second chemical do not belong together.
Step 4 — Build the antique pattern gradually
Use only the compatible antiquing treatment and application method specified by its manufacturer. Start with a restrained pattern, leaving some clear reflection. Check the front at safe handling points instead of judging the wet back. Look for balanced density, irregular edges and enough untouched mirror; stop before those small marks become large clear patches.
Step 5 — Add backing color and allow it to cure
Stop the treatment and clean up exactly as instructed. Once dry, apply a compatible backing finish. Dark gray or black makes clear patches look deeper; brown or bronze gives them a warmer tone. Color changes the appearance of missing reflection—it cannot put the reflective layer back. Allow the specified cure before assembly.
Step 6 — Reassemble and inspect
Refit the frame without forcing clips against the glass. Look at the result upright, in its intended light and from normal viewing distance. Check for scratches, distracting runs and loose fittings. If the reflection no longer suits the room, use the piece decoratively rather than treating it as a functional vanity mirror.
Method 2: Make Antique Mirror Glass with a Mirror-Effect Coating
This route starts with clear glass—not an existing mirror's backing. It creates a decorative reflection. For example, Rust-Oleum Mirror Effect is designed for the reverse side of glass or clear acrylic on indoor objects. Other products may differ.
A route without stripping mirror silvering: You are adding a coating, not using bleach to remove an existing reflective layer. The manufacturer specifies surface cleaning, thorough drying and light coats. Read the current label for application conditions and intervals; a decorative mirror-like coating is not a guarantee of the same reflection as manufactured mirror glass. This is manufacturer-based guidance, not an OJMirror-tested project.
Step 1 — Prepare the glass and mark the viewing side
Use a sound test piece suitable for the coating. Clean it as directed, remove residue and let it dry. Mark which side will face the viewer on removable masking outside the coated area, so you do not coat the wrong surface.
Step 2 — Make a plain coating sample first
Follow the label's shaking, distance, coat and recoat instructions. Apply to the reverse side when specified. Inspect through the unpainted face once handling is permitted. Check whether this product's reflection is acceptable before working on an antique pattern.
Step 3 — Introduce variation only by an approved technique
Use the manufacturer's aged-effect technique if one is provided. Rust-Oleum's mercury-glass project describes a product-specific decorative approach; it is not a recipe for stripping mirror silvering. Do not add bleach or substitute an unrelated treatment. If the selected coating has no compatible antiquing instructions, do not improvise chemical additives.
Step 4 — Back, cure and inspect
Add only the backing or protective finish permitted by the product system. Allow the required cure, then view the sample upright in its intended light. Check reflection, adhesion and permitted cleaning. A successful small craft sample does not establish suitability for bathroom walls or commercial glazing.
Method 3: Apply a Front-Surface Faux-Antique Finish
A front finish leaves the reflective backing in place. It suits low-touch decoration when the back is inaccessible, but the exposed coating can scratch. “Faux” does not automatically mean removable.
Step 1 — Test preparation and adhesion
Select a decorative coating suitable for glass and follow its preparation instructions. Try it on a separate sample first. Check compatibility with any existing surface treatment; keep the mirror unaltered if that treatment is unknown.
Step 2 — Build a light decorative pattern
Protect the frame and nearby surfaces. Use a compatible applicator to create sparse, uneven marks, then step back to assess the reflection before adding more. Leave the central area clearer if the mirror still needs to be useful. Paint sitting on the front will remain visible at close range.
Step 3 — Check wear and cleaning after curing
Test the proposed cleaning method on the cured sample. If the finish lifts, smears or scratches, it is not ready for that use. Avoid this route for heavily handled surfaces or a main vanity mirror unless the complete coating system is suitable.
Light, Medium and Heavy Antique Mirror Finishes
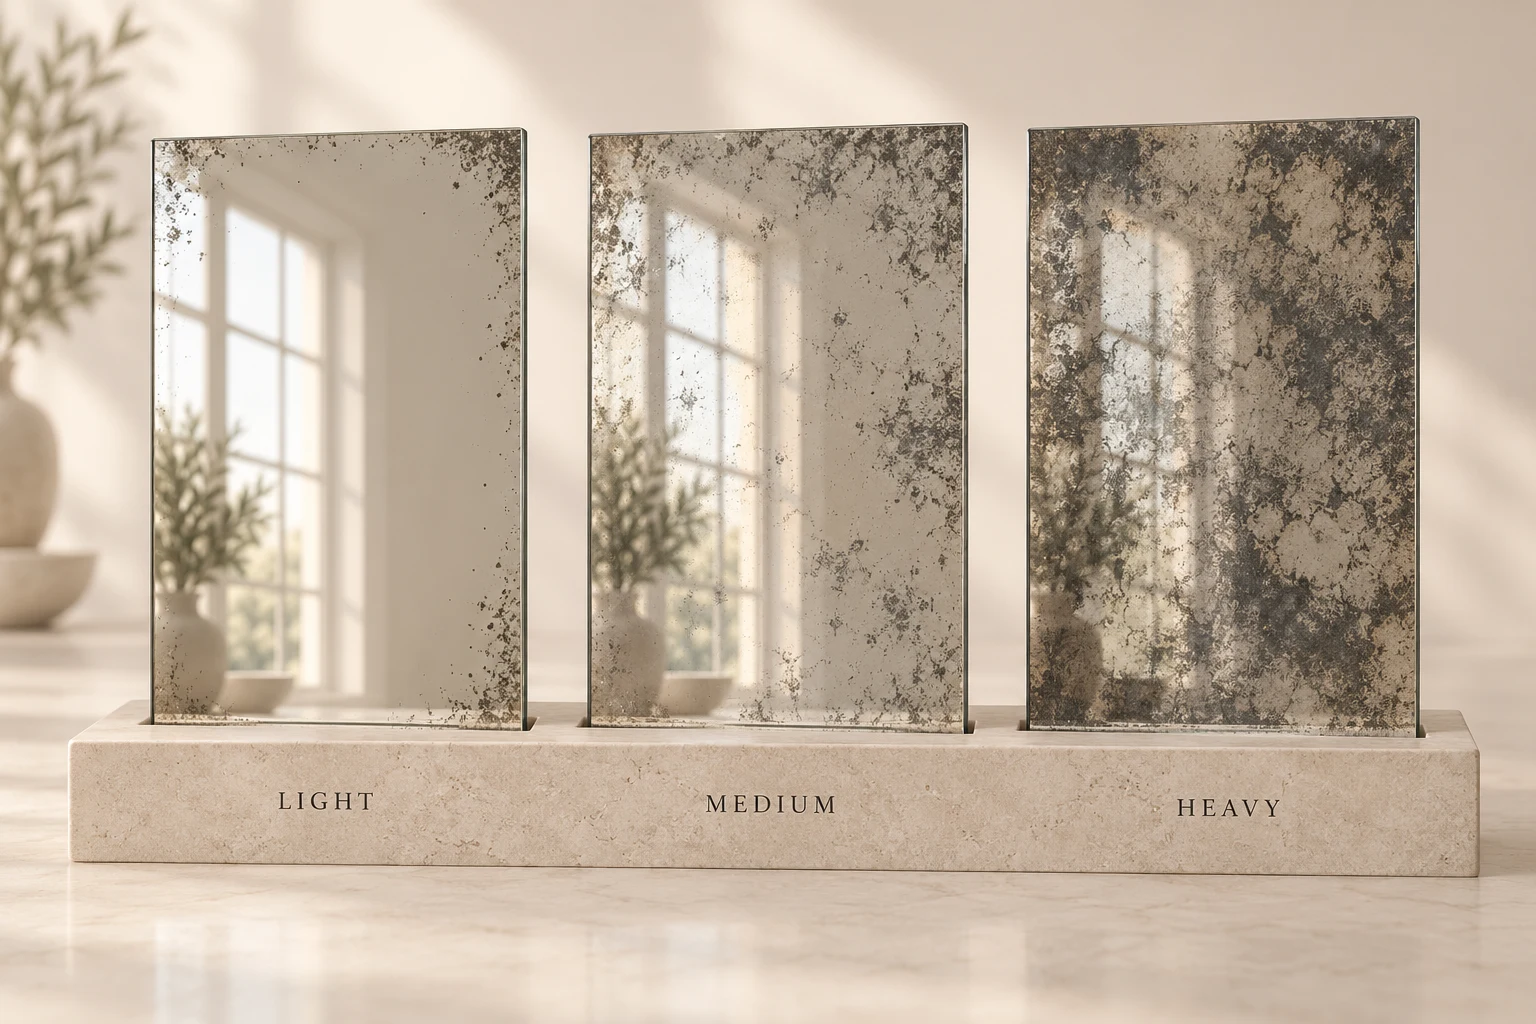
Pattern density changes how much useful reflection remains. Light aging leaves larger clear areas; medium aging makes the texture more noticeable; heavy aging makes the panel read more as a decorative surface. These are descriptive choices, not standardized coverage grades.
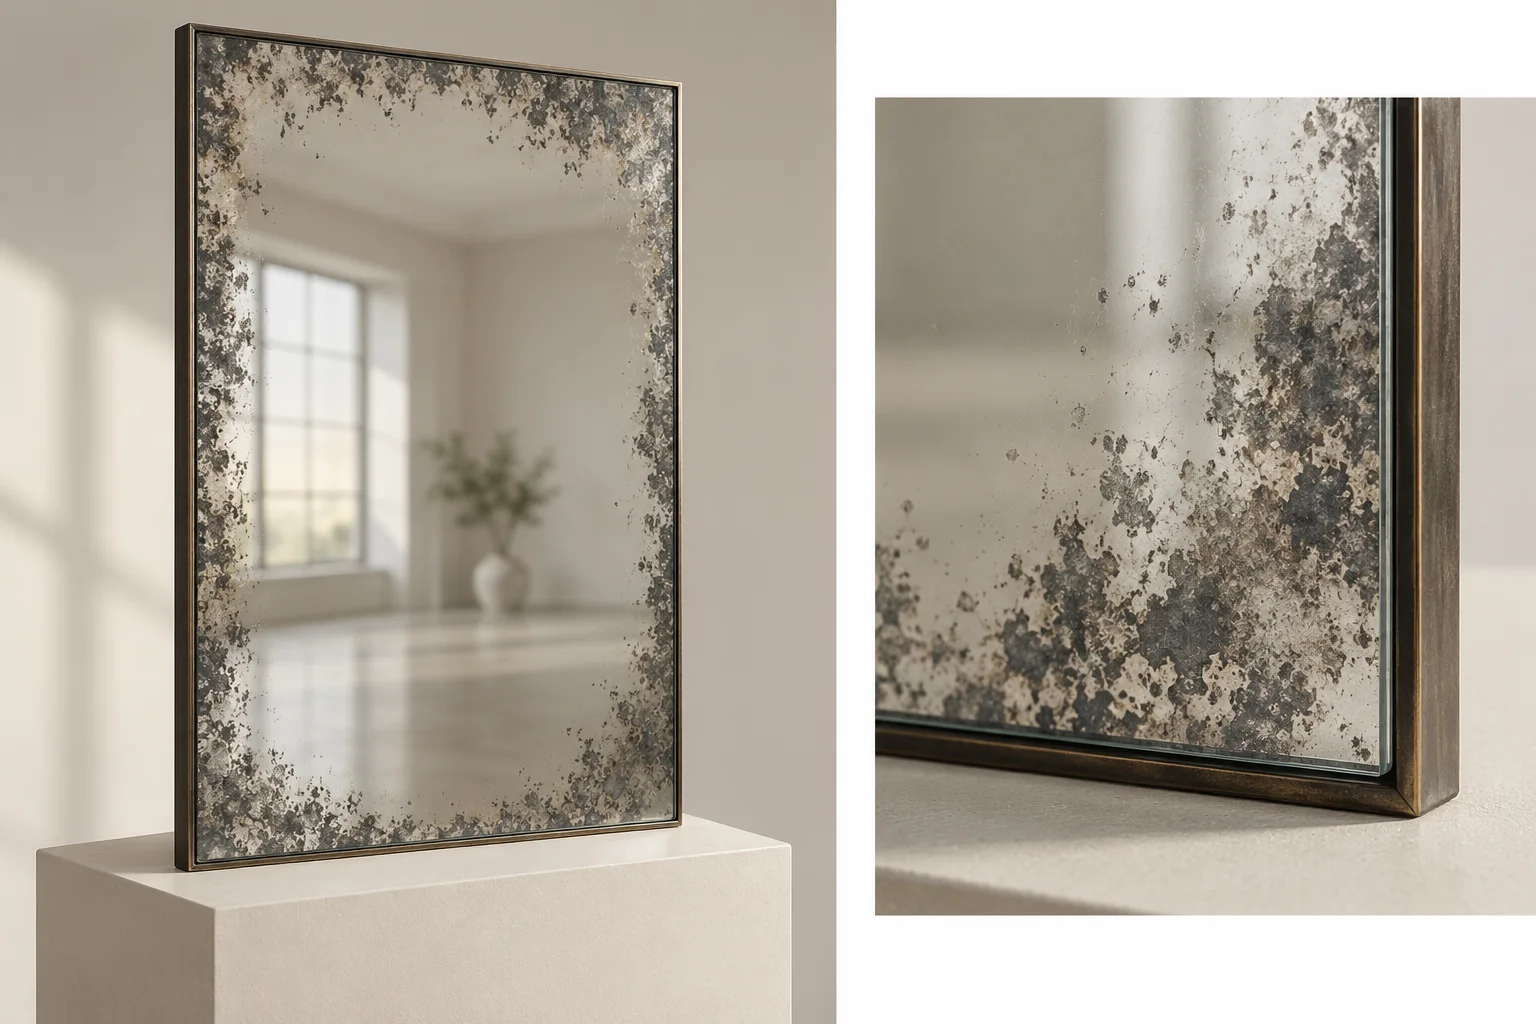
For edge aging, keep the center clearer on a test sample and assess it from normal viewing distance. Irregular edges usually read more naturally than a repeated row of identical spots. Leaving more reflection at first gives you room to judge the result; lost silvering cannot simply be put back with paint.
How to judge your finished sample
Photograph the same piece before and after using the same light, angle and background. Note the substrate and complete product system, active work time, curing time and anything that failed. Inspect the cured finish for distracting runs, scratches, poor adhesion and unsuitable reflection. This record is more informative than a filtered room photograph.
Why DIY Antique Mirrors Go Wrong
The backing will not release evenly
Protective coatings vary. Residue, old repairs or uneven application can block access to the reflective layer. Repeated aggressive scraping may replace one problem with scratches that remain visible from the front.
Too much reflection disappears
The most common irreversible mistake is continuing after the desired effect has already appeared. Work in short, observable increments. Background paint can soften the contrast of clear areas, but it cannot restore the original reflection.
The pattern looks sprayed instead of aged
Identical dots, long vertical runs and an overworked center often reveal the application method. Variation needs restraint: mixed edges, different densities and enough untouched mirror to keep the composition balanced.
Multiple panels do not match
A random hand process is difficult to reproduce across panels. Even when each panel looks attractive alone, adjacent pieces may have noticeably different density or direction. Projects need an agreed sample, an acceptable variation range, panel orientation and a plan for future replacements.
DIY Finish vs. Professionally Made Antique Mirror Glass
| Decision | DIY existing mirror | Coated clear glass | Professionally made antique mirror glass |
|---|---|---|---|
| Best scale | One replaceable piece | Crafts and decorative panels | Multi-panel or fabricated projects |
| Pattern control | Depends on hand application | Depends on coating technique | Selected pattern and approved samples |
| Batch consistency | Difficult to repeat | Variable | An agreed variation range is still needed |
| Reflection | Remains in untouched areas | Coating-dependent | Product- and pattern-dependent |
| Fabrication | Risky after finishing | Substrate and coating limits apply | Cutting, edges and cutouts need technical confirmation |
| Failure cost | Replace the mirror | Recoat or replace the glass | Sampling and planning before fabrication |
Professional antique mirror glass is not automatically identical from panel to panel. An approved sample gives everyone a reference, but the acceptable variation still needs agreement.
For one small mirror, slight variation can be part of the charm. Across a wall, a dark patch at eye level or a sudden change at a joint becomes harder to ignore. Compare adjoining physical samples in the intended light, not just isolated close-ups.
A front-applied effect is exposed to handling; a reverse-side effect sits behind the viewing glass, but its rear protection still depends on the product system. Neither the word “DIY” nor “professional” establishes scratch resistance, moisture suitability or safety backing. Ask for the selected material's care instructions and application limits.
For sheets, cut-to-size pieces or wall panels, review antique mirror glass. For a complete framed product, explore finished antique mirrors.
Planning several panels? Include the layout and viewing direction with your brief. A small color sample cannot show how an entire wall will read.
Compare professional finish options before committing to a multi-panel layout.
Explore Antique Mirror Glass →When Should You Buy Antique Mirror Glass Instead of Making It?
Consider a manufactured product for a large installation, several adjoining panels, repeat orders or a job requiring specific edges and cutouts. The benefit is agreeing on a sample and fabrication scope before installation—not a promise that every panel will be identical.
A useful project brief can stay short: panel sizes and quantity; finish reference and tone; edge or cutout details; application, substrate and destination. Confirm the available glass construction, safety provisions, fabrication sequence, installation compatibility and acceptable variation in writing. Listing an operation does not mean it is available for every product.
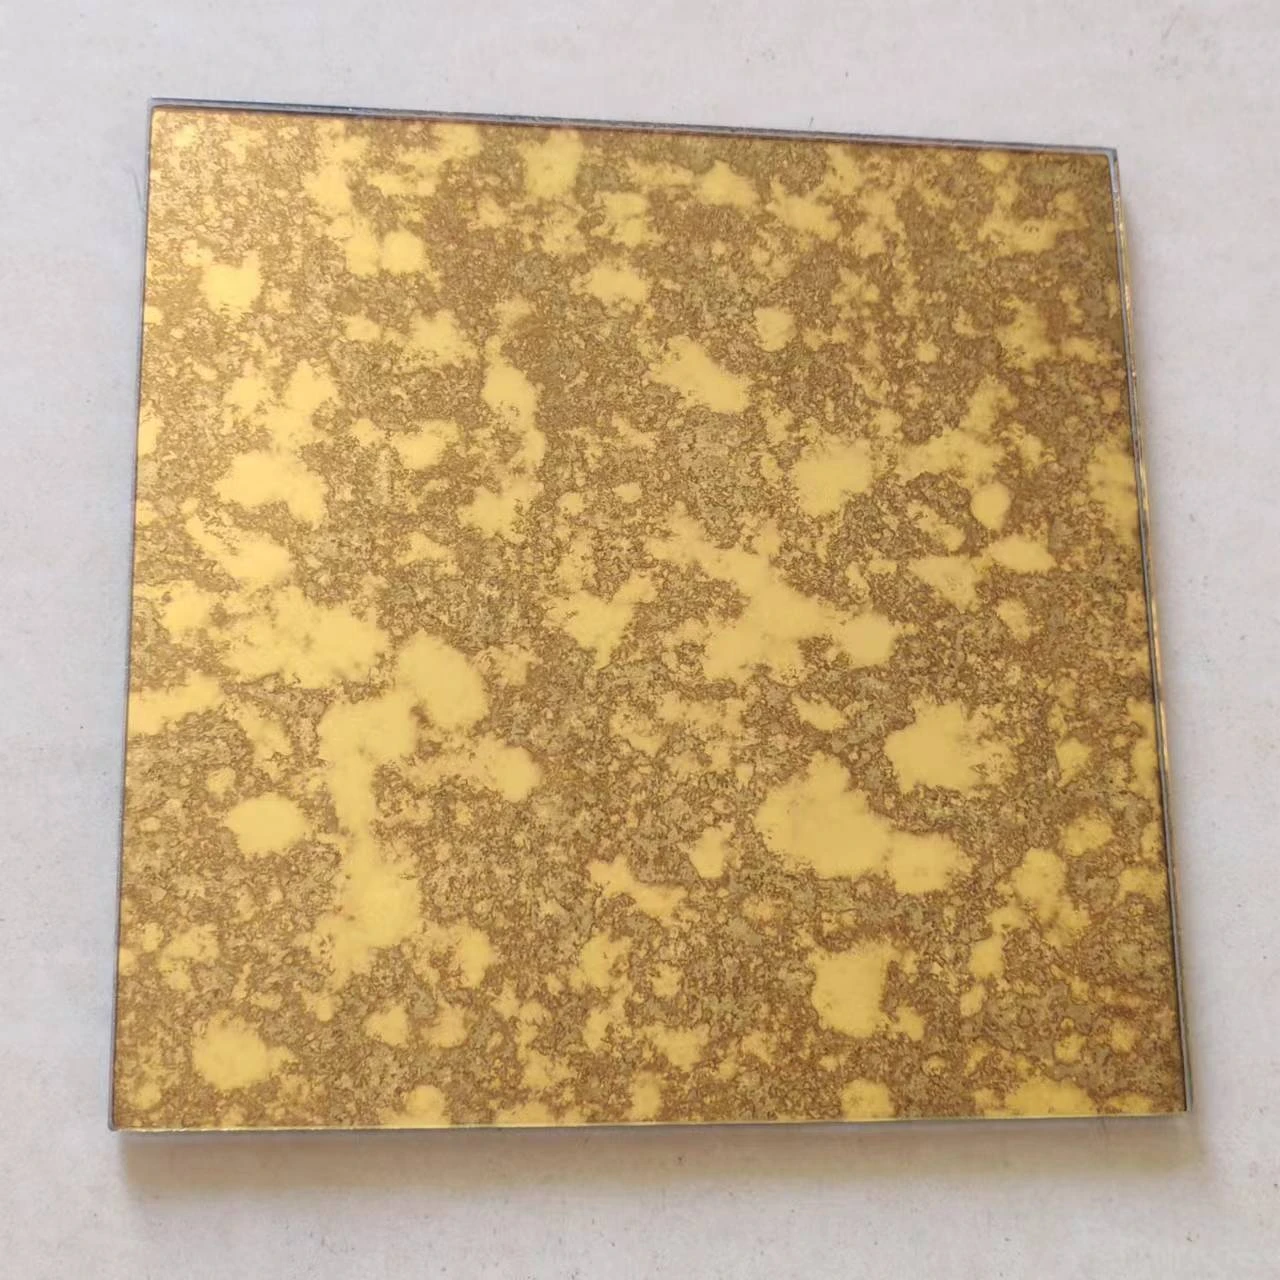
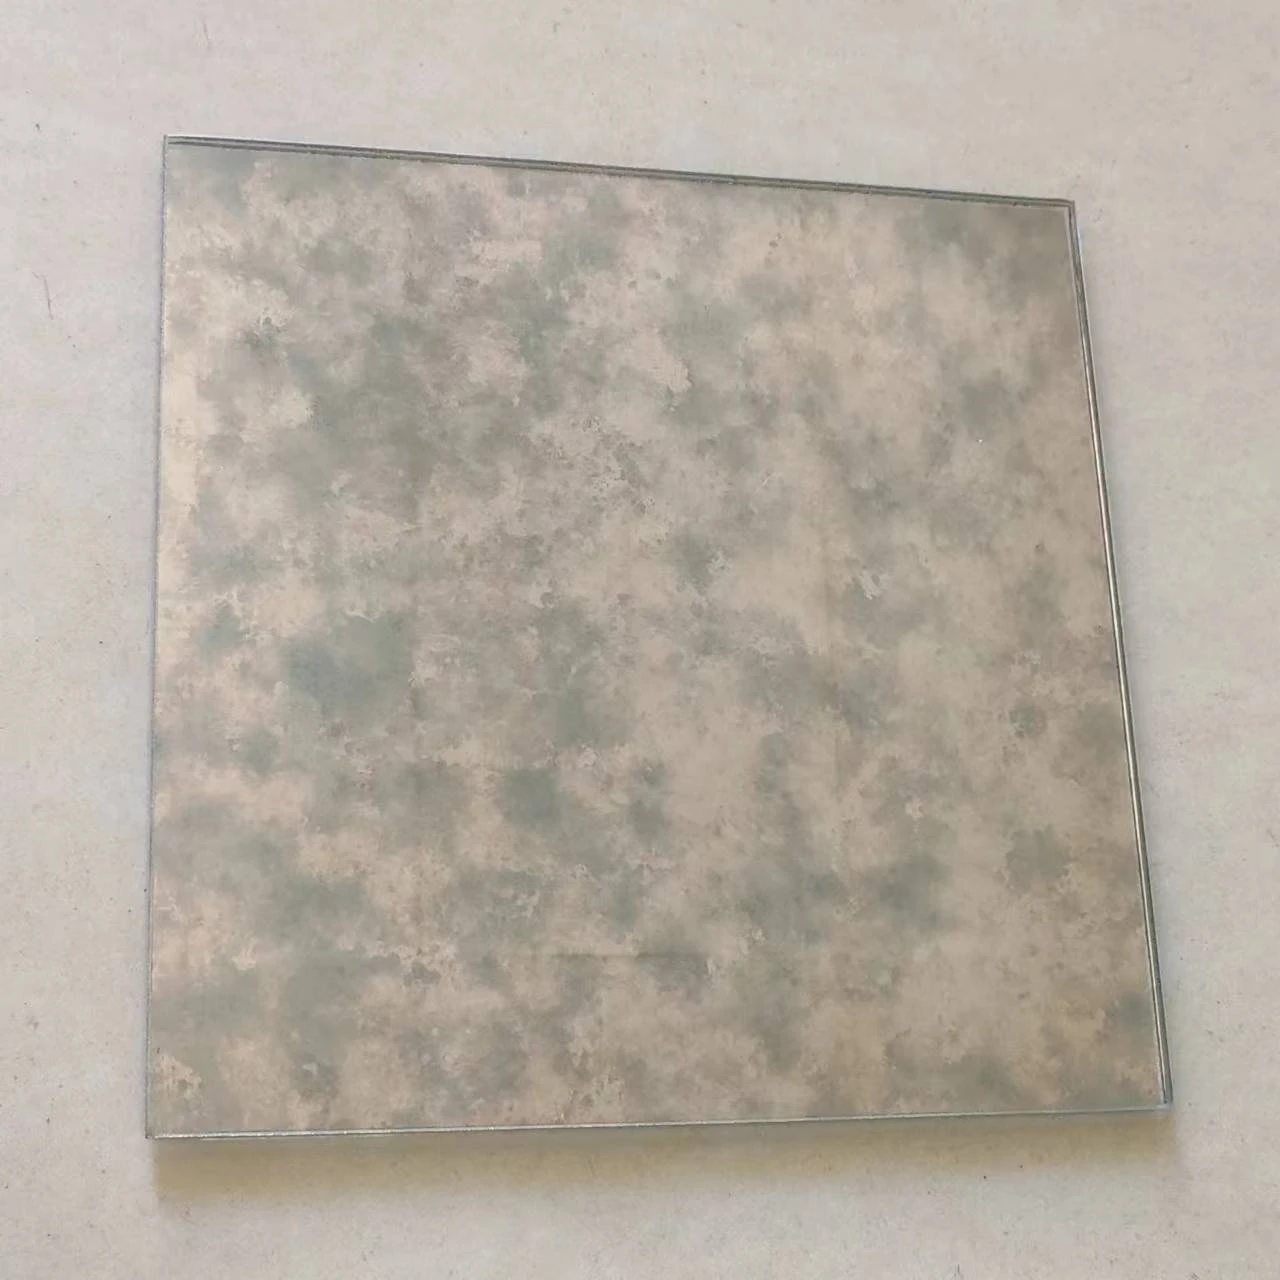
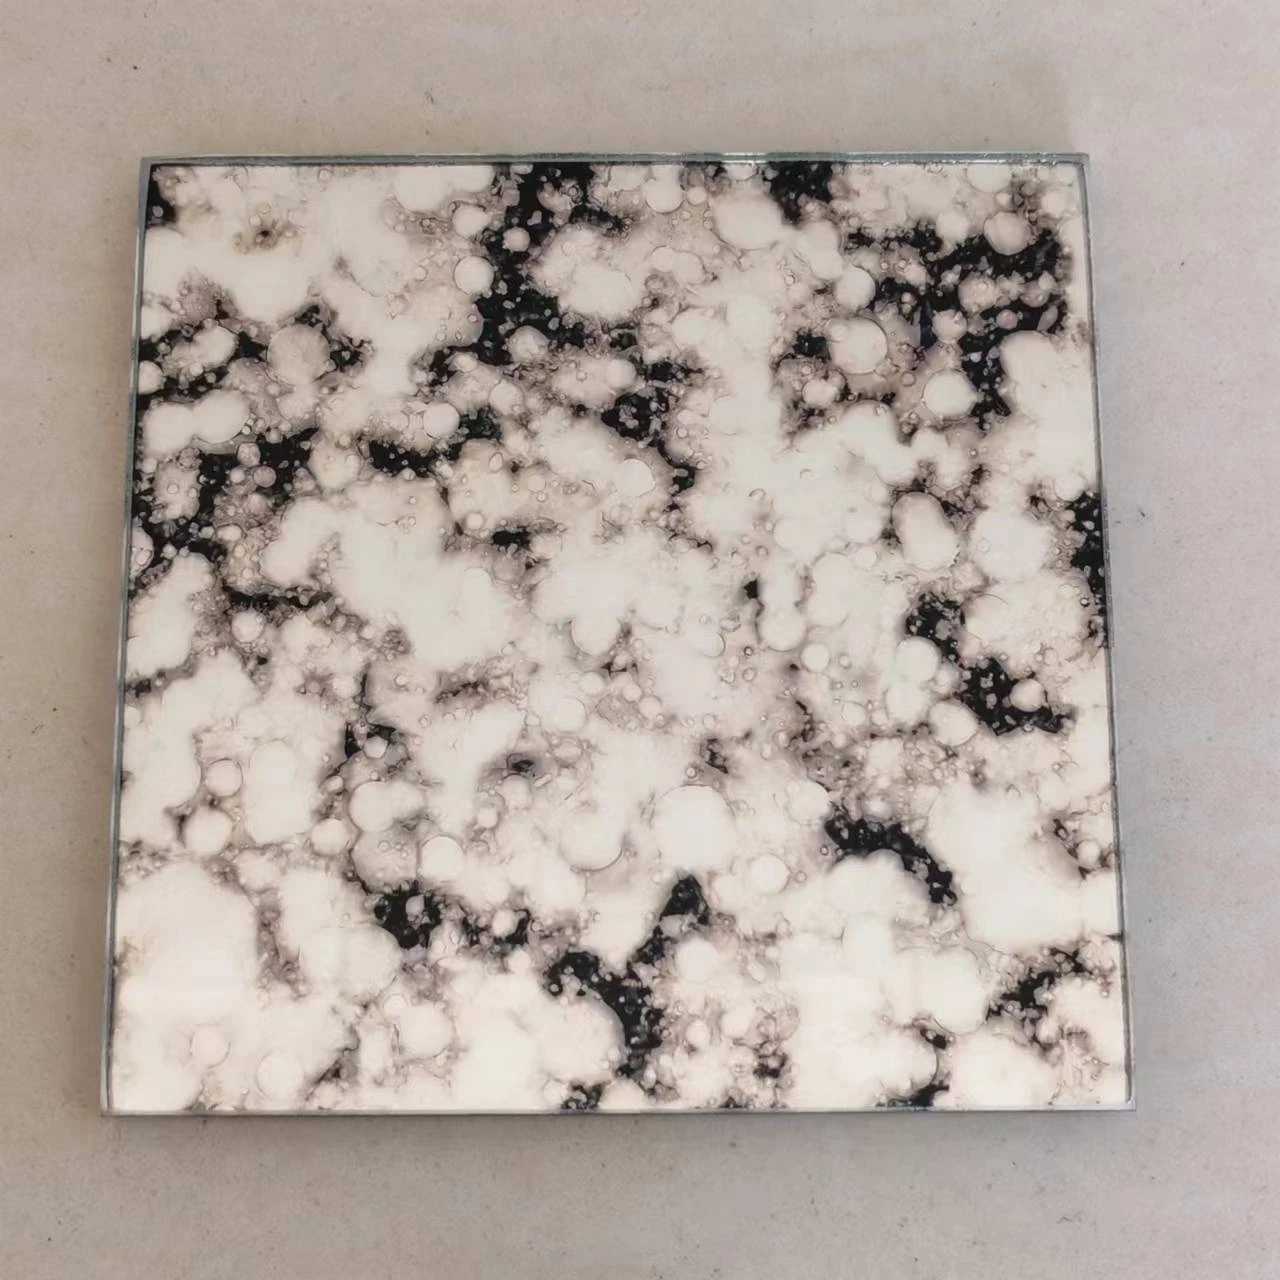
Real OJMirror antique mirror glass finish examples
The following photographs are already identified on the OJMirror Antique Mirror Glass page as actual finish samples. They show separate professional products, not three outcomes from one DIY process. Lighting and screens affect color; use physical samples for approval.
Frequently Asked Questions
Can you antique a mirror without removing the backing?
You can apply a decorative finish to the front, or create a mirror-like antique effect on separate clear glass. Neither method is the same as distressing the reflective layer of an existing mirror. To change that layer, access from the back is normally required.
Can you antique a mirror with vinegar or bleach?
Not as a universal method. Vinegar appears in some mirror-effect paint techniques on clear glass; that does not make it a treatment for every existing mirror. Bleach-based tutorials also depend on the mirror construction. Use a documented, compatible product system, and never combine bleach with vinegar, acids, ammonia or other cleaners.
Can an over-antiqued mirror be repaired?
Usually not to its original condition. Once reflective material has been removed, ordinary background paint cannot recreate it. A decorative backing or compatible mirror-effect coating may reduce the visual contrast, but the reflection will differ.
Can antique mirror glass be used in a bathroom?
Possibly, but it depends on the selected product, edge protection, backing, adhesive system and moisture conditions. Ask the supplier and installer to confirm the complete assembly rather than approving the glass by appearance alone.
Can antique mirror glass be cut, drilled or tempered?
Processing limits vary. Some products allow cutting, edging and holes but may prohibit tempering or require a specific sequence. Use the chosen product’s current data sheet and obtain fabrication confirmation before ordering.
Is antique mirror suitable for everyday reflection?
That depends on pattern density. A lightly antiqued mirror may retain enough clear area for casual use. A heavily mottled panel works better as decorative cladding than as the main mirror over a vanity or salon station.
What is the easiest way to antique a mirror?
A small separate clear-glass coating trial avoids stripping an existing mirror and can be a more manageable starting point. It still requires compatible materials, ventilation and curing. Do not read “easier” as suitable for every location or user.
Can you make a mirror look antique without bleach?
Yes. A compatible mirror-effect coating on clear glass or a front-surface decorative finish can create an aged appearance without using bleach to attack the existing reflective layer. Choose a documented product system; bleach-free does not mean hazard-free.
Can you antique a mirror with spray paint?
A mirror-effect spray designed for clear glass can create a reverse-coated decorative reflection. Ordinary metallic spray is not the same product. Spraying the front of an existing mirror creates an exposed decoration, not back-distressing.
How much does it cost, and how long does it take?
Use the materials checklist and the chosen product labels to estimate both. Include a test piece, protection, waste handling and possible replacement. Allow the full curing sequence as well as hands-on work. A price or time from someone else's mirror and coating is not a reliable quote for yours.
Can you antique a mirror without removing it?
Only a compatible front-surface decorative route is potentially accessible when the back cannot be reached. Do not pry a bonded mirror off the wall for a craft project. A fixed mirror still needs safe working access, surface compatibility and protection of the room.
How do you make a mirror look old around the edges?
Plan a restrained edge-focused pattern on a separate sample using your selected method. Keep the central reflection clearer if needed. Creating the look at the front and removing reflective material from the back are different processes; do not mechanically abrade the edge or invent a chemical treatment.
Explore OJMirror Antique Mirror Glass
Planning more than one decorative piece? Send your panel sizes, quantity, reference image, target tone and application. Add edge details and cutouts if known. OJMirror can review the brief against available options; final specifications require sample and technical confirmation.
Sources and Safety References
- Rust-Oleum — Mirror Effect Spray Paint: substrate, reverse-side application and indoor-object scope. Consult the current product label and SDS.
- Rust-Oleum — Mercury Glass Project: a specific decorative coating technique, not universal mirror treatment.
- CDC — Cleaning and Disinfecting with Bleach: chemical-separation safety, not antiquing instructions.
- Poison Control — Chlorine Gas: hazards of incompatible household products.