 Select image to enlarge
Replacing mirrors across several rooms? Go to the project buyer checklist.
Table of Contents
- What Is Mirror Desilvering?
- Are Black Spots in Your Mirror Really Desilvering?
- Why Is My Bathroom Mirror Turning Black Around the Edges?
- How to Repair Mirror Desilvering: Compare the Options
- Should You Repair or Replace a Desilvered Mirror?
- How Much Does Mirror Desilvering Repair Cost?
- How to Reduce the Risk of Mirror Desilvering
- How Mirror Manufacturing Quality Affects Desilvering
- Mirror Desilvering FAQs
- For Hotels, Contractors, and Project Buyers
What Is Mirror Desilvering?
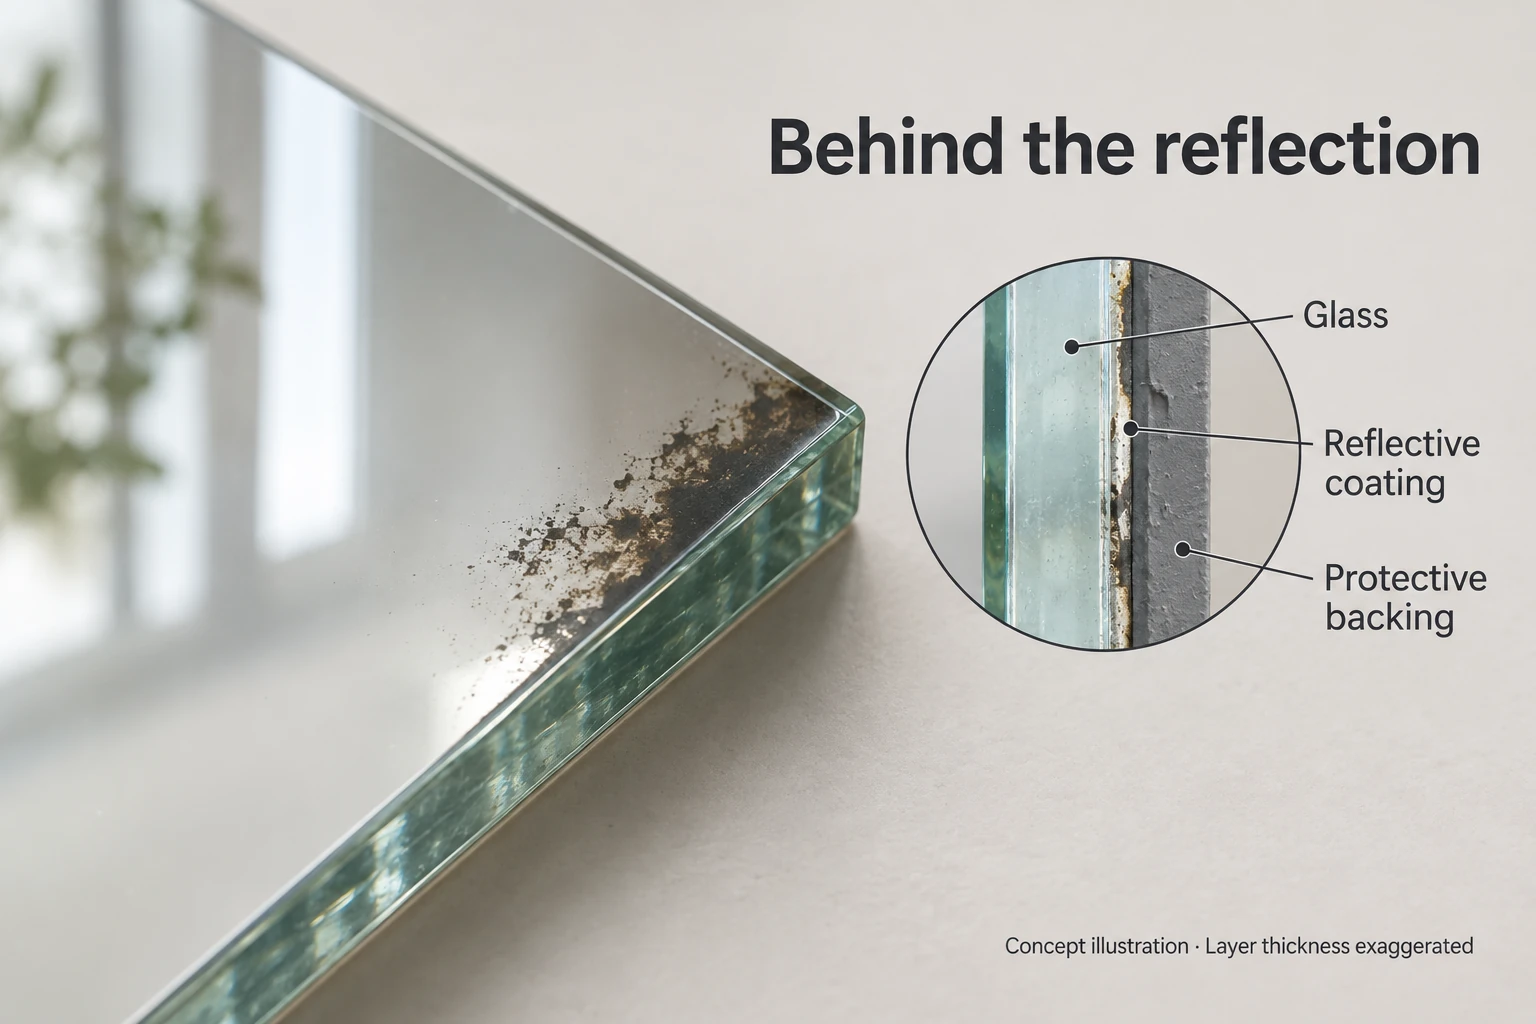
A silvered mirror has three basic parts: glass, a thin reflective silver coating, and a protective backing. Desilvering occurs when that reflective coating deteriorates. Mirror rot is a common name for the same problem; it describes coating damage rather than biological decay.
The reflective layer is deposited metal, not ordinary silver-colored paint. That distinction matters when evaluating repair products: covering a damaged area and rebuilding its reflection are different jobs.
 Select image to enlarge
- Glass
- The transparent front layer.
- Reflective coating
- The thin metal layer that creates the reflection.
- Protective backing
- The rear coating that helps protect the reflective layer.
Are Black Spots in Your Mirror Really Desilvering?
Check the mark in three steps
- Record it before cleaning. Take one photo of the whole mirror and a close-up of the mark. Note whether it appeared at delivery or developed later.
- Check the surface gently. Follow the mirror’s care instructions on a small area with a soft cloth. Do not scrape the glass or lift an installed mirror to inspect its back.
- Compare the result. A changing mark may be residue; one that remains behind smooth glass may involve the coating. Failure to wipe off is not enough to diagnose desilvering, and location alone does not establish the cause. Send photos and product details to the seller before altering a mirror under warranty.
| What you see | Useful next step |
|---|---|
| Dark areas around the bottom or side edges | Look for persistent moisture or cleaning-liquid residue; compare with an earlier photo |
| A spot within the viewing area | Check delivery photos and record when it first appeared |
| A mark that changes after appropriate cleaning | Inspect the remaining area before deciding whether there is also backing damage |
| Mottling on an antique or decorative mirror | Compare the original finish or approved sample |
Desilvering vs dirt, mold, and fogging
A cloudy or dark area can have more than one explanation. Compare where it appears and whether it changes as the glass dries or receives appropriate surface cleaning.
| Problem | What happens? | Useful response |
|---|---|---|
| Fogging | Temporary condensation forms on the glass | It normally clears as the glass dries and moisture disperses; check a mark that remains afterward |
| Surface residue | Deposits remain on the exposed glass | Use the approved care method on a small area; assess any remaining mark |
| Desilvering | The reflective coating behind the glass deteriorates | Cleaning cannot rebuild the coating; compare concealment, specialist assessment, and replacement |
| Suspected mold on surrounding materials | Growth or staining affects a frame, joint, or wall | Assess the affected material and persistent moisture; do not apply mold-removal chemicals to the mirror as a diagnostic test |
Black color alone cannot establish the cause, and surface contamination can coexist with coating damage. Persistent cloudiness is not automatically desilvering. If the location of a mark is unclear, send photographs to the seller or a glass specialist before trying stronger cleaners.
What the OJMirror photographs show
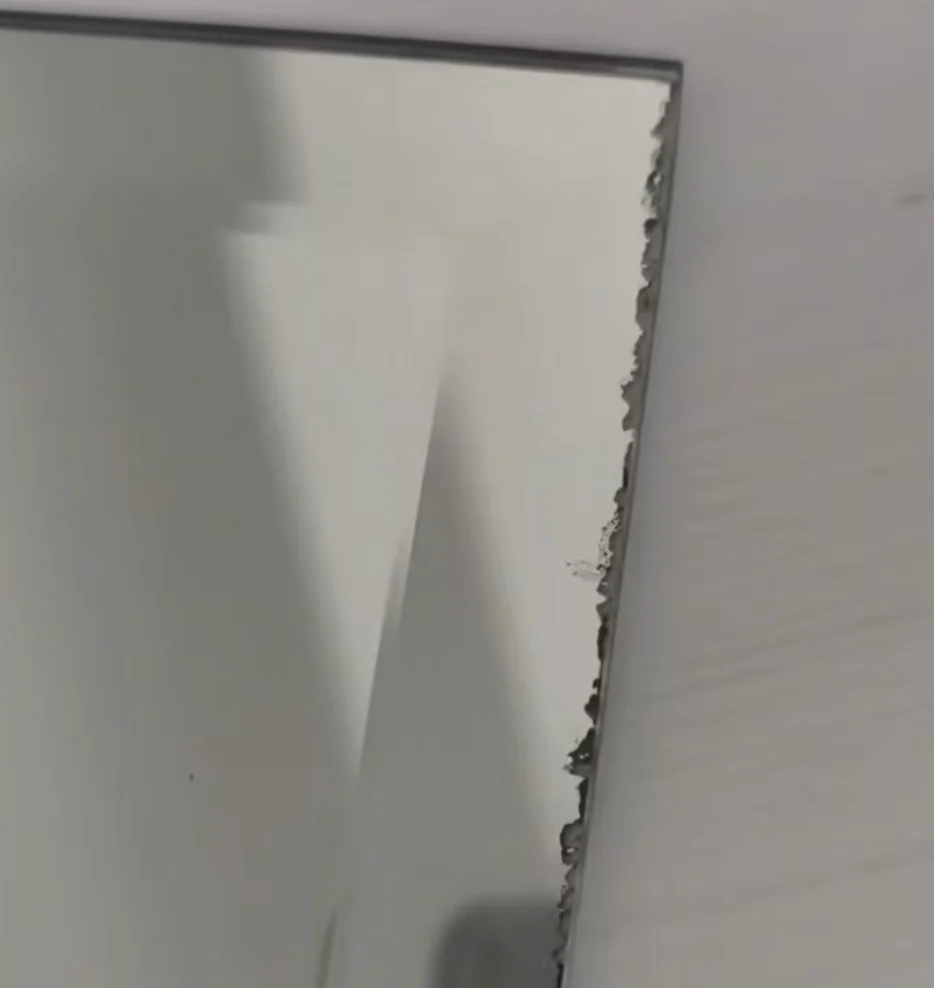
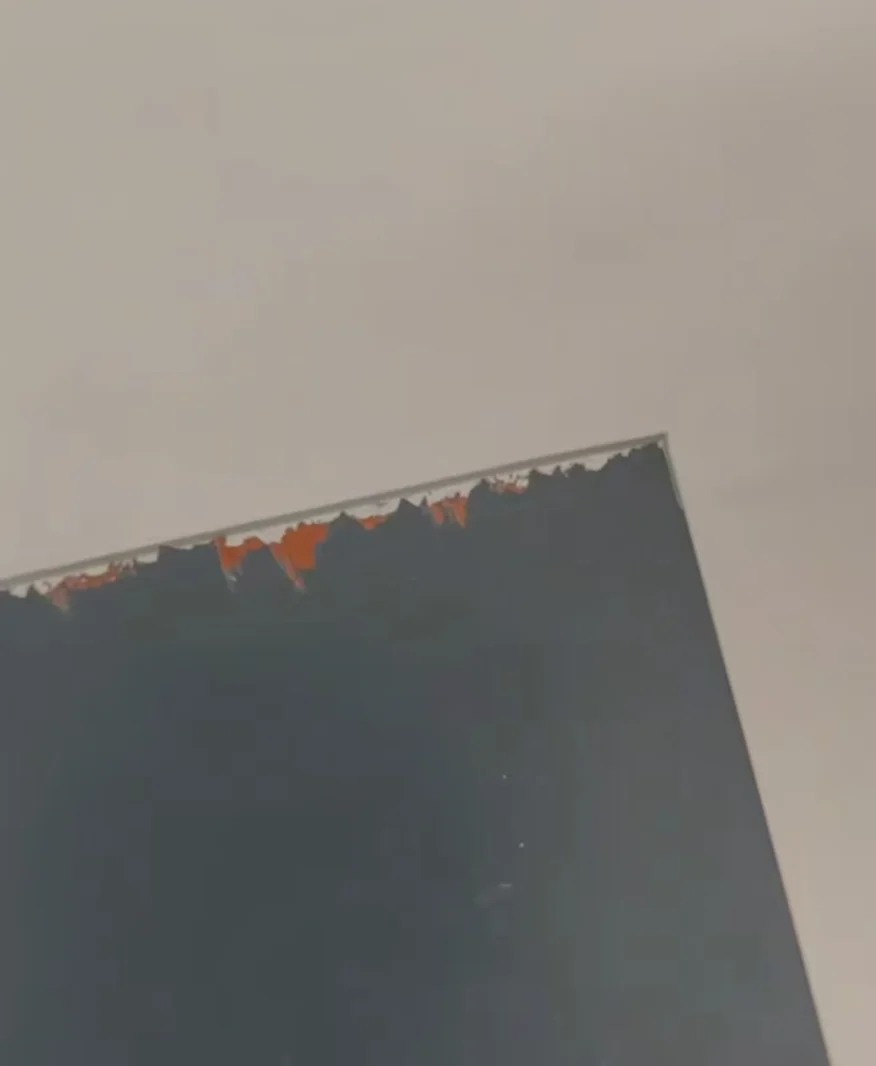
The opening photograph shows an irregular dark band along the mirror edge. The rear-surface photograph below shows an uneven coating boundary with reddish-brown and lighter exposed areas near the edge. These are visible observations; the photos do not identify which coating layers have deteriorated or why.
 Select image to enlarge
Use these photos to compare the location and pattern of a mark, then collect the product and installation details needed for assessment. An edge defect or backing peeling off is a reason to investigate; it is not proof of a particular cleaner, adhesive, or manufacturing fault.
Why Is My Bathroom Mirror Turning Black Around the Edges?
Moisture, unsuitable cleaning chemicals, backing damage, and incompatible mounting materials can affect the mirror's protective and reflective layers. Edges deserve particular attention because water and cleaner can collect there and reach vulnerable areas.
Moisture and cleaning residue
Look at the lower edge after cleaning or a shower. Liquid left there is a practical issue to address. A dry-looking center does not tell you whether the border or the space behind the mirror remains wet.
Dry residual liquid at the edges after cleaning. Choose the cleaner and method specified in your mirror's care instructions; avoid experimenting with stronger chemicals when a mark does not wipe away.
Scratched backing or incompatible adhesive
Scratches in the rear coating can compromise its protection. Installation materials matter too: adhesive compatibility depends on the backing and any safety film. Protect the backing during handling and follow the installation instructions for that combination.
The useful question is whether the adhesive matches the actual mirror backing—not simply whether its packaging says “mirror glue.” Keep that check with the installer or supplier.
Mirror construction and installation conditions
The coating system, edge treatment, mounting arrangement, and conditions of use belong in the same assessment. A frame, thicker glass, or LED lighting alone tells you little about how the reflective layer is protected. For a new mirror showing black spots, document the condition before attempting a repair so the seller can assess it.
How to Repair Mirror Desilvering: Compare the Options
Choose according to your goal: hide a damaged border, preserve distinctive glass, or restore a clear everyday reflection. Those goals lead to different solutions.
| Option | When it makes sense | What to expect |
|---|---|---|
| Frame or trim | Damage is limited to an edge you can cover | A smaller visible mirror area; the coating remains damaged |
| Professional resilvering | Keeping the original glass matters | Assessment and recoating, with removal and finish expectations agreed first |
| Replacement | You want a clear mirror and retaining the old glass offers little benefit | A new mirror or compatible assembly, fitted to the existing installation |
| Repair paint or film | A limited cosmetic improvement is enough | A patch that may look different from the surrounding reflection |
Cover limited edge damage with a suitable frame
A frame can conceal a narrow damaged border. Use this checklist before buying or fitting one:
- Check the glass and mounting. Cracks, chipped edges, or loose mounting need an installer’s assessment before cosmetic work.
- Measure the full defect. Measure inward from each affected edge at several points, including corners. Record the widest damaged strip.
- Check the frame’s actual overlap. Compare coverage onto the glass—not the frame’s total outer width—with the measured defect. Check how much usable reflection remains.
- Check fit and compatibility. Allow for mounting clips, the backsplash, and any lights, controls, or service access. Confirm the frame’s fixing method and compatible materials.
- Follow the frame manufacturer’s fitting instructions. Have an installer assess work that involves moving a heavy bonded mirror or an electrical assembly.
- Address recurring moisture. Check whether the lower frame channel can retain water or cleaner. Concealment does not rebuild the reflective layer or prove that deterioration has stopped.
Consider professional resilvering for glass worth keeping
Resilvering removes and replaces the old coating. It may be worth investigating for a beveled, shaped, engraved, or personally significant mirror. For an antique, discuss the preservation goal first: a brighter reflection may change the character you want to keep.
Recoating does not fix scratches, chips, or cracks in the glass. A locally resilvered area can also show a boundary against the original silver.
Ask for a quote covering removal, transport, treatment, and reinstallation where needed. Agree the expected finish and what happens if hidden glass damage is found. Compare that complete scope with replacement, rather than comparing a coating-only price with a fully installed new mirror.
Replace a bathroom mirror when a fresh reflection is the priority
Replacement deserves consideration when damage extends into the viewing area, a frame would cover too much glass, or preserving the original piece has little value. Photograph and measure the installation before selecting a new mirror.
For a plain wall mirror, a glass specialist can assess the replacement requirements. For an LED bathroom mirror or mirrored cabinet, first check whether the manufacturer offers a compatible panel or assembly. Matching width and height is only part of the fit: mounting, structure, lighting, and controls may also matter.
Include removal, disposal, installation, and any surrounding finish repairs in the comparison. Address the conditions associated with the old damage before fitting the replacement.
Replacing mirrors for several rooms? Use the project checklist below to prepare dimensions, quantities, and installation photos for OJMirror.
Can a glass shop cut away desilvered mirror edges?
For a removable, untempered mirror, a glass processor may assess whether trimming the damaged border and finishing new edges is practical. The remaining glass must be sound, and the smaller dimensions must still suit the frame and mounting. This removes an affected strip; it does not restore the coating or guarantee that further deterioration will stop.
Do not cut or drill tempered glass after tempering. NGA’s heat-treated glass guidance explains that cutting and other fabrication must precede heat treatment. Ask the processor to identify the glass first. An installed LED mirror, cabinet door, laminated or safety-backed panel, or mirror with mounting holes needs assessment as an assembly; it cannot simply be treated as loose plain glass. Include removal, edge finishing, and refitting in the quote.
Know what repair paints, films, and kits actually do
“Mirror repair” covers several different products. Cosmetic paint and film can change the appearance of a defect; chemical silvering kits perform a different process. Read the intended application and expected result before choosing one.
Metallic repair paint may reflect light differently from the original coating. A patch that looks acceptable from one position may remain visible from another. For a desilvering mirror under warranty, document the problem and contact the seller before changing the backing or applying a patch.
 Select image to enlarge
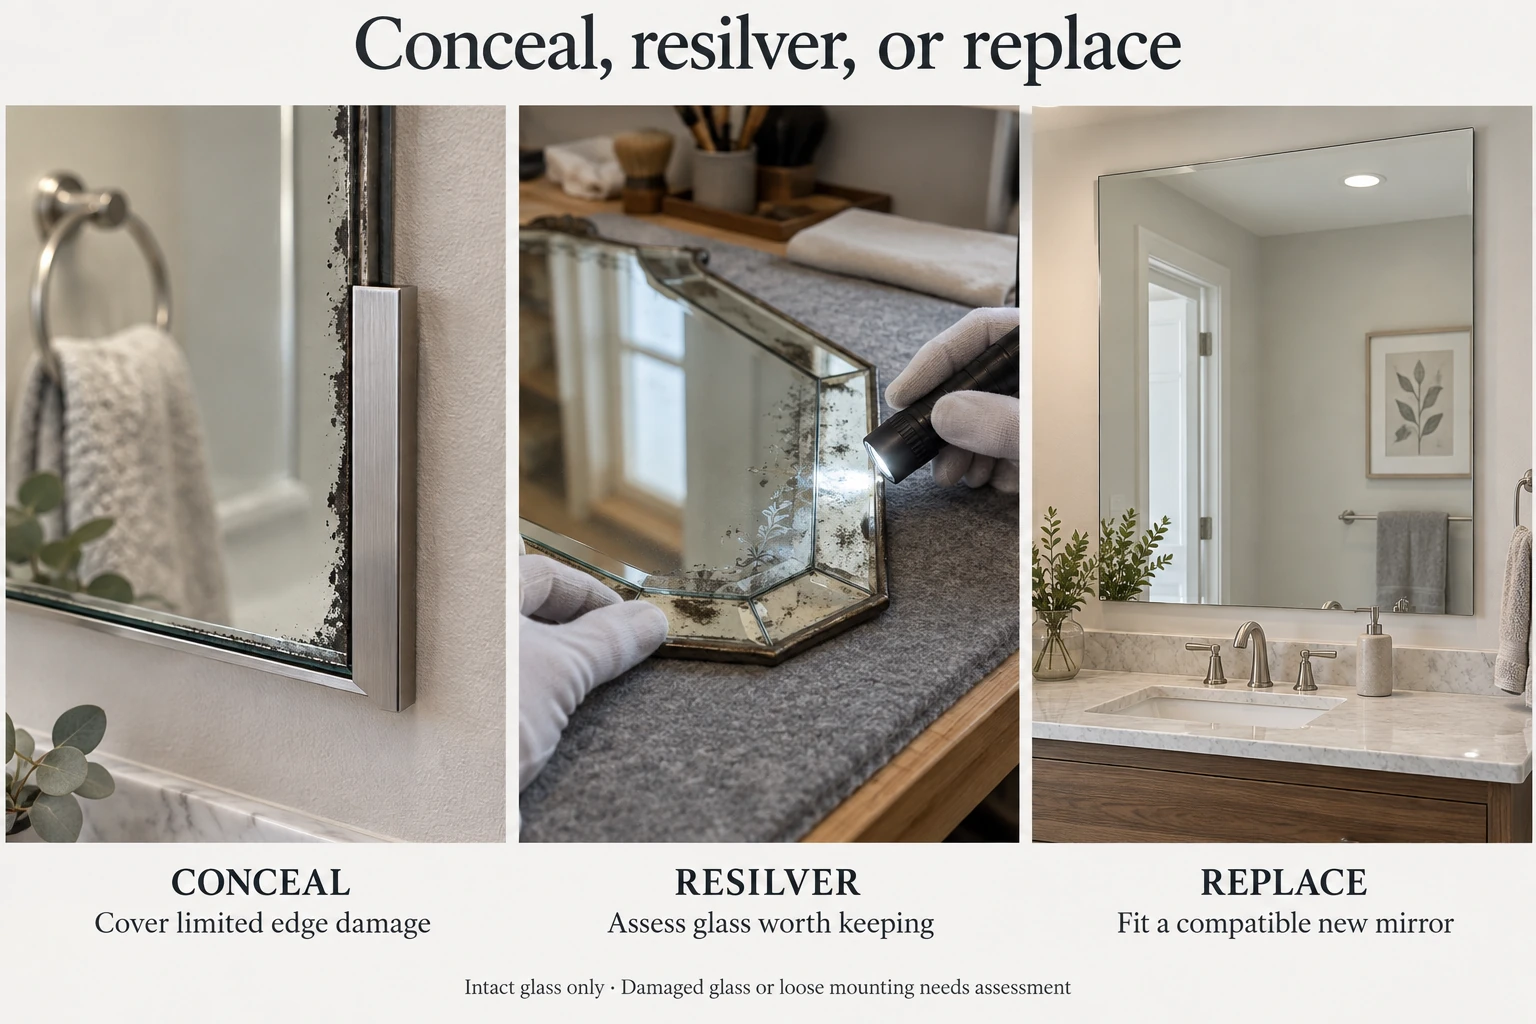
- Conceal
- Cover limited edge damage; the damaged coating remains.
- Resilver
- Ask a specialist to assess glass worth keeping.
- Replace
- Choose a compatible new mirror or assembly.
Should You Repair or Replace a Desilvered Mirror?
Start with the condition of the glass and mounting, then consider how much usable reflection remains. These are starting points for an assessment, not a diagnosis from a photograph.
| Mirror or damage pattern | Next step | What to confirm |
|---|---|---|
| Small damaged border, intact glass | Compare a suitable frame with replacement | The frame covers the full defect without obstructing controls; it does not restore the coating |
| Damage within the main viewing area | Obtain a replacement quote | Size, safe removal, installation, and the conditions associated with the damage |
| Antique or personally significant glass | Seek a preservation assessment before resilvering | Whether changing the original reflection would reduce the value you want to preserve |
| Large bonded wall mirror | Ask an installer to assess removal | Access, handling, disposal, and possible wall or backsplash repairs |
| LED mirror | Check a compatible panel or complete assembly | Mounting, wiring, controls, lighting, and service access |
| Mirrored cabinet door | Check a replacement door assembly | Hinge pattern, door weight, clearances, and any electrical functions |
| Several affected hotel rooms | Compare affected and unaffected rooms before bulk replacement | Batch, installer, adhesive, cleaning routine, and moisture conditions |
How Much Does Mirror Desilvering Repair Cost?
There is no useful single price without the mirror size, location, glass condition, and installation details. Request itemized quotes for the same finished result. A resilvering price for loose glass cannot be compared directly with a replacement price that includes removal and fitting.
| Cost item | Professional resilvering | Replacement |
|---|---|---|
| Removal and access | Include taking down the original glass | Include removal of the existing mirror or assembly |
| Transport and handling | Check delivery to and from the specialist | Check freight, delivery access, and handling |
| Main work | Removing and renewing the reflective coating | New glass, panel, door, or complete mirror assembly |
| Installation | Refitting the original glass and compatible mounting materials | Fitting the new product and any required electrical work |
| Surrounding repairs | Allow for damage exposed during removal | Allow for wall, tile, or backsplash work if the fit changes |
| Scope and finish | Agree the expected result and exclusions for existing glass defects | Agree the product specification, installation scope, and warranty terms |
Which quote should you request first?
- Minor edge damage: Compare a suitable frame or trim, its fitting cost, and any clearance changes. The quoted result is concealment, not a renewed reflective layer.
- Standard bathroom mirror: Request a new mirror plus removal, delivery, disposal, and installation. Separate glass-only pricing from the fitted total.
- Antique or distinctive custom mirror: Request a preservation assessment, specialist treatment, protected transport, and reinstallation. Agree the finish and handling risks before comparing the total with replacement.
These are quote scenarios, not market prices. A usable budget comparison needs the same location, dimensions, scope, and quote date.
For an ordinary bathroom mirror with no particular reason to retain the glass, replacement is a sensible quote to obtain first. For shaped, engraved, antique, or sentimental glass, the value of preserving it may justify specialist work. Ask both providers what their quote excludes before deciding. For multiple rooms, include access scheduling and room downtime in the project comparison.
How to Reduce the Risk of Mirror Desilvering
Mirror cleaning: do’s and don’ts
- Put approved cleaner on a soft cloth. Follow the finished mirror’s instructions for the cleaner and cloth. Where liquid cleaning is permitted, control the amount on the cloth rather than spraying the mirror and letting it run toward the perimeter. Do not use abrasive pads. NGA’s 2019 guidance also advises against commercial mirror cleaners containing ammonia or vinegar; do not use a homemade acid cleaner as a workaround. Follow any stricter product-specific care requirements.
- Finish at the edges and joints. After cleaning, remove residual liquid from accessible edges, frame joints, and the area above a backsplash. Check the lower border even when the center looks dry.
- Notice moisture that keeps returning. If the frame, wall, or lower edge stays damp after normal bathroom use, have the ventilation and installation conditions checked. Repeatedly wiping the front will not resolve moisture behind a fixed mirror.
- Record changes instead of scrubbing harder. Take dated close-ups from a similar angle and distance. These help show whether the affected area is changing, but cannot establish its cause.
Consider a frame that encloses the mirror edge
For a new or replacement mirror, a frame that wraps around the glass edge can help shield it from direct contact during use and cleaning. Ask how the frame holds and protects the edge, rather than judging protection from the front appearance alone. See our framed mirror options.
The frame must suit the mirror and installation. Check whether its lower channel can retain water or cleaner, how moisture is managed, and whether gaskets, adhesives, and sealants are compatible with the backing. A framed mirror can still develop black edges. Adding a frame over existing damage conceals it; it does not rebuild the reflective layer.
Installation details to confirm
Keep adhesive and backing compatibility instructions with the order records. Follow the finished product’s requirements for the substrate, rear ventilation, and sealing. Do not add a continuous perimeter bead simply because an edge has turned black: the specified sealant and its placement depend on the mirror’s construction and moisture-management design. Have electrical assemblies installed and serviced according to their instructions and applicable local requirements.
The NGA’s mirror-cleaning guidance (2019 edition) supports applying cleaner to a cloth and drying edges and joints. For a finished LED mirror, follow its own care instructions for lights, controls, and openings as well. For older decorative glass, see our antique mirror cleaning guide.
How Mirror Manufacturing Quality Affects Desilvering
Backing condition and edge workmanship deserve attention alongside the mirror’s appearance. NGA’s 2024 fabrication guidance announcement emphasizes protecting backing and edges throughout fabrication to reduce black-edge risk.
For a replacement order, ask which records relate to the actual mirror specification and batch. A general factory photograph or unrelated test report cannot answer that question.
| Check | Evidence to request |
|---|---|
| Reflective coating and protective backing | The supplied mirror specification and applicable supplier documentation |
| Edge processing and backing condition | Inspection criteria and dated photos showing the relevant edges and rear surface |
| Adhesive, tape, or safety-film compatibility | Written compatibility guidance for the exact materials being combined |
| Corrosion testing, if claimed | Method, conditions, duration, sample construction, acceptance criteria, and recorded result |
| Batch traceability | A link between the shipment or room records and the relevant production and inspection records |
ASTM C1503-24 covers specified silvered flat glass that has not undergone further processing such as edgework or other fabrication. Its scope excludes safety-glazing requirements and mirrors intended for persistently humid or corrosive environments. It is not a complete certification for an assembled LED bathroom mirror, evidence that a particular OJMirror product was tested, or a prediction of service life. Confirm the applicable requirements and supporting records for the finished product.
Mirror Desilvering FAQs
Why is my mirror turning black from the bottom?
Moisture and cleaning liquid can collect along a mirror's bottom edge, especially where it meets a frame or backsplash. If liquid reaches vulnerable backing or coating, deterioration may appear there first. However, the location alone does not prove the cause. Dry residual liquid according to the mirror's care instructions, note any persistent dampness, and photograph changes over time. If the marks sit behind smooth glass and do not respond to appropriate surface cleaning, ask the seller or installer to assess the coating and installation.
Can mirror desilvering be repaired?
Its appearance can be improved, and suitable glass can sometimes be professionally resilvered. Cleaning cannot replace a lost reflective layer. Choose framing for concealed edge damage, assess resilvering when retaining the glass matters, and compare replacement for an everyday bathroom mirror.
Can you stop mirror desilvering from spreading?
Addressing moisture exposure, unsuitable cleaners, or an installation problem may reduce further deterioration, but it will not restore the coating already lost. There is no fixed timeline for spread; coating condition and continuing exposure vary. Track changes with dated photographs. Covering the edge alone is not evidence that the underlying problem has stopped.
Can a copper-free mirror still develop black edges?
Yes. Copper-free mirror construction does not make a mirror immune to damage. Review the coating system, installation requirements, and care instructions for the mirror you are buying; the copper-free label alone does not guarantee resistance to black edges.
Does a mirror defogger prevent desilvering?
A defogging feature is not a guarantee of reflective-layer durability. If a supplier claims it prevents desilvering, request evidence for that model. Consider the backing, edges, installation, and care requirements alongside its features.
Should I replace a desilvered bathroom mirror?
Compare replacement when damage interferes with the reflection, acceptable framing would hide too much glass, or restoration costs are difficult to justify. For antique or distinctive glass, obtain a preservation assessment before deciding. For an LED mirror or cabinet, check compatible replacement assemblies first.
Can black spots on a mirror be removed?
Surface residue may be removable with the specified cleaning method. A dark area caused by loss of the reflective coating will not disappear through cleaning. If a mark remains, stop escalating the cleaner strength and ask the seller or a glass specialist to assess it.
Is mirror desilvering dangerous?
A dark coating defect alone does not establish whether an installed mirror is safe. Cracked glass, chipped edges, loose mounting, or water reaching an electrical assembly require separate attention. Do not try to remove a heavy bonded mirror yourself; have the glass and installation assessed.
Can a desilvered mirror be repaired at home?
Cleaning surface residue or planning suitable trim may improve appearance, but neither rebuilds missing silver. Chemical silvering requires a different process and controlled handling. For a fixed, large, or illuminated mirror, have removal and coating or component work assessed by the appropriate specialist.
Does sealing mirror edges stop desilvering?
Sealing cannot replace coating already lost. Whether a sealant is suitable depends on the mirror backing, mounting design, and moisture-management detail. Obtain the manufacturer’s specified material and application instructions; adding a continuous bead around every mirror is not a universal repair.
For Hotels, Contractors, and Project Buyers
Replacing mirrors across several rooms means matching the existing interiors and addressing the conditions around the damage. Start with a short project brief so the replacement specification reflects what the rooms actually need.
Replacing Mirrors Across Multiple Rooms?
Send these details to OJMirror, including the existing model or order reference if available. Also record when the marks first appeared. Compare affected rooms with an unaffected room from the same order, using room numbers, batch labels, and cleaning and installation records where available. Photos help describe the visible condition; they do not establish the cause by themselves.
| Send us | Why it helps |
|---|---|
| Photos: full mirror, affected edge, and surrounding installation | Show the affected area and its setting; include arrival photos if available |
| Mirror dimensions and existing model | Check the replacement size and assembly fit |
| Quantity affected out of the total | Define project scope and identify room or batch patterns |
| Installation details, adhesive name, and cleaner used | Review mounting and care conditions |
| Required features and finishes | Match the replacement specification to the existing rooms |
What should hotels and contractors specify?
Turn the investigation into a written replacement brief. The manufacturing checklist above asks for evidence; these requirements define what the supplier and installer must agree before an order.
| Specification item | What to agree |
|---|---|
| Glass and reflective backing | The exact glass, coating, backing, and any safety-film construction for the finished product |
| Edge treatment and frame | Required edgework; whether the frame encloses the glass edge; protection at corners and cutouts, and how the lower frame channel manages moisture |
| Installation | Mounting, substrate, and adhesive compatibility for the supplied backing |
| Moisture management | The product-specific requirements for rear ventilation, drainage, and any sealing |
| Acceptance and traceability | Inspection criteria, applicable test evidence, and records linking delivered units to production batches |
A “copper-free” label or a general test claim cannot replace this specification. Ask the supplier to identify any requirement that still needs verification.
Before Bulk Replacement
- Approve a replacement sample. Review the dimensions, finish, usable reflection, and required functions against the existing rooms. Keep the approved sample as the reference for production and delivery checks.
- Confirm installation compatibility. Agree the mounting system, substrate, and adhesive/backing combination before ordering. For LED mirrors and cabinet doors, include the structure, controls, and access needed for replacement.
- Agree QC and acceptance criteria. Specify appearance checks, photo records, batch identification, and how delivery discrepancies will be reported. Review the scope of any performance evidence; test hours alone do not predict years in service.