Quick Answer
For an above-mirror light, 75–80 inches above finished floor (AFF), measured to the fixture bottom, is a useful planning reference from Kohler's bathroom guide. Its side-sconce reference is 60–65 inches AFF to the backplate midpoint. These are source-specific layout suggestions, not universal building-code heights or ready-to-use electrical-box locations.
Above-mirror light
75–80 in AFF
floor to fixture bottom
Kohler layout reference; allow for complete fixture height
Side sconces
60–65 in AFF
floor to backplate midpoint
Kohler layout reference; evaluate face lighting and glare
Mirror-to-light gap
3 in as one guide's starting point
mirror top to fixture bottom
Home Depot layout advice, not a required minimum
Junction box: Product-specific; floor to box center. Mounting drawing and backplate coverage.
Sources: Kohler's bathroom height guide, PDF page 3 and Home Depot's vanity lighting guide. A reference height applies only to its named endpoint; a gap must also suit the product's instructions.
Three checks before choosing a height: Does the complete fixture fit around the mirror? Does it light the user's face without distracting glare? Does its mounting drawing suit the electrical-box position? Record existing fixed points first when renovating.
On this page
Mirror Clearance and Light Width
How far above the mirror should a vanity light be?
For an initial sketch, Home Depot suggests 3 inches above the mirror. Measure the clear distance from the mirror's outer top edge to the light's lowest part, including shades. This is a layout suggestion, not a mandatory clearance or a guarantee of even facial illumination.
If the fixture instructions require more space, use that requirement. With a tall mirror or low soffit, compare a shorter mirror, a shallower fixture profile, or side lighting before moving the light higher. Do not measure to the backplate when the shade extends below it.
For a complete calculation, see the 36-inch vanity layout example: mirror top 71 inches + chosen gap 4 inches = fixture bottom 75 inches. The fixture center and box center are separate points.
What size vanity light should you choose?
Kohler's large-vanity example uses an overhead fixture approximately 75% of the mirror width, without extending beyond the mirror. Treat that as a visual proportion to compare—not proof that a fixture has enough light output.
| Mirror outside width | Fixture width at 75% | Planning use |
|---|---|---|
| 24 in | 18 in | Compare a compact fixture with the mirror outline |
| 30 in | 22.5 in | Choose an available size near the proportion, then check output |
| 36 in | 27 in | Assess full shade width, not only the backplate |
These are calculations, not OJMirror product sizes. For two separate mirrors, apply the comparison to each mirror; for one shared mirror, assess both users' positions rather than scaling a single fixture mechanically.
If the mirror size is still open, use the bathroom mirror size calculator to compare the available width first. The 30-inch vanity guide and 48-inch vanity guide cover smaller and wider arrangements; a mirror's side inset is not automatically usable sconce clearance.
Bathroom Sconce Spacing
How far apart should vanity sconces be?
Start with the mirror's outside width, the complete width of each sconce, and the clear edge gap. With identical sconces placed symmetrically outside the mirror:
Center-to-center spacing = mirror width + 2 × edge gap + sconce width.
For a 24-inch mirror, 2 inches of clear space on each side, and two 4-inch-wide sconces, the center spacing is 24 + 2 × 2 + 4 = 32 inches. The complete arrangement spans 36 inches from one outer fixture edge to the other, before any extra clearance to side walls.
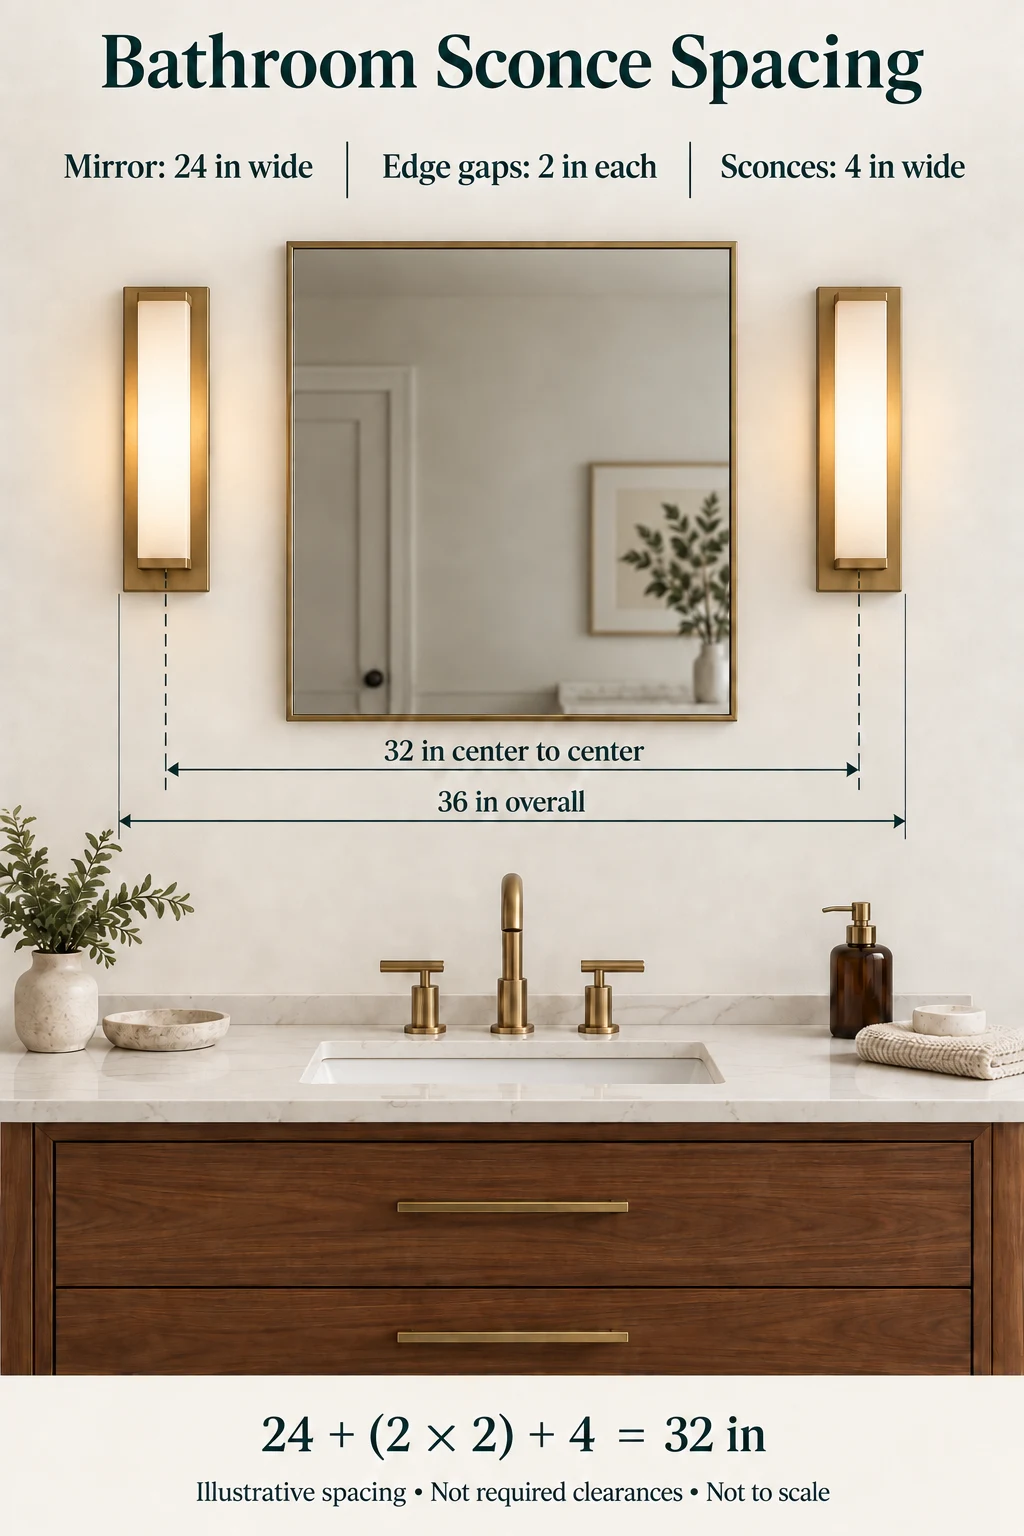
Enlarge the sconce spacing diagram
| Mirror outside width | Center spacing with the same 2 in gaps and 4 in sconces | Total fixture-to-fixture width |
|---|---|---|
| 24 in | 32 in | 36 in |
| 30 in | 38 in | 42 in |
| 36 in | 44 in | 48 in |
Use the widest shade or diffuser in the calculation. An asymmetric fixture or offset backplate needs its own drawing; these geometric centers do not automatically identify the box centers. A projecting cabinet also needs a door-swing check, even when the front elevation looks spacious.
How to Measure
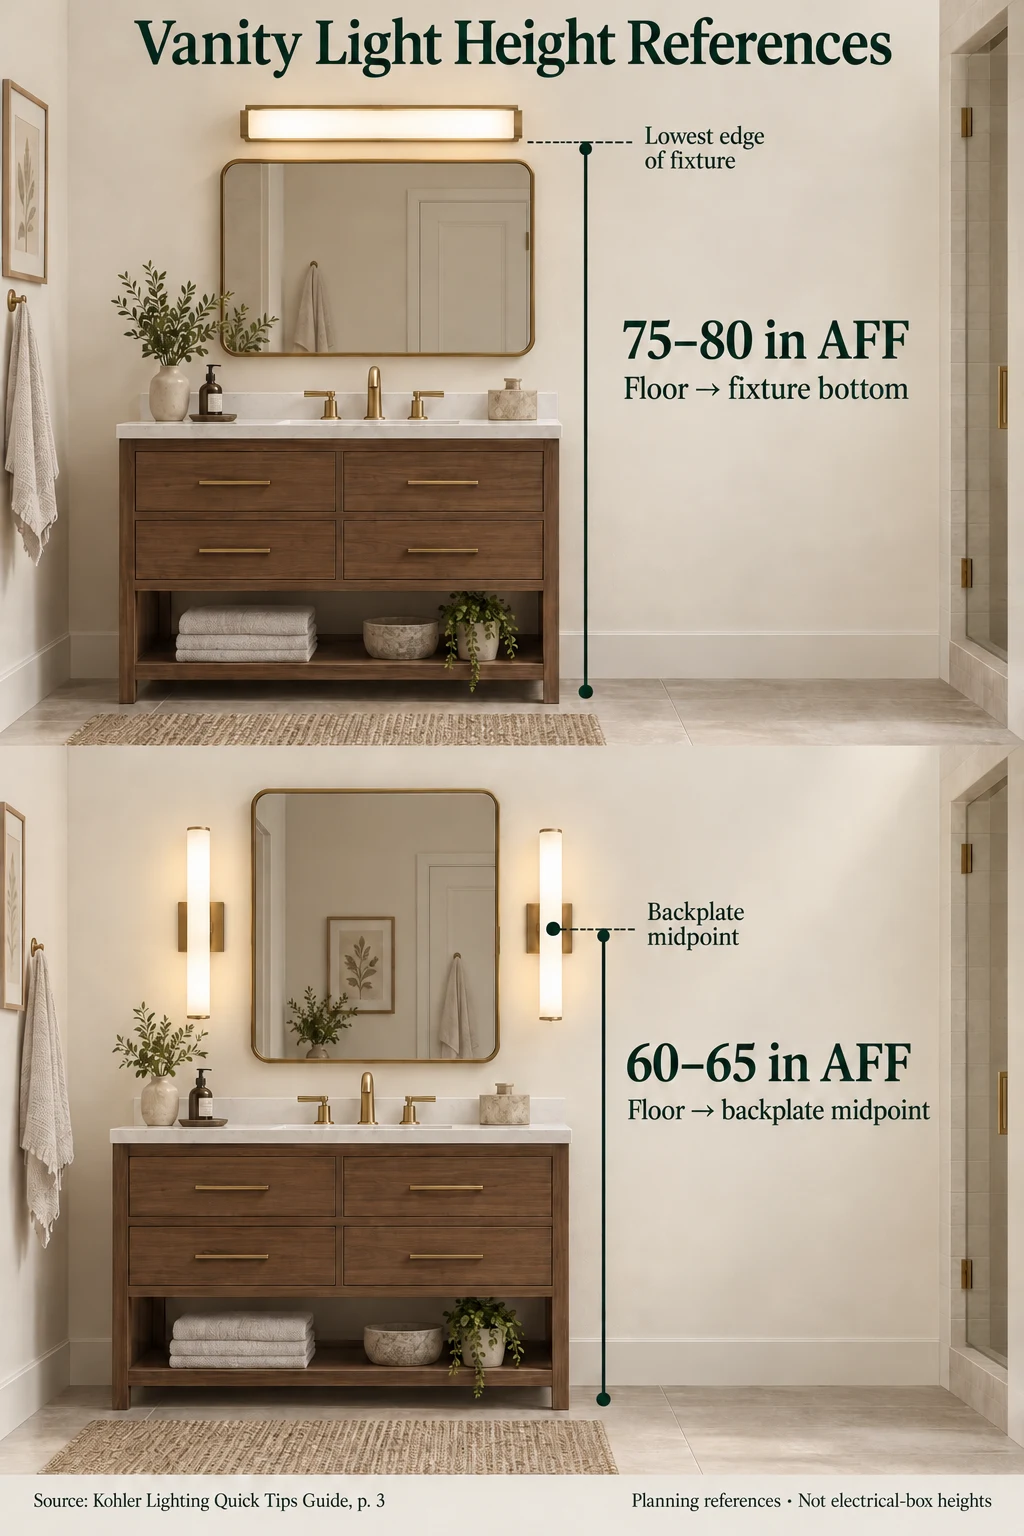
Enlarge the height reference chart
Start with the finished floor and mark the mirror's top edge. Next, place the full light outline above or beside the mirror. The electrical box may sit above or below the fixture's center, so locate it from the mounting drawing.
A height is only useful when its endpoint is named. The diagram and key below give each point a short label for drawings and installation discussions.
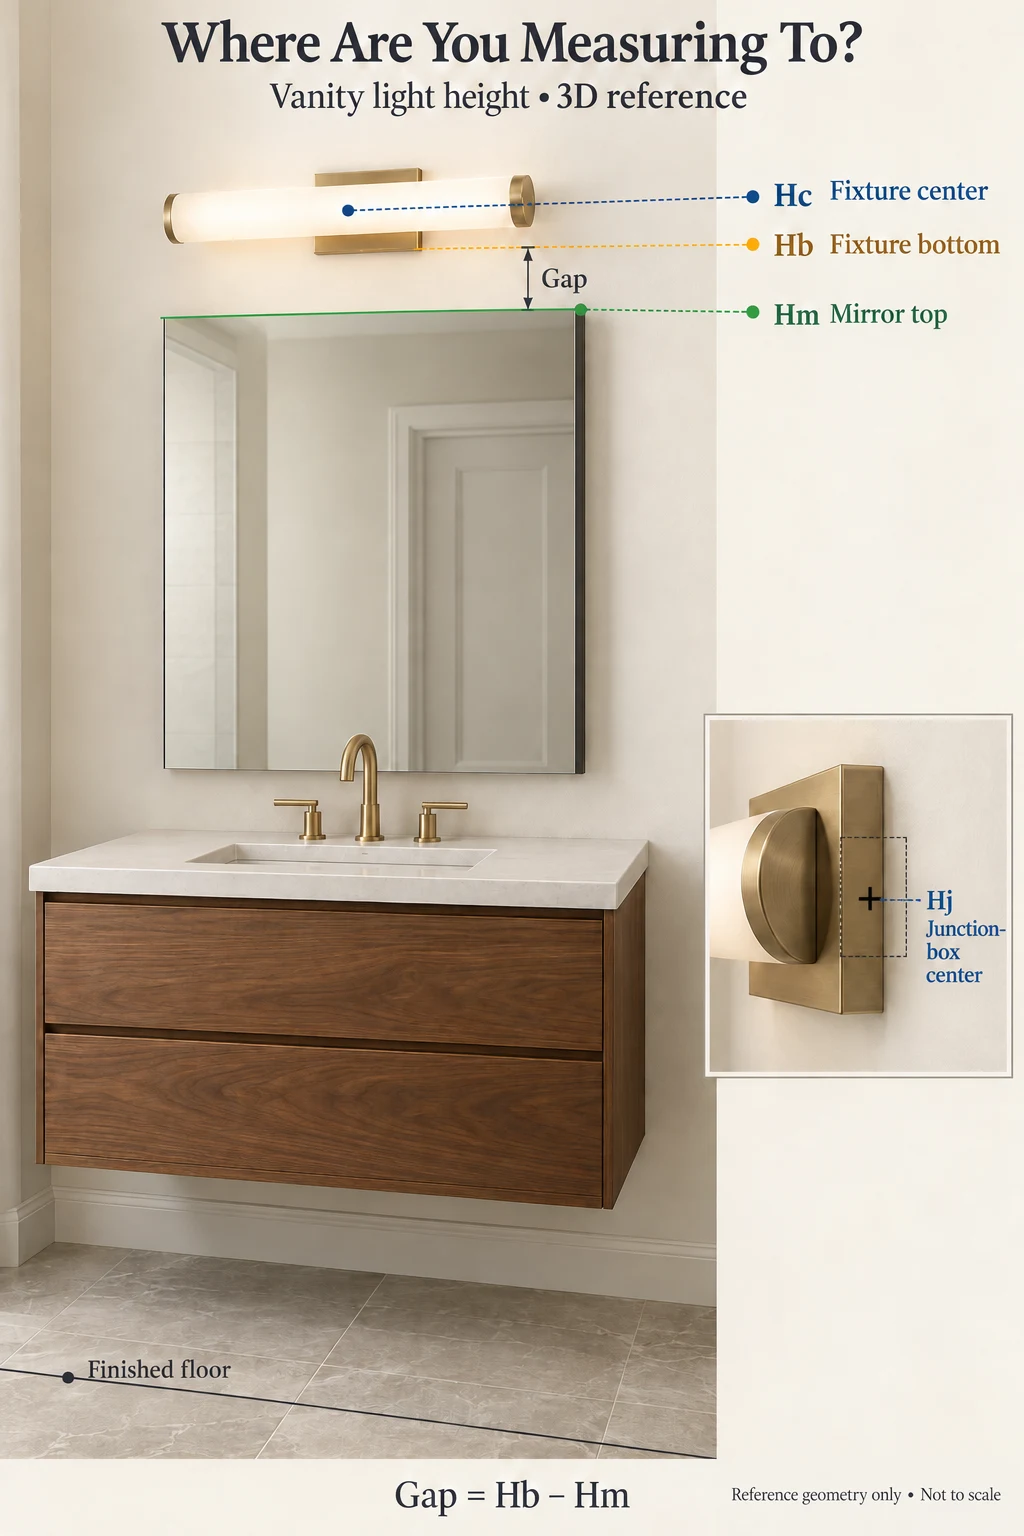
Measurement key
- Hm — mirror top: Floor to the upper edge of the mirror.
- Hb — fixture bottom: Floor to the lowest part of the complete fixture.
- Hc — fixture centerline: Floor to the fixture's defined center, not automatically its luminous center.
- Hj — junction-box center: Floor to the electrical connection-box center, which may be offset from Hc.
Gap = Hb − Hm. This is the clearance above the mirror, not a fifth height measured from the floor.
Shades and mounting direction can change the lowest edge without moving the electrical box. The fixture drawing relates these points and shows its wall projection and backplate coverage.
Why source heights differ
Published guides may refer to the fixture base, centerline, or backplate. A five-inch-tall symmetric fixture has its geometric center 2.5 inches above its bottom: using the same number for both points moves the installation by 2.5 inches. An undefined endpoint makes a range unsuitable for locating the electrical box. Keep the source's endpoint beside the number on the drawing.
Vanity Light Height Calculator
Use your mirror's top height, a chosen clear gap, and the complete fixture height to compare an overhead layout. All inputs are inches. The starting values reproduce the hypothetical example below; they are not recommended product clearances.
Your layout, with the endpoints kept separate.
Example values · inches · AFF means above finished floor.
Planning arithmetic only. Hc is a geometric reference, not the luminous center. No installation approval or automatic inquiry submission.
Without the calculator: Hb = mirror top + chosen gap. Fixture top = Hb + complete fixture height. For a vertically symmetric fixture, Hc = Hb + half its height. Only when the mounting drawing defines the signed offset from that center can you calculate Hj = Hc + offset. Leave an unknown offset unresolved—not zero.
The remaining space above the fixture is ceiling height minus fixture top. This is geometry, not clearance approval. The tool does not assess light output, mounting support, backplate coverage, cabinet door movement, or electrical suitability.
Vanity Light Height for a 36-Inch Vanity
This hypothetical layout example uses a 36-inch vanity and a 30 × 32-inch mirror. It demonstrates the arithmetic—not a tested OJMirror product combination or a recommended height for every user.
The countertop is 34 inches AFF. Place the mirror bottom at 39 inches AFF: its top is 39 + 32 = 71 inches. A chosen 4-inch clear gap puts the light bottom at 75 inches AFF. For a vertically symmetrical fixture 4 inches tall, the geometric center is 77 inches AFF, and its top is 79 inches.
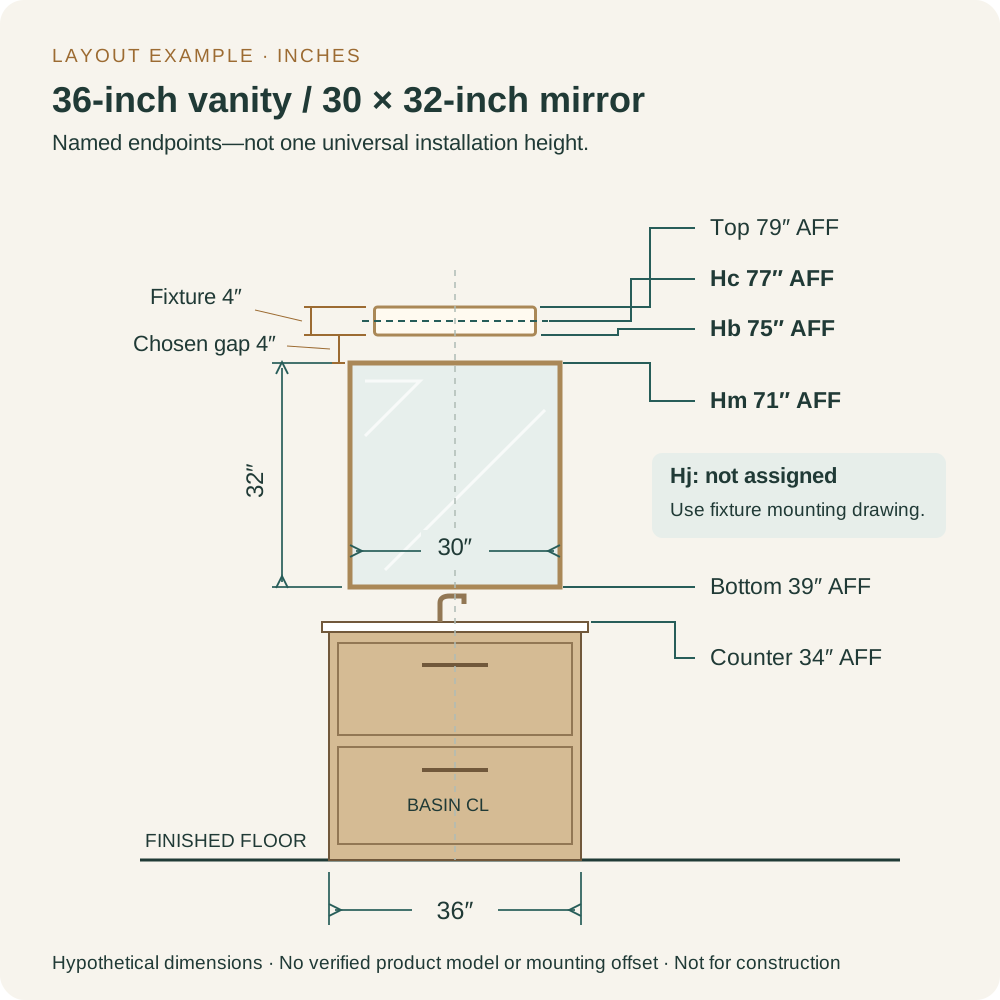
Read the three endpoints separately: Hm = 71 inches at the mirror top; Hb = 75 inches at the fixture bottom; Hc = 77 inches at the fixture's geometric center. Hj is not automatically 77 inches.
To obtain Hj, use the manufacturer's signed vertical mounting offset: Hj = Hc + offset. Positive means the box center sits above Hc; negative means below. If the drawing does not define that relationship, leave the box location to be resolved before rough-in.
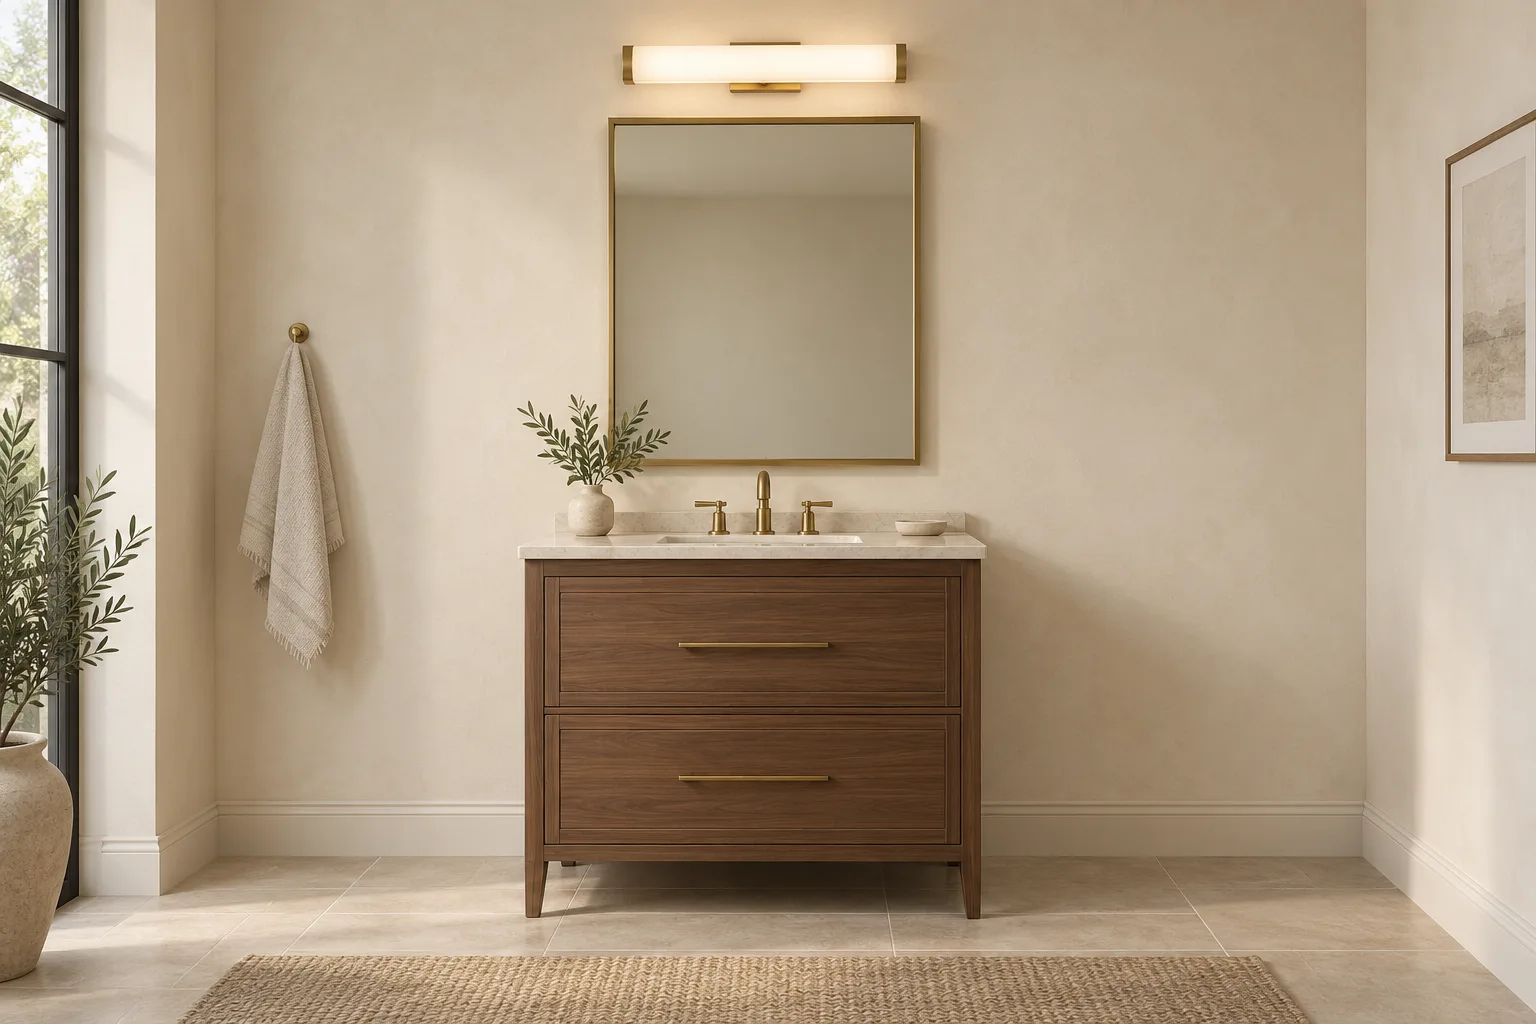
How to check an existing junction box
Start with its measured center above the finished floor and its horizontal distance from the basin centerline. Ask the installer to record the opening and mounting condition without exposing or working on live wiring.
Compare those fixed points with the replacement fixture's mounting drawing. The backplate must cover the opening, while the complete light must clear the mirror and ceiling. Coverage alone does not establish secure mounting or electrical compatibility.
For a drawing-defined offset, work backward: Hc = Hj − offset, then Hb = Hc − half the fixture height for a vertically symmetrical fixture. If the result conflicts with the mirror, compare another fixture or mirror size before considering relocation. Reverse an up/down fixture only when its instructions permit that orientation; the lowest edge and projection may change.
Above-Mirror Lights vs Side Sconces
Start with the space available. These options depend on the actual fixture and room, not the situation label alone.
| Your situation | Options to consider | Deciding factor |
|---|---|---|
| Little space beside the mirror | Above-mirror light | Space above the mirror and ceiling clearance |
| Tall mirror or low ceiling | Side sconces, if side space allows | Side clearance and light at face level |
| Projecting medicine cabinet | Overhead light or side sconces | Cabinet depth, door swing, and light projection |
| Little space above or beside the mirror | Front-lit mirror | Useful facial illumination and mounting space |
| Decorative wall glow wanted | Backlit mirror plus facial task lighting | Separate lighting for the face |
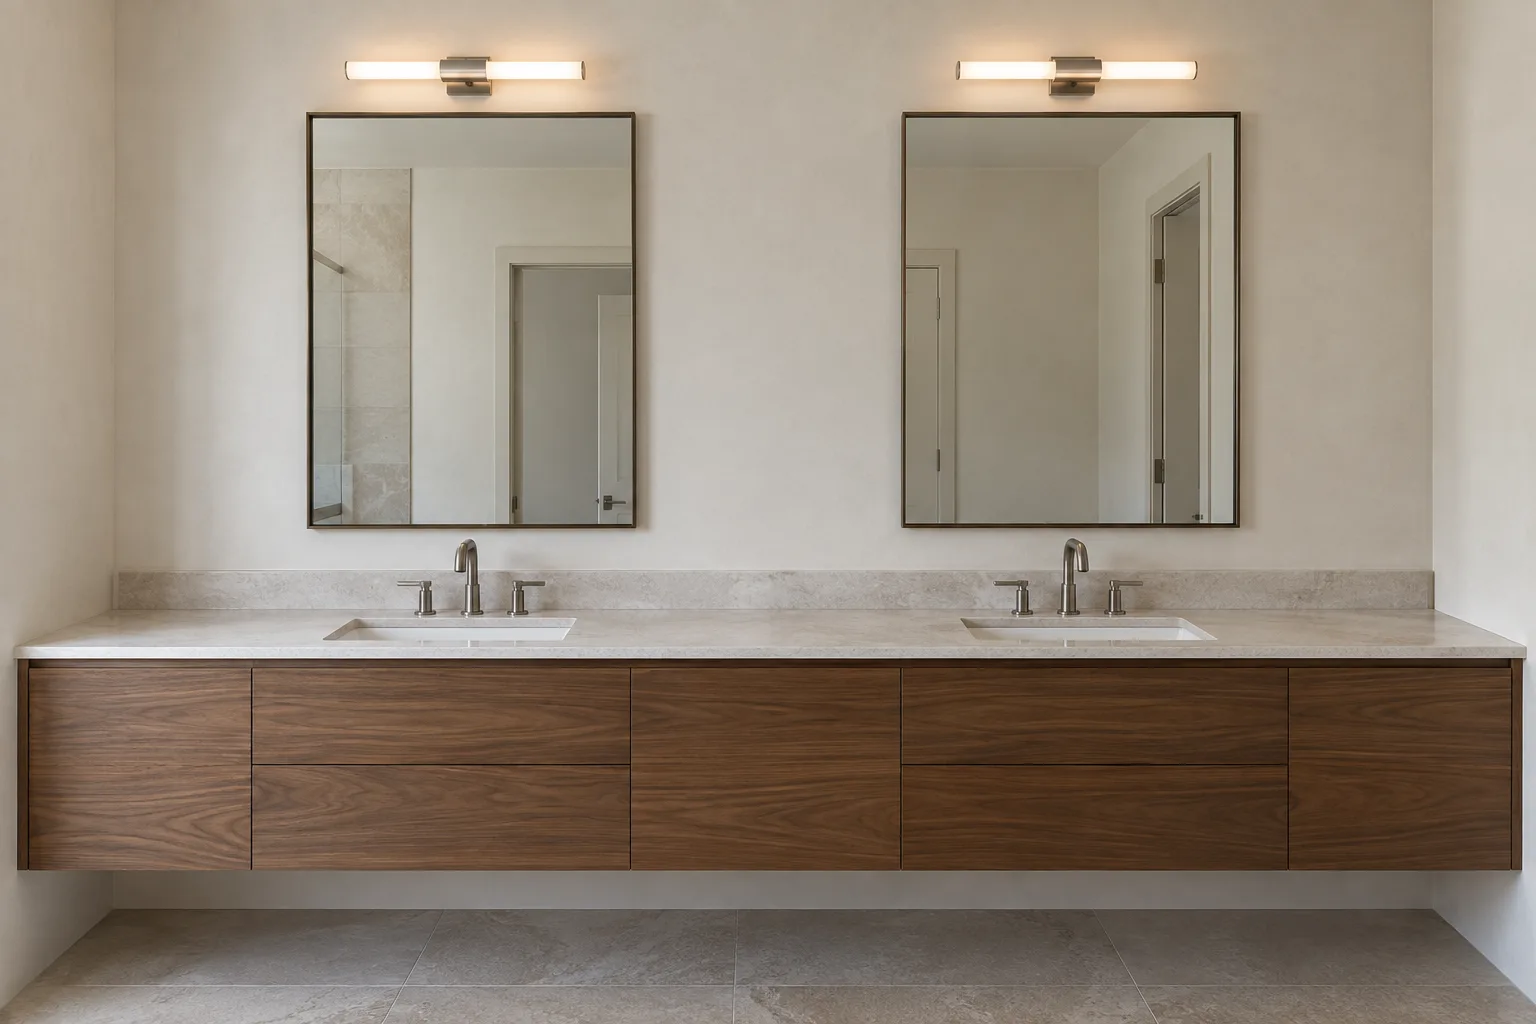
| Double vanity | Two lights, a long fixture, or sconces | Both basin positions |
Above-mirror lights
Place the mirror for the user's view, allowing for the countertop, backsplash, and faucet. Fit the complete light above it. A shorter mirror or lower-profile fixture may solve a tight layout; raising the light is only useful if it still lights the face effectively.
Align basin, mirror, and light where possible. Show offsets, wall returns, and fixed electrical points on one dimensioned elevation.
Side sconces
Position the light-emitting area relative to the face, rather than judging placement by the backplate alone.
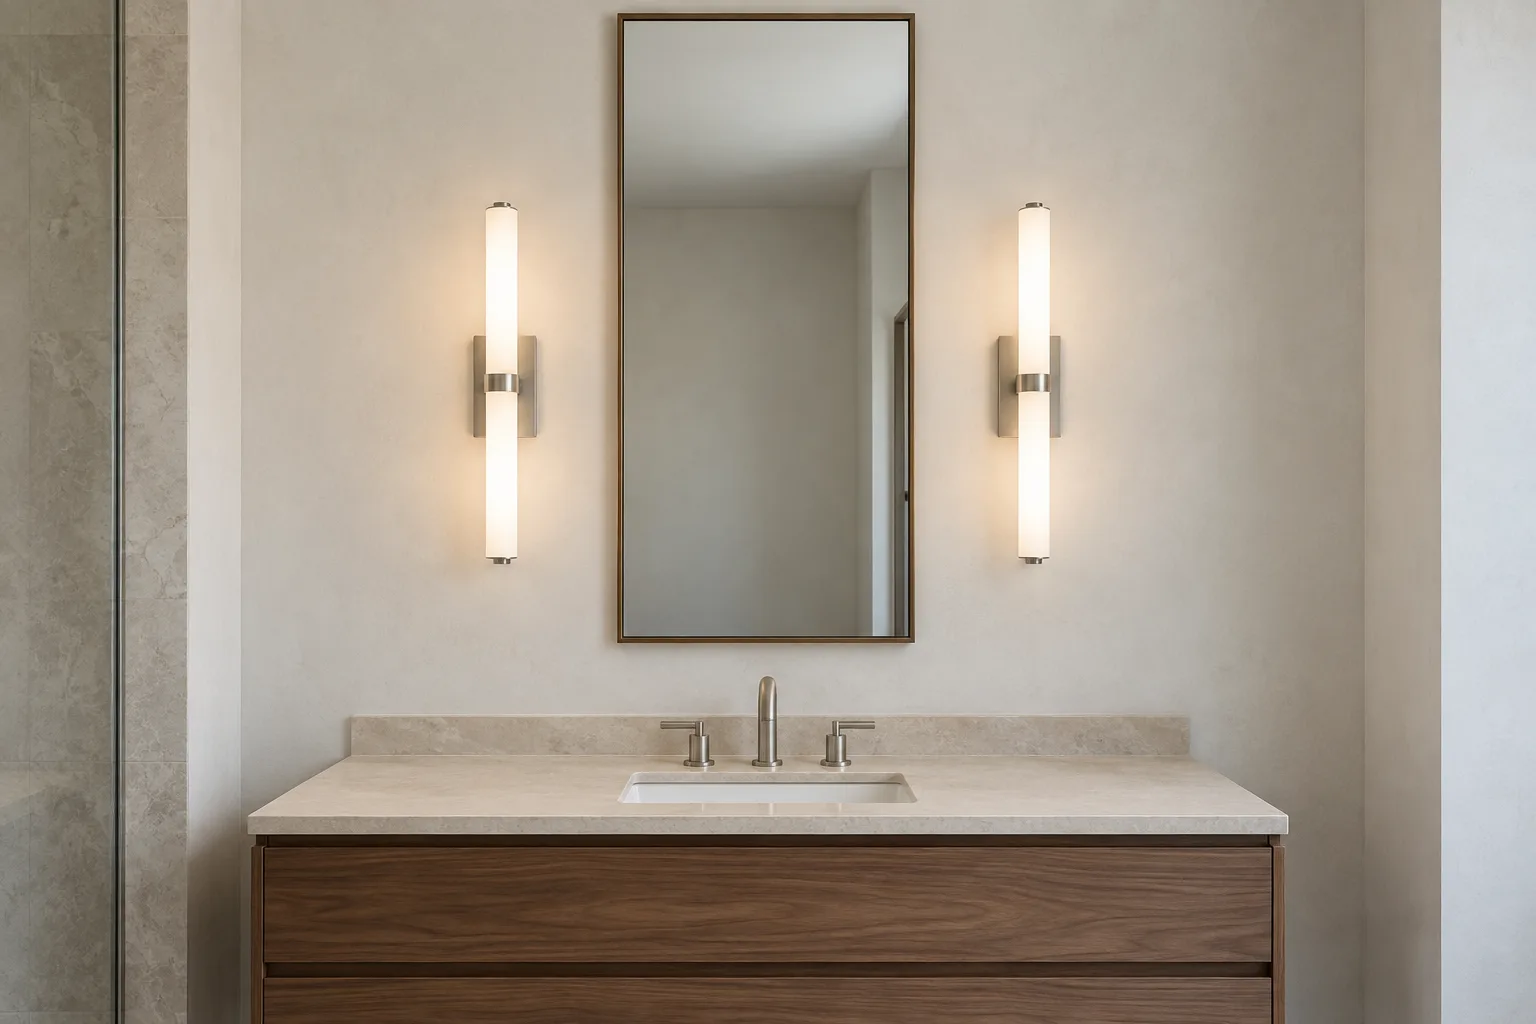
Diffusers, globes, and up/down lights distribute light differently. Allow space around frames, switches, outlets, doors, and nearby walls. Longer diffused sources may suit users of different heights; a mock-up helps reveal glare and shadows before repeating the layout.
Brightness, CRI and glare: what height cannot fix
A fixture can fit the wall perfectly and still produce uncomfortable glare or shadows under the eyes. Treat mounting geometry and lighting quality as separate checks.
Lumens describe light output, not how much reaches the face. Ask for the complete fixture's output and distribution, rather than relying on wattage or mirror-width proportions. Distance, direction and room surfaces also affect the result; no single lumen figure suits every vanity.
CCT describes light color; CRI describes color fidelity. For color-sensitive grooming, compare documented CRI 90+ options, not just a warm/cool label. The U.S. Department of Energy's LED guide explains that CRI 90 or higher indicates excellent color fidelity, while CRI alone has limitations. Compare CCT with the room lighting and finishes in a sample or mock-up; neither metric proves comfortable brightness.
At the intended viewing position, look for exposed bright LEDs, distracting mirror reflections and facial shadows. Compare diffusion, source position and manufacturer-compatible dimming. A 3D scene cannot establish illuminance or glare performance. For repeat room types, assess an actual sample installation before approving the full order.
Placement mistakes that can cause facial shadows
Use these observations to choose what to test in a sample installation. A shadow does not establish a code violation, and moving a fixture is not always the solution.
| What you notice | Possible layout issue | What to compare |
|---|---|---|
| Dark areas under the brow or chin | Light arrives mainly from above | More forward or side light at the user's face; test before changing the box |
| One side of the face looks darker | Uneven source position or an obstruction | Both viewing positions, cabinet projection and a more balanced layout |
| Bright reflection makes grooming uncomfortable | Exposed source or reflected glare | Diffusion, viewing angle and compatible dimming—not just greater mounting height |
| Attractive wall glow but a dim face | Backlighting is doing an ambient job | Front-facing task light alongside the ambient effect |
Keep the same viewing position and room-light setting when comparing alternatives. Concept renders illustrate placement; they cannot validate these effects.
Ceiling Height and Special Cases
Ceiling height changes the space available above a fixture—not the height of the user's face. This comparison holds an illustrative light bottom at 76 inches AFF and its full height at 5 inches, giving a top edge at 81 inches:
| Ceiling | Space above the example fixture | What changes |
|---|---|---|
| 8 ft / 96 in | 15 in | Check soffits and tall mirrors carefully |
| 9 ft / 108 in | 27 in | More headroom does not require raising the light |
| 10 ft / 120 in | 39 in | Use separate room lighting if the wider space needs it |
These are geometric remainders, not required clearances. Subtract any soffit or trim depth from the usable height; keep the intended viewing position central to the decision.
Vessel sink, tall faucet, or high backsplash
These elements can raise the mirror bottom and reduce the glass height available below an overhead light. Check the user's view and ceiling clearance before raising the mirror and fixture together.
Double vanity
Design around both basin centerlines. One light centered on the cabinet may not serve both users; the options in the selection table need to be evaluated from each position.
Round and arched mirrors
For an overhead light, measure clearance from the highest outer point of the circle or arch, not from its shoulders or the top of the rectangular portion. Center the complete fixture deliberately relative to the basin and mirror.
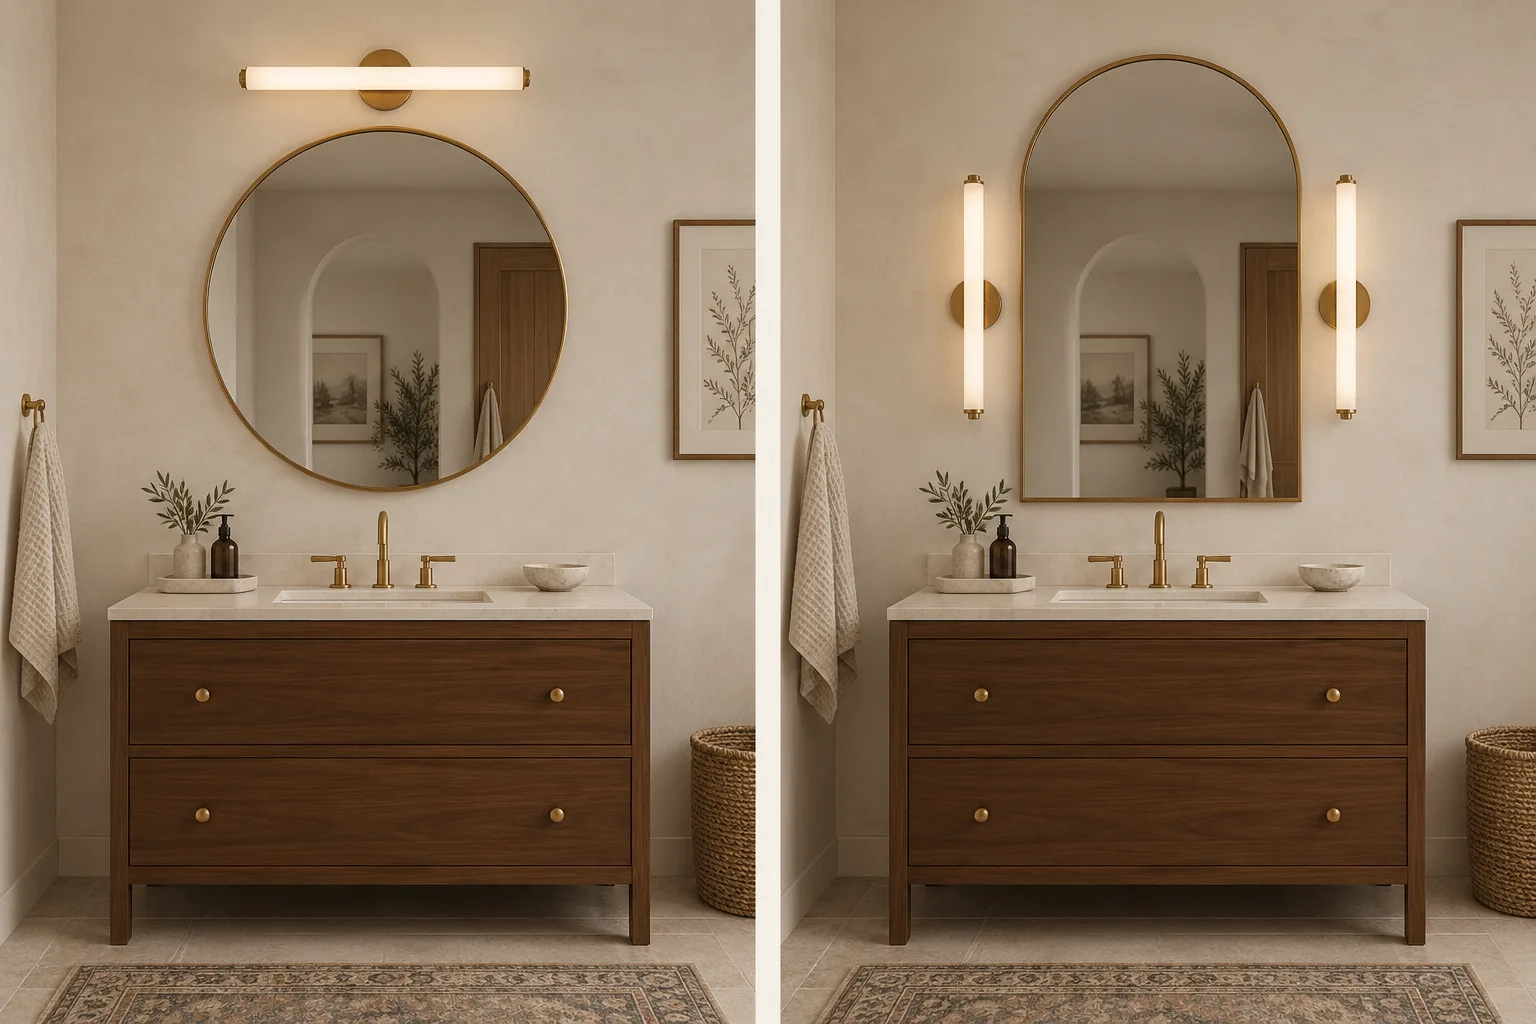
With side sconces, use the mirror's outside envelope at the fixture's position and the full shade width. A narrowing arch may leave more room near the top but still conflict with the fixture lower down. A paper outline helps test both shapes before ordering.
Mirrored medicine cabinet
A medicine cabinet adds depth, door swing, internal components, and service access. A surface-mounted cabinet can also change how an overhead fixture reaches the face.
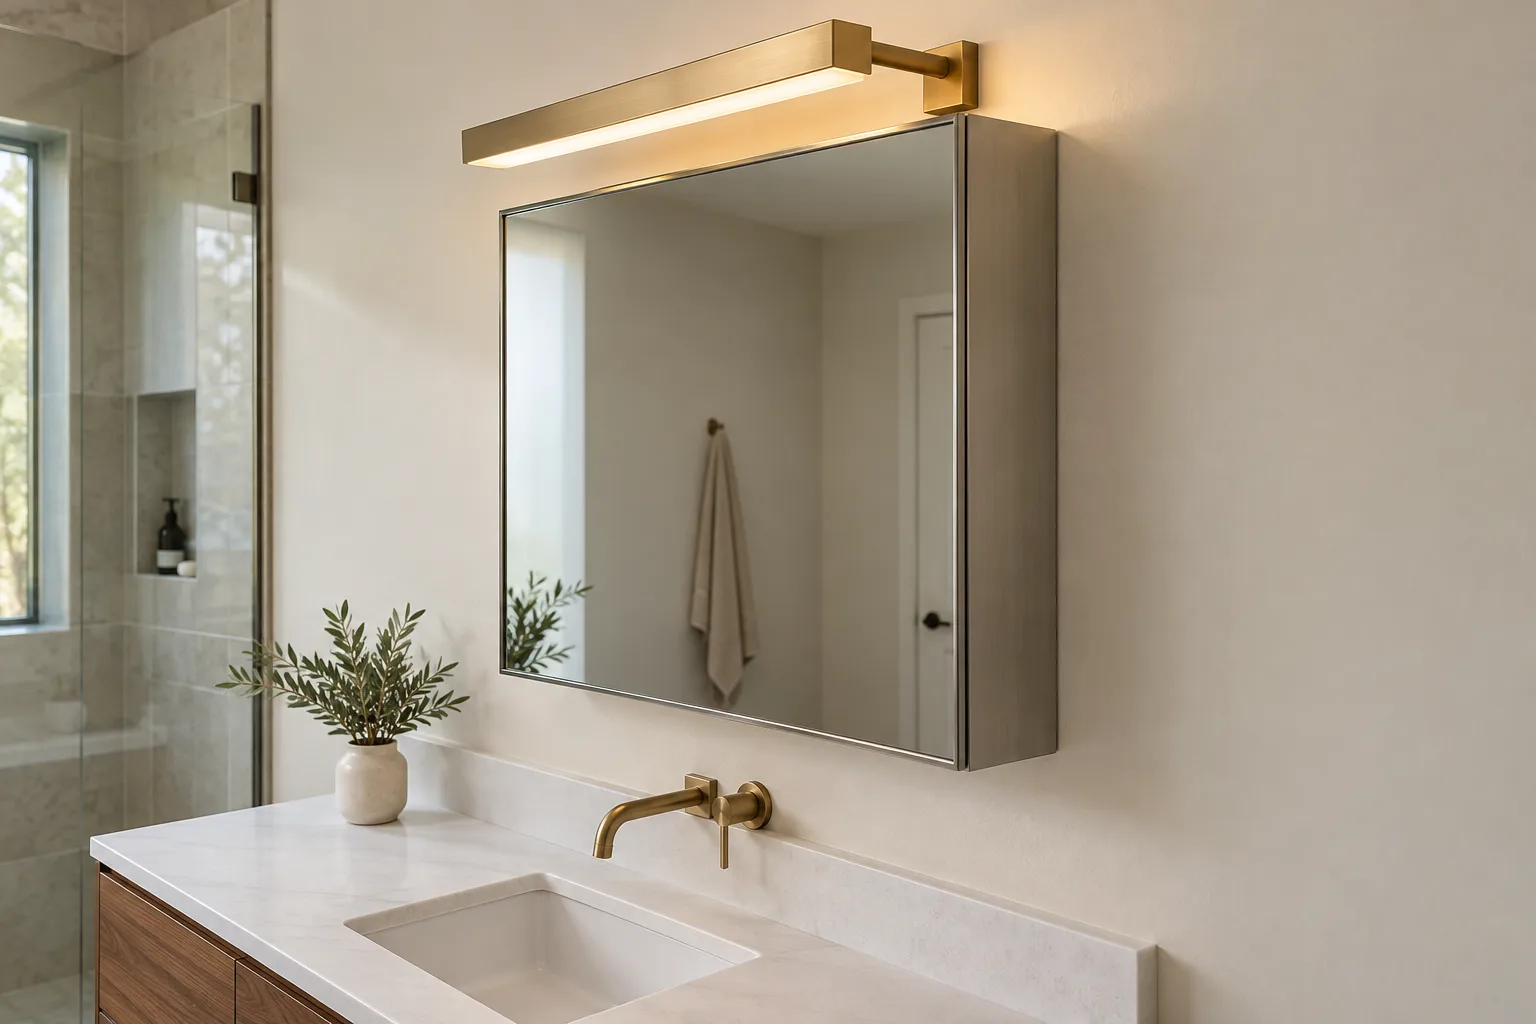
Use a front elevation and side section to resolve door clearance, fixture projection, and service access. Compare OJMirror's medicine cabinet configurations before fixing the cabinet outline.
Measure cabinet projection and the light-emitting surface's projection from the same finished wall. For example, 5 inches to the cabinet front and 7 inches to the light's emitting surface places that surface 2 inches farther forward. It does not prove that the light clears the door's complete sweep or illuminates the face adequately; those require a plan view and a lighting assessment.
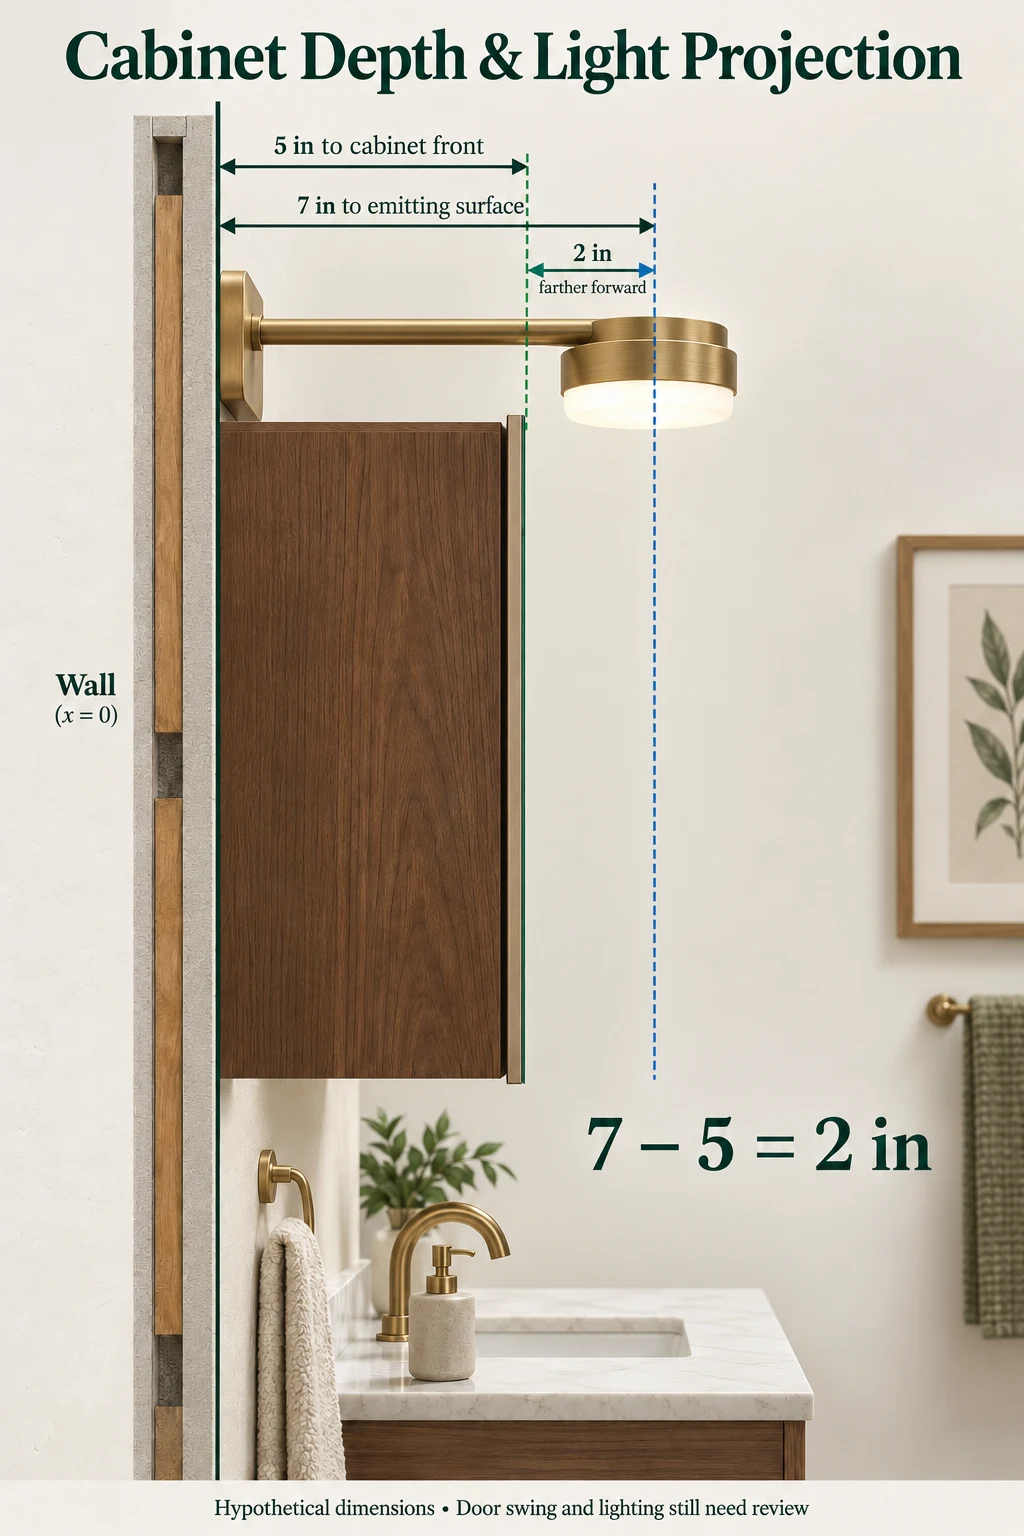
Enlarge the cabinet side section
Children, seated users, and accessible rooms
General adult planning ranges do not establish accessibility. Review the reflecting surface, viewing area, controls, and reach for the intended users. ADA §603.3 addresses mirror reflecting-surface height, not vanity-light mounting height. OJMirror's ADA mirror guidance provides related planning context; applicable project requirements govern.
When to Consider a Lighted Mirror
If separate lights will not fit, compare a lighted mirror with changing the mirror size or fixture profile. Integrated lighting saves space around the glass only when its mounting arrangement also fits.
Front-lit mirror
Consider when: Forward-facing light is needed without separate surrounding fixtures.
Check: Viewing position, light output, diffusion, and glare. A lit border alone does not prove adequate facial lighting.
Backlit mirror
Consider when: Ambient wall glow is wanted and facial task lighting is provided separately.
Check: Rear mounting clearance and the actual lighting effect. Backlit wall glow is not equivalent to forward task lighting.
Lighted mirror with room lighting
Consider when: Mirror lighting handles the face while other fixtures serve the wider room.
Check: Brightness, shadows, switching, and circuits. Mirror lighting does not automatically replace general lighting.
Explore OJMirror's bathroom mirrors and compare front-lit, backlit, and combined-light options. Define the available width, height, and cabinet depth before requesting a configuration. Confirm output, controls, electrical entry, documentation, and bathroom suitability for the selected model and market.
Before Electrical Rough-In and Ordering
Use one dimensioned wall elevation—a front view—to coordinate the vanity, mirror, light, and electrical point before rough-in sets box and wiring locations. Identify the approved configuration for each room type.
Choosing the mirror before electrical rough-in? Send OJMirror your vanity elevation, mirror dimensions, and existing junction-box position, along with quantity and destination market. These details help clarify the mirror or cabinet specification for quotation.
Four checks: backplate covers the opening; fixture clears the mirror; raised light still serves the face; cabinet door clears the sconce throughout its sweep.
View the four installation checks
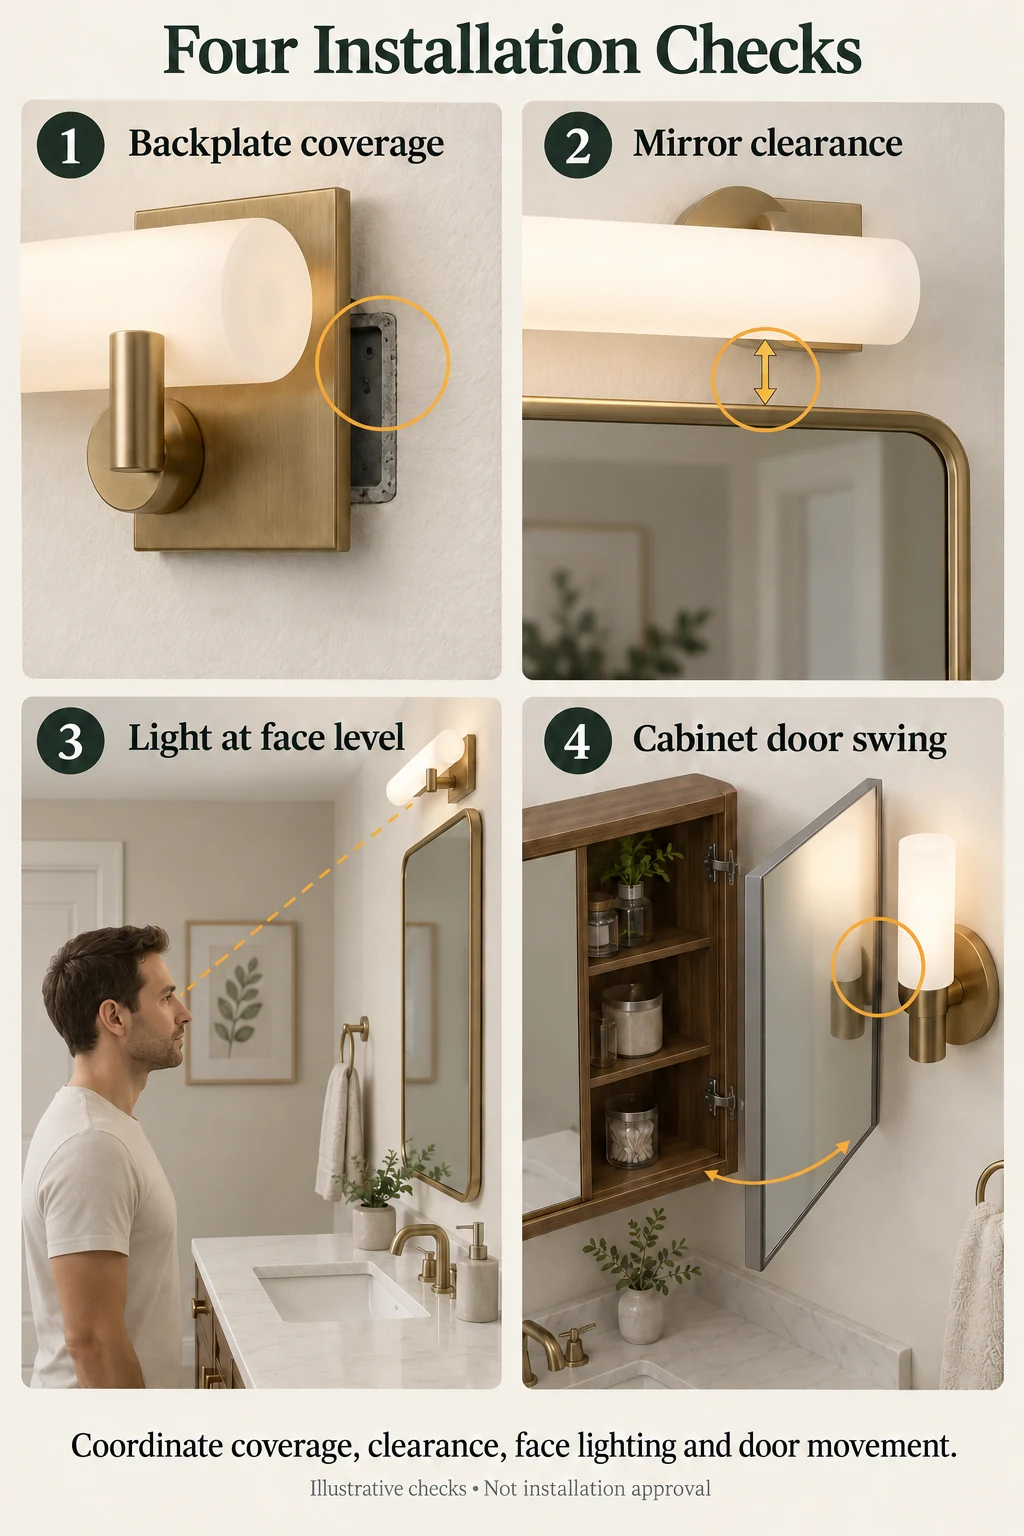
Record the wall and viewing requirements
Before drilling, tape paper outlines of the mirror and complete fixture onto the wall, marking the proposed mounting point separately. View the arrangement from each intended user's position and check cabinet-door movement. This tests fit and sightlines—not hidden services, structural support or lighting output.
- Mark the finished floor, countertop, backsplash, faucet, and each basin centerline.
- Record clear wall width and height to the ceiling or soffit, including adjacent walls, switches, outlets, and door trim.
- Define mirror outside dimensions, clear reflective area, and orientation. Check the intended users' view before adjusting the mirror to fit a light.
Resolve the fixture and electrical interfaces
- Show the complete fixture outline, mounting direction, projection, and named height endpoint—not just the backplate.
- Locate the junction box or cable exit and backplate from the product drawing.
- Check mirror-top gap, ceiling and side clearances, cabinet depth, door swing, and service access together.
- For a lighted mirror, include power entry, rear components, switching, and controls.
Confirm the order
- Approve the elevation and any necessary cabinet side section. Keep basin, mirror, and light relationships explicit, especially for offset or double basins.
- Confirm mirror construction, dimensions, mounting, and any applicable lighting/electrical specifications against the selected products.
- Record quantity, room type, destination market, and identification schedule. The vanity mirror planning page connects these inputs to configuration and quotation.
This is not wiring instruction. Circuit design, box type, fixture rating, bathroom-location suitability, and connection method must follow product documentation, project requirements, and applicable local rules. Use a qualified professional where required.
FAQ
How far above a bathroom mirror should a vanity light be?+
One published starting point is 3 inches; it is not a universal minimum. Measure to the lowest fixture edge, then use product clearances and the available space to settle the layout.
How high should bathroom sconces be beside a mirror?+
The height chart uses Kohler's backplate-midpoint reference. That point need not match the center of the diffuser. Adjust the layout for intended users, glare and the selected fixture rather than treating a published range as a fixed box height.
Should vanity lights be centered over the mirror or sink?+
They often share a centerline on a single vanity. With an offset layout, prioritize the reflection and lighting at the basin and document the arrangement.
Should vanity lights be above or beside the mirror?+
Choose by available space and facial lighting. The selection table compares overhead fixtures, sconces, and lighted mirrors; cabinet door clearance may rule out an otherwise suitable option.
Can I keep the existing electrical box when replacing a vanity light?+
Only if the replacement's mounting arrangement, backplate coverage, and clearances suit that location. An existing connection alone does not establish compatibility.
Is vanity light height measured to the center or bottom?+
Either may appear in a guide, so keep the named endpoint with the number. In the worked example, a 4-inch-tall symmetric light has its bottom at 75 inches and center at 77 inches AFF. Those dimensions are not interchangeable.
What height should the vanity light junction box be?+
Use the chosen fixture's mounting drawing, including any offset from its center. A general 75–80-inch planning range cannot locate the box; the measurement section distinguishes Hj from the visible fixture dimensions.
What if the mirror is too tall for a light above it?+
Compare a shorter mirror, a lower-profile fixture, side sconces or a front-lit mirror. Choose by available space and facial lighting, rather than forcing a familiar height. See lighted mirror alternatives.
Sources and Example Scope
- Kohler Lighting Quick Tips Guide, 2021, PDF page 3: source-specific bathroom height endpoints and overhead width proportion.
- Home Depot: Vanity Light Height: three-inch above-mirror layout suggestion.
- U.S. Access Board, ADA §603.3: mirror reflecting-surface requirements, not light mounting heights.
- U.S. Department of Energy: LED Basics: CCT, color fidelity and the limitations of CRI.
Sources checked October 12, 2026. Dimensioned examples are hypothetical arithmetic, and rendered scenes are concepts—not field measurements, product approvals, or photometric tests. Product instructions and project-specific requirements govern installation.
Revision note — October 12, 2026: Added the 36-inch layout calculation, existing-box check, curved-mirror comparison and lighting-quality guidance. The example has no assigned product model or verified mounting offset; it is not an installation approval.
Discuss Your Mirror Project
To discuss a mirror or cabinet quotation with OJMirror, send the proposed width and height, quantity, and destination market. Include cabinet depth where applicable. A wall drawing or photograph should show the vanity width, basin positions, available height, and any fixed lights or electrical points.
Optional project details, if available: project name, room type, mirror schedule or drawings, lighting type, color temperature (CCT), supply voltage, and control or dimming requirements. Mark unresolved items “To be confirmed.” These are requested specifications, not confirmation that every configuration is available.
These details help clarify mirror or cabinet requirements before quotation or sample approval. They do not replace formal lighting design or installation approval by the project's qualified professionals.
Email opens your mail app. Attach your drawing before sending.