Table of Contents
The Quick Answer
| Bathroom layout | Mirror size to test | What determines the fit |
|---|---|---|
| Centered sink, no side sconces | 52–54 in wide | Balanced starting point; 4–3 in per side |
| Centered sink, fuller look | 54–56 in wide | Greater visual presence; 3–2 in per side |
| Side sconces on a 60-in clear wall | 44 in in the worked example | Calculate fixture widths, gaps and outer margins first |
| Offset single sink | Compare narrower basin-centered and wider cabinet-centered options | User position and visual center may differ |
| Round mirror | 36–42 in diameter initially | Check vertical space as well as width |
| Edge-aligned modern design | Up to 60 in wide | Accurate finished dimensions and mounting access |
These are design starting points, not fixed specifications. The margins assume an exact 60-inch countertop and include the mirror frame. Sconce size, sink position and clear wall space determine which option fits.
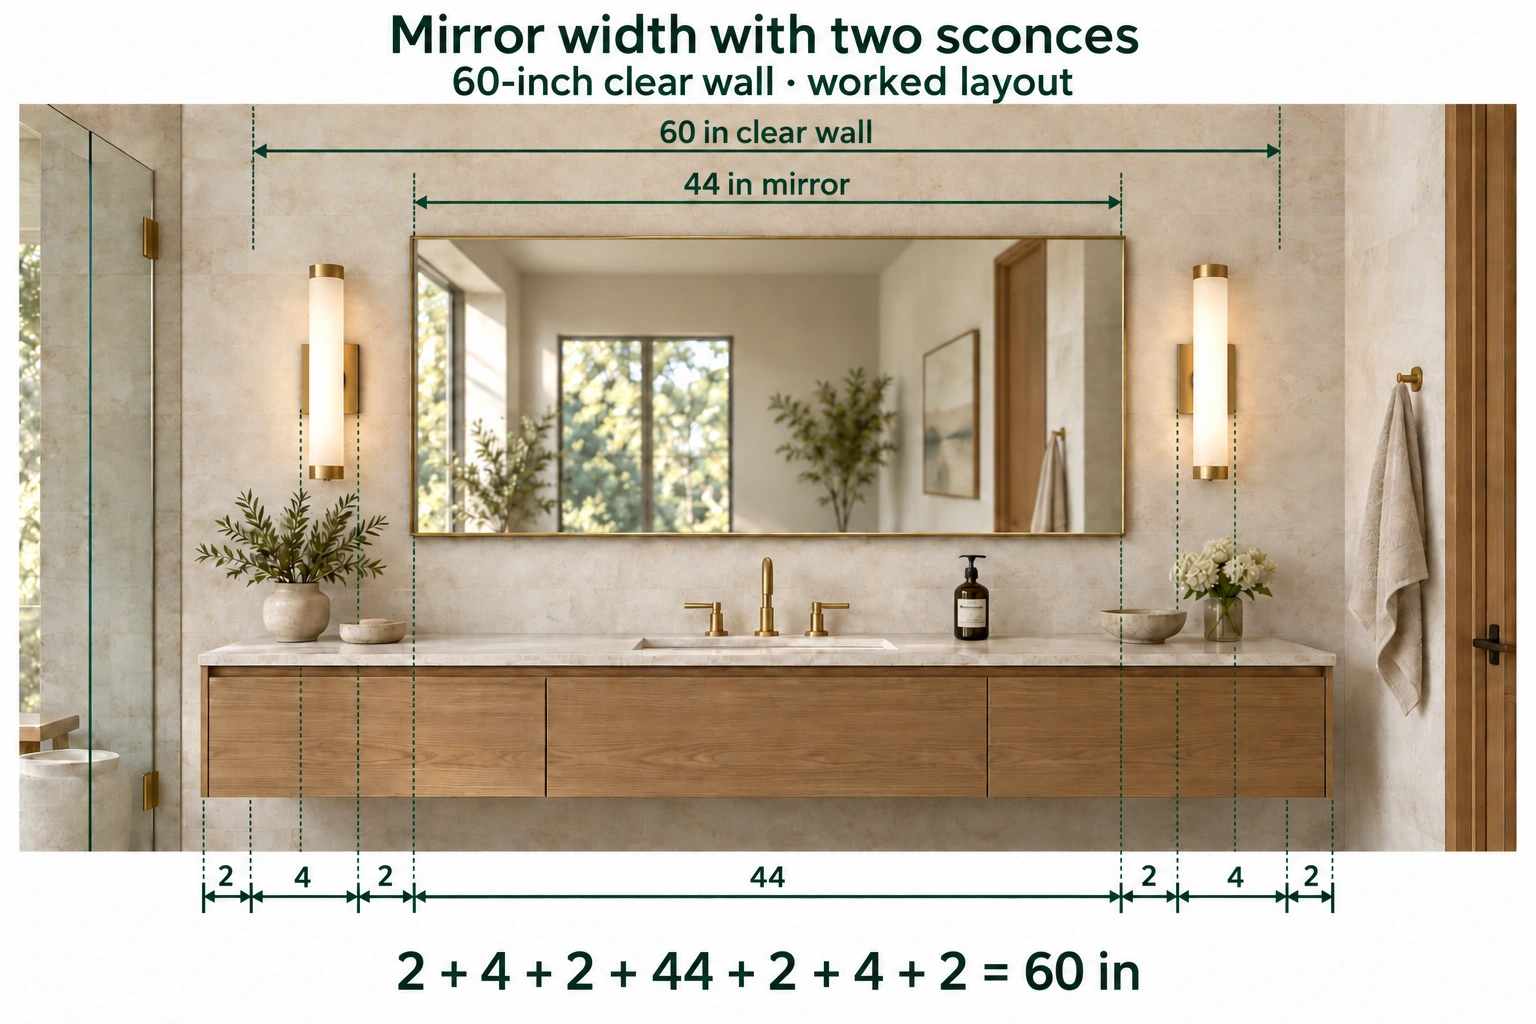
With side sconces: a 48–50-inch mirror may work when the wall provides sufficient room. On a 60-inch wall, two 4-inch fixtures, two 2-inch mirror gaps and two 2-inch outer margins leave 44 inches for the mirror. See the wall-width calculation.
Try the Bathroom Mirror Size Calculator with your measured wall and vanity dimensions. For two basins, use the 60-inch double-vanity mirror guide; for a smaller cabinet, see the 48-inch vanity guide.
Start With the Sink Position
With a centered single sink, the mirror and vanity can share one centerline. With an offset basin, compare two arrangements:
- a mirror centered on the basin or primary use position; and
- a wider mirror positioned to relate to both the basin and the full cabinet.
Prioritize a comfortable reflection at the sink, then consider the overall composition. The cabinet center and useful mirror center are not always the same line.
Offset-sink example: on a 60-inch countertop, put the basin centerline 24 inches from the left edge. A 44-inch mirror centered on that basin extends from 2 to 46 inches, leaving 2 inches left and 14 inches right. Center the same mirror on the cabinet instead and it extends from 8 to 52 inches: equal 8-inch margins, but its center sits 6 inches to the right of the basin. Tape both outlines on the wall and check your reflection at the faucet before choosing.
How Wide Should One Mirror Be?
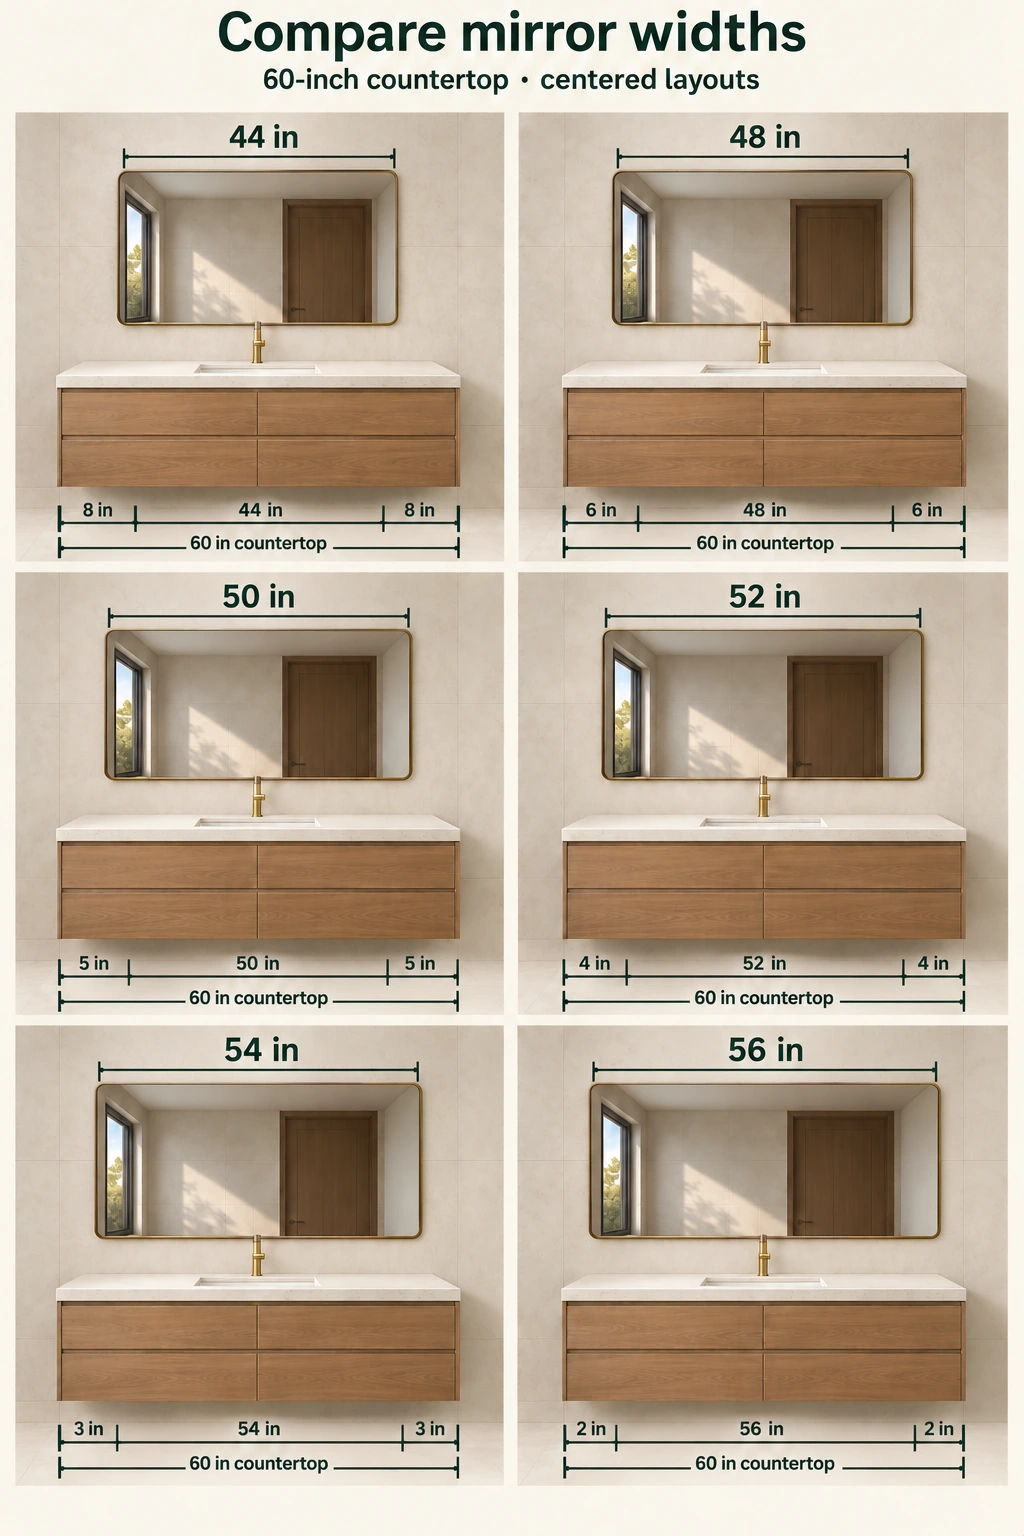
For a centered mirror, calculate the side margin:
Side margin = (60 inches − mirror outside width) ÷ 2
Use the full product width, including the frame. A 54-inch framed mirror does not provide 54 inches of clear reflecting area.
| Mirror width | Margin on each side | Example width × height | Main consideration |
|---|---|---|---|
| 42–44 in | 9–8 in | 42 × 32 or 44 × 32 in | Narrower option for a basin-focused layout or constrained sconce spacing |
| 48 in | 6 in | 48 × 36 in | More side space; check sconce fit |
| 50 in | 5 in | 50 × 32 in | Keep the basin within the useful reflective area |
| 52 in | 4 in | 52 × 32 in | Balanced starting point; check frame and fixtures |
| 54 in | 3 in | 54 × 32 or 54 × 36 in | Fuller composition; check upper light clearance |
| 56 in | 2 in | 56 × 36 in | Nearby walls, trim and mounting access |
| 60 in | 0 in | 60 × 36 in | Edge-aligned design requires accurate finished dimensions |
Width × height examples illustrate proportions, not a list of stocked OJMirror sizes. Different recommendations often assume different sink positions, lighting or frame widths; compare those conditions before choosing a number.
How Tall Should the Mirror Be?
A mirror 30 to 36 inches high is a useful starting range to test. Choose the height around the backsplash, faucet, upper light fixture and users’ viewing needs—not wall height alone.
A 38–42-inch-high mirror can suit a taller wall or a layout without a low overhead light. It is not automatically a better fit for tall users: check both the bottom reflecting edge and top sightline at the intended mounting position. It would exceed the 36-inch allowance in the worked example below.
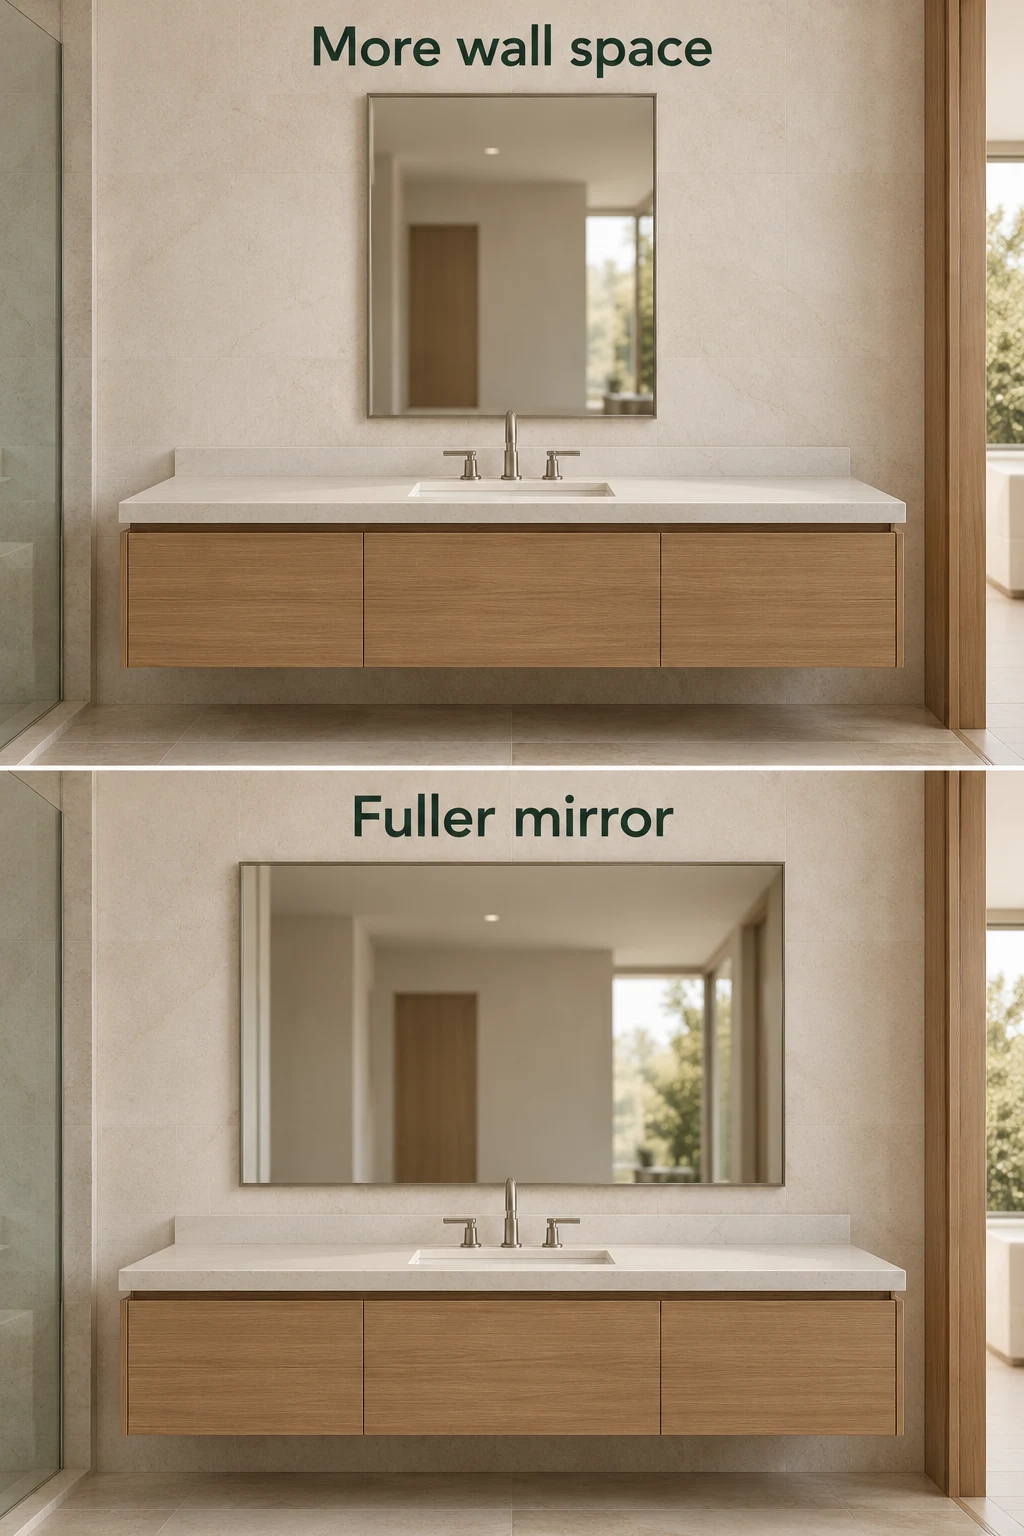
As proportion examples—not product specifications—a 60 × 30-inch mirror looks wider and lower, while 54 × 32 inches is less elongated and 54 × 36 inches adds vertical presence (width × height). At the same bottom edge, the taller option extends the reflection upward, which can help taller users; outline it at the intended mounting height to check the view. A high backsplash raises the available lower edge, while an overhead vanity light limits the top, so check both before choosing extra height.
Worked mounting-height example: assume a countertop at 36 inches above finished floor (AFF), a backsplash top at 40 inches, a proposed mirror bottom at 43 inches and a light-fixture bottom at 82 inches. Reserving an illustrative 3-inch gap below the light gives:
Maximum mirror height = 82 − 43 − 3 = 36 inches
A 54 × 32-inch mirror ends at 75 inches AFF, leaving 7 inches below the light. A 54 × 36-inch mirror reaches 79 inches, using the full allowance; a 54 × 40-inch mirror reaches 83 inches and does not fit. The assumed 3-inch gap is not a universal installation requirement—use the fixture instructions for the actual layout.
This is not an accessible mounting example. Under the 2010 ADA Standards, §603.3, mirrors above lavatories or countertops have a maximum height of 40 inches AFF to the bottom of the reflecting surface, not just the frame. Review applicable accessibility requirements separately.
Coordinate the Mirror With Lighting and Electrical Points
Allow space for the complete light fixture, not just its electrical box.
| Lighting layout | Effect on mirror size | Details to coordinate |
|---|---|---|
| Side sconces | Calculate from clear wall width; a narrow wall may need 42–44 in rather than 48–50 in | Fixture width, projection, box position and required spacing |
| Light above the mirror | Mainly limits mirror height | Mirror top, fixture bottom, box position and mounting instructions |
| Integrated LED mirror | May free side-wall space | Power point, cable exit, rear housing, mounting cleat, controls and electrical version |
The side margins in the size chart are not guaranteed sconce clearances. Show the fixtures and mirror together on the wall elevation, and follow the selected products’ installation requirements.
For a symmetrical pair of side sconces, estimate the width budget:
Maximum mirror width = clear wall width − 2 × (outer margin + sconce width + mirror-to-sconce gap)
For example, a 72-inch clear wall with a 2-inch outer margin, a 4-inch-wide fixture and a 2-inch mirror gap on each side leaves 72 − 2 × (2 + 4 + 2) = 56 inches for the mirror. The same allowances on a 60-inch wall leave only 44 inches. These are layout assumptions, not electrical clearances; also check fixture projection, box centers and mounting instructions.
For an LED mirror, review lighting direction as well as appearance. A glowing product photograph does not show the rear housing, wiring route or mounting access.
What Changes With Framed, Frameless, Round or Pill Mirrors?
Compare complete outside dimensions with useful reflecting area.
For example, a 54-inch outside width with a 1-inch non-reflective border on each side leaves 52 inches of reflective width. An illuminated band or wider frame can change this further; use the selected model’s drawing rather than assuming all of the outside width is usable glass.
| Mirror type | What changes |
|---|---|
| Framed | The frame reduces reflecting area and adds visual weight |
| Frameless | A wider mirror can look lighter, while edge clearance and mounting access still matter |
| Round or pill | Maximum width controls fit; curved areas provide less reflection than a rectangle of the same overall size |
For a round or pill mirror, outline the actual shape above the sink. Width alone does not show how much reflection will be available at the user’s position.
For a round mirror, compare 36- and 42-inch diameters first; a 48-inch circle creates a fuller focal point if the height and lighting allow it. Centered over a 60-inch countertop, these leave 12, 9 and 6 inches per side respectively. Diameter is also height, so a 48-inch round mirror needs much more vertical space than a 54 × 32-inch rectangle. A pill mirror has separate width and height dimensions.
Measure Before Ordering
Measure the whole wall elevation:
- Record cabinet width and the widest finished countertop separately.
- Mark the basin and faucet centerlines.
- Measure clear wall space and locate returns, cabinets, trim, outlets and switches.
- Show the backsplash, faucet, mirror and lighting heights.
- Add the mirror’s outside size, frame, rear housing, mounting zone and power entry.
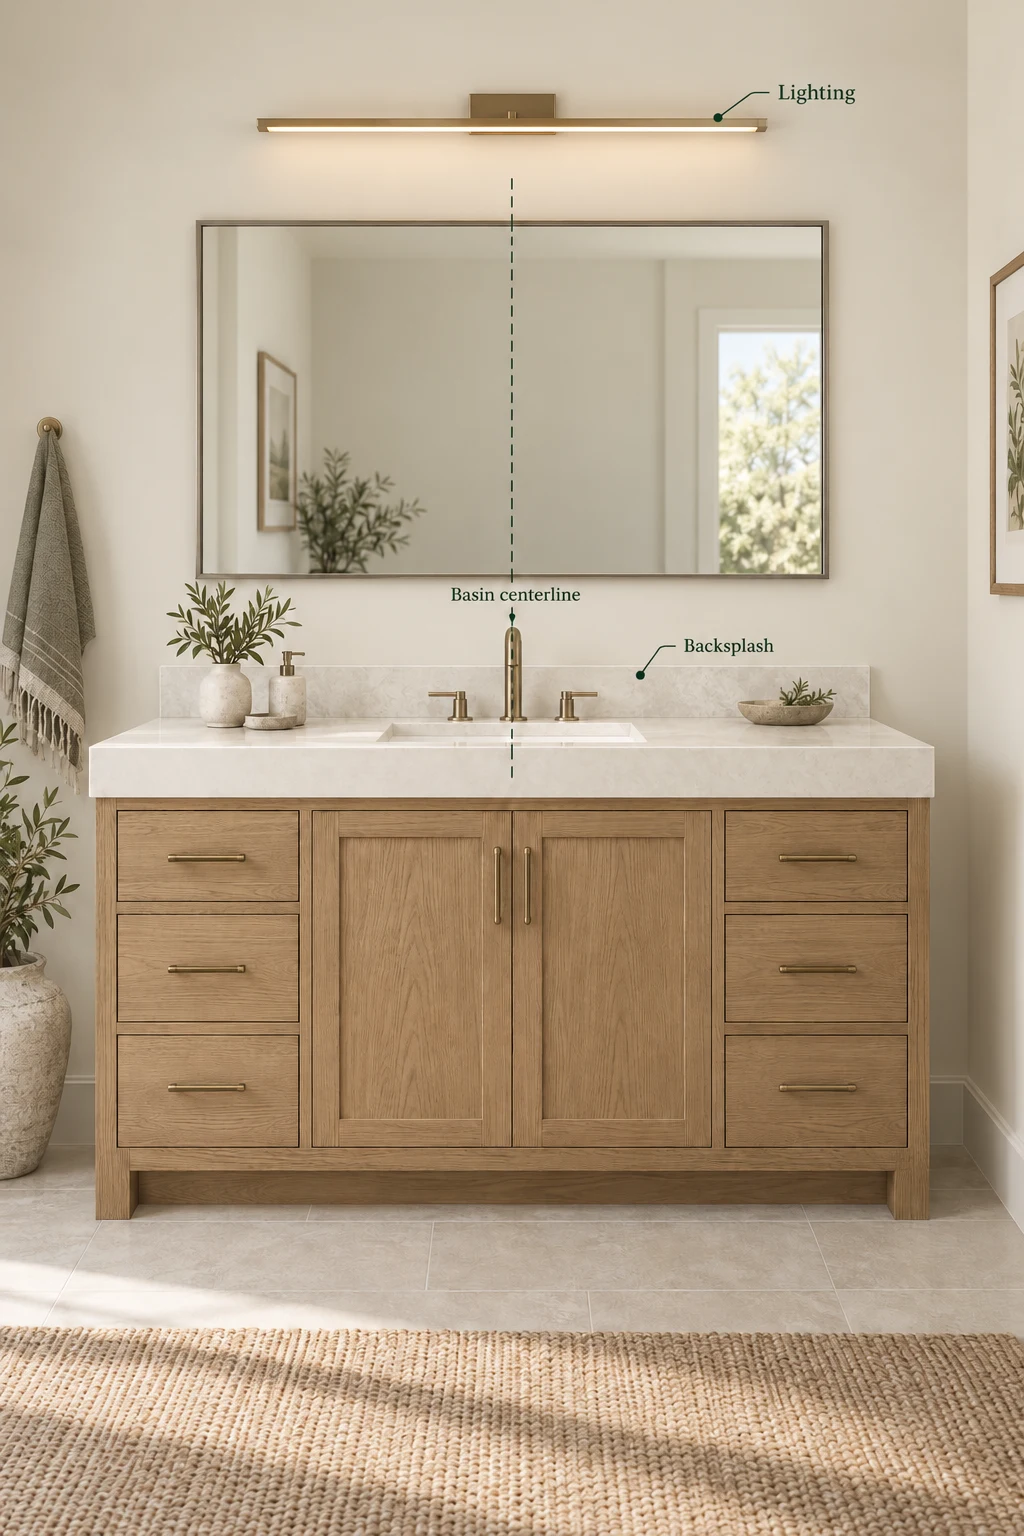
Mark the proposed outline on the wall or a scaled drawing before ordering. Use measured finished dimensions rather than the vanity’s nominal size.
Avoid three common mistakes: treating countertop side margins as wall-light clearances, using the cabinet centerline without checking an offset basin, and ordering by glass size when a frame increases the outside dimensions.
What OJMirror Checks Before Production
For a project size review, provide:
- room type, mirror ID and quantity;
- finished vanity, countertop and clear-wall dimensions;
- basin and faucet centerlines;
- mirror outside size, reflecting area, shape, frame and finish;
- lighting, power, controls, wall construction and mounting conditions;
- destination market and required product documentation; and
- drawing and sample references.
The selected model’s construction, mounting and electrical details belong in the approval drawing before production.
Explore OJMirror’s bathroom mirror range to compare constructions and configurations.
Project-Type Coordination Considerations
Project type changes the coordination priorities—not the basic sizing rules.
| Project type | Design priority | Sizing approach |
|---|---|---|
| Residential | Proportion and user preference | Start with the sink layout and available wall |
| Hotel guestroom | Repeatability and lighting coordination | Review the elevation by room type |
| Multifamily | Standardization and installation tolerance | Check repeated wall, sink and electrical conditions |
| Luxury hospitality | Visual scale and custom detailing | Evaluate the mirror against the complete elevation |
For repeated rooms, link each mirror to its room type and vanity schedule. The same 60-inch cabinet can require a different mirror arrangement where sinks, walls or lighting change.
Frequently Asked Questions
Is a 48-inch mirror too small for a 60-inch vanity?
No. Centered over an exact 60-inch countertop, it leaves six inches per side—useful for a lighter look or side lighting. Make sure it provides a comfortable reflection at the sink.
Is a 54-inch mirror too large for a 60-inch vanity?
Usually not. It leaves three inches per side when centered, creating a fuller look. Side sconces, a wide frame or nearby obstructions may call for a narrower option.
Can the mirror be the same width as the vanity?
Yes, for an intentional full-width design. A 60-inch mirror leaves no side margin against an exact 60-inch countertop, so wall accuracy, adjacent finishes and mounting access matter.
What size round mirror works over a 60-inch single vanity?
Compare 36- and 42-inch diameters first, or 48 inches for a fuller look with sufficient height. Centered side margins are 12, 9 and 6 inches respectively. Diameter also determines height.
What size LED mirror works over a 60-inch vanity?
Compare widths of 48–56 inches. The final choice also needs room for the selected model’s power entry, rear housing and mounting system.
Should a bathroom mirror be wider than the sink?
Often, yes: extra width provides a broader viewing area. Use the basin centerline for alignment while fitting the mirror to the wall and lighting.
Should the mirror be centered over the sink or the vanity?
With a centered sink, both usually share a centerline. For an offset sink, prioritize the user’s reflection and compare a basin-centered mirror with a wider, cabinet-related arrangement.
What size mirror works with side sconces on a 60-inch vanity?
Use the clear wall width, not the vanity width alone. A 48–50-inch mirror needs sufficient wall space; on a 60-inch wall, the worked example leaves 44 inches after allowing for two 4-inch fixtures, 2-inch gaps and 2-inch outer margins.
Can I use a narrower 36–44-inch mirror over a 60-inch vanity?
Yes, for a basin-focused composition, an offset sink or a wall constrained by sconces. Centered over a 60-inch countertop, a 36-inch mirror leaves 12 inches per side and a 44-inch mirror leaves eight. Check usable reflection and the overall balance before ordering.
What size mirror works for a 60-inch vanity with one sink?
Compare 48–56 inches wide, starting with 52–54 inches for balanced proportions. Adjust for an offset sink, side lighting, frame width and available wall space.
Request a Project Mirror Size Review
Planning mirrors for a hotel, multifamily or residential project? Send OJMirror your vanity elevation, basin centerline, lighting layout and quantities. We can help review the proposed mirror size against those details and identify mounting or power-entry coordination points before you settle on a configuration. For repeated rooms, include the room-type schedule so the review addresses differences between layouts—not just one nominal vanity width.
| Submit | What to include |
|---|---|
| Vanity width | Finished cabinet and countertop dimensions |
| Sink layout | Sink count and basin centerline positions |
| Wall width | Clear wall dimensions and nearby obstructions |
| Mirror quantity | Total quantity and quantities by room type |
| Project type | Residential, hotel, multifamily or other application |
| Country / market | Destination market |
| Drawing upload | Vanity elevation, lighting and electrical plan if available |
Still comparing proportions? Calculate a starting mirror size before preparing your project brief.