Custom bathroom mirrors for senior living communities, assisted living facilities and care environments. Explore LED, framed and cabinet options for multi-room projects.
Compare the product direction, coordinate the room, and prepare a model-specific quotation request. Start with the details you know; confirm the rest through drawings and sample review.
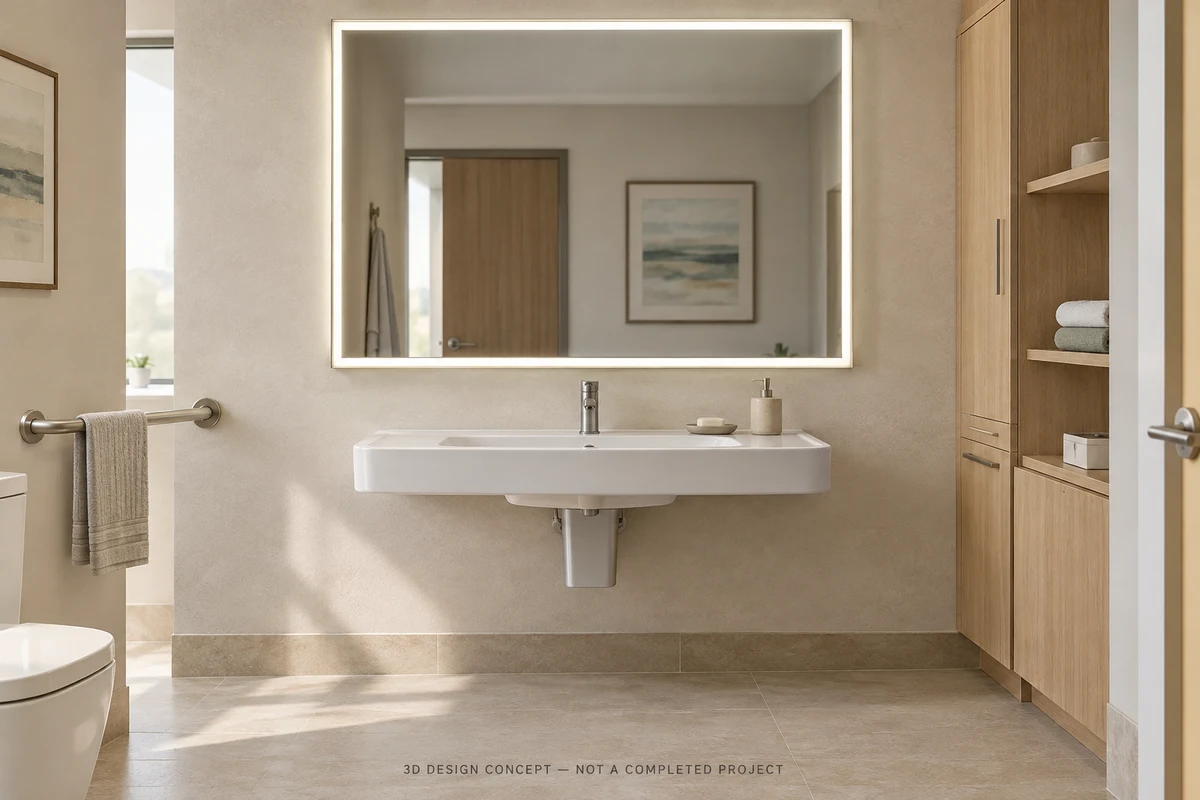
3D design concept—not a completed OJMIRROR project or proof of accessibility compliance. Final layout, clearances, fittings and product specifications require project review.
01 / MIRROR COLLECTION
Senior Living Bathroom Mirror Types & Options
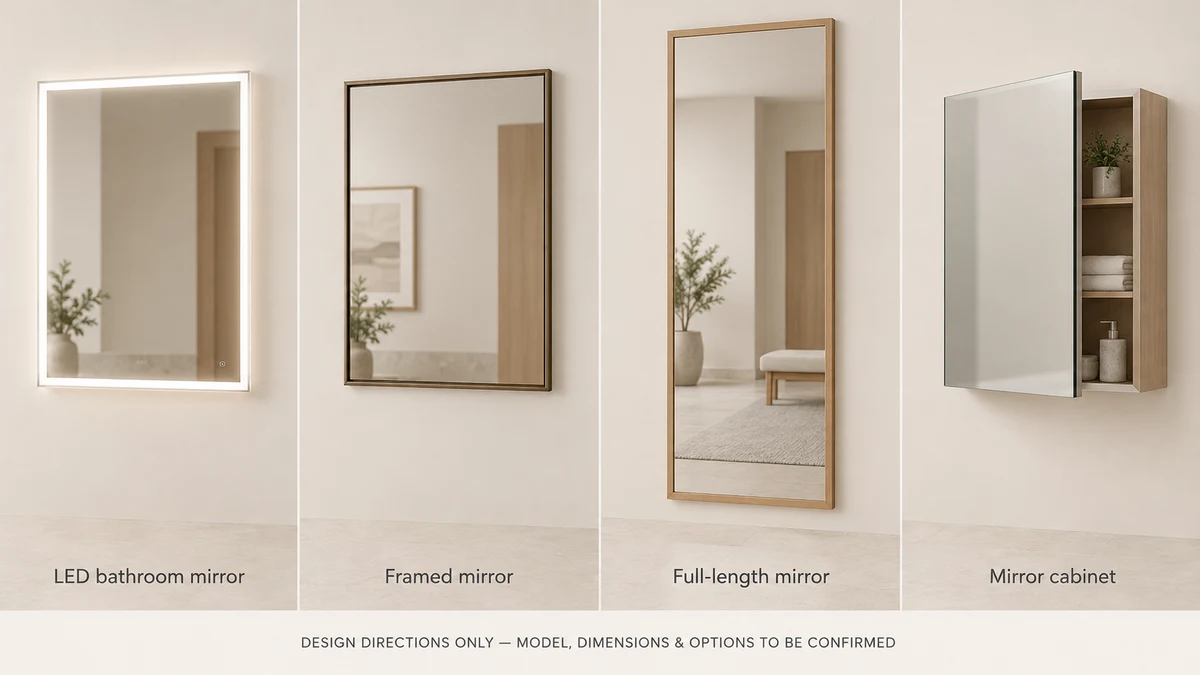
Start with what the resident needs to do, then choose the mirror format. Integrated lighting may suit a grooming area; a framed mirror may better support a residential interior where separate fittings already provide the light. A cabinet adds storage, but also changes depth, door clearance and the installation detail.
Design directions only. These illustrations do not identify orderable models, standard dimensions or included functions.
01
LED Bathroom Mirrors for Assisted Living
For grooming areas where integrated face lighting is part of the room brief.
Resident experience See the face comfortably during everyday washing and grooming, with an understandable control sequence.
What to confirm before ordering
Reflecting area, light distribution, switch behavior and electrical configuration. Obtain the quoted model reference, drawing revision and applicable documentation.
For a coordinated residential interior with separately specified room lighting.
Resident experience A familiar, personal setting without an additional powered control.
What to confirm before ordering
Overall versus reflecting dimensions, frame profile, finish sample and mounting. Obtain the quoted model reference, drawing revision and applicable documentation.
For rooms where integrated storage suits the care arrangement and available wall depth.
Resident experience Everyday items are easier to locate and reach in an operator-approved arrangement.
What to confirm before ordering
Recess or surface mount, body/opening dimensions, door swing, projection and service access. Obtain the quoted model reference, drawing revision and applicable documentation. A cabinet is not automatically secure medication storage.
Use this schedule to request comparable proposals. These are configuration directions, not released model specifications. Connect each selected type to a supplier-confirmed model and drawing revision before ordering.
Model, material, finish sample, edge/backing and mounting: TBC
Dressing mirror
Full-length viewing position
Room elevation, visible glass area, approach and door clearances
Model, glass specification, weight and fixing arrangement: TBC
Bathroom cabinet
Storage behind a mirrored door
Wall construction, body/opening dimensions, door swing, shelf requirements
Model, recess depth, fittings, installation and any electrical options: TBC
TBC means “to be confirmed,” not a standard feature or a zero value. A feature offered on one model should not be copied into another model’s schedule.
For an accessible resident bathroom, apply the viewing and mounting review below to the chosen format. “Accessible” is not a fifth product family or a stand-alone certification.
The experiences below are design goals, not resident testimonials or measured health outcomes. Use them to guide the sample-room discussion with designers and operators.
01
Resident Bathrooms: A Calm Start to the Day
A resident should be able to settle into a familiar routine—wash, look up and see a useful reflection without searching for a control. Review the mirror from the actual approach to the basin, including seated use where relevant.
Mirror direction: LED or non-lighted bathroom mirror, depending on the lighting plan. Room check: vanity and faucet coordination, reflecting area, switching sequence and service access.
02
Independent and Assisted Living Suites: A Space That Feels Personal
Dressing and checking an outfit can be a small moment of independence. A coordinated frame and a clear approach to the mirror support a residential atmosphere without adding unnecessary functions.
Mirror direction: framed or full-length mirror; separate bathroom specification where needed. Room check: doors, wardrobe access, furniture, resident viewing position and the normal level of assistance.
03
Care-Support Spaces: Comfort and Dignity During Personal Care
Where staff assist with grooming, the mirror should be considered alongside privacy, working space and the operator’s routines. It should not force the resident or caregiver into an awkward position simply to obtain a reflection.
Mirror direction: a simple configuration reviewed for the activity. Room check: viewing position, cleanable interfaces, control location and operator-approved placement.
For memory-care settings, ask the care team whether a mirror is appropriate in that location and how residents respond to reflections. Do not assume more mirrors, brighter lighting or a particular shape provides a therapeutic benefit.
04
Community Salons: Enjoy the Appointment and the Result
The mirror helps a resident follow the appointment and see the finished hairstyle from the salon chair. Review the reflection at the chair’s working positions, not only while standing in an empty room.
Mirror direction: station-sized LED or framed mirror. Room check: chair movement, stylist lighting, reflected light sources, cleaning products and accessible controls.
05
Wellness and Activity Rooms: Participate at a Comfortable Pace
Where the activity program uses mirrors, residents may need to see their own position without a visually overwhelming wall. The operator should decide whether a mirror is useful, where it belongs and how much coverage is appropriate.
Mirror direction: selected wall or full-length format. Room check: activity layout, furniture, edge protection, fixing and reflected distractions. This is an interior-planning choice, not a claim about rehabilitation outcomes.
06
Visitor Washrooms: Freshen Up Without Guesswork
Visitors should be able to find a useful reflection and understand the lighting quickly. Repeatable fittings and straightforward controls also make the room easier for facilities staff to manage.
Mirror direction: coordinated bathroom LED or non-lighted mirrors. Room check: basin positions, shared lighting, cleaning access and maintenance arrangements.
04 / ACCESSIBLE DESIGN
ADA Bathroom Mirror Mounting & Accessibility
Mirror Mounting Height and Viewing Positions
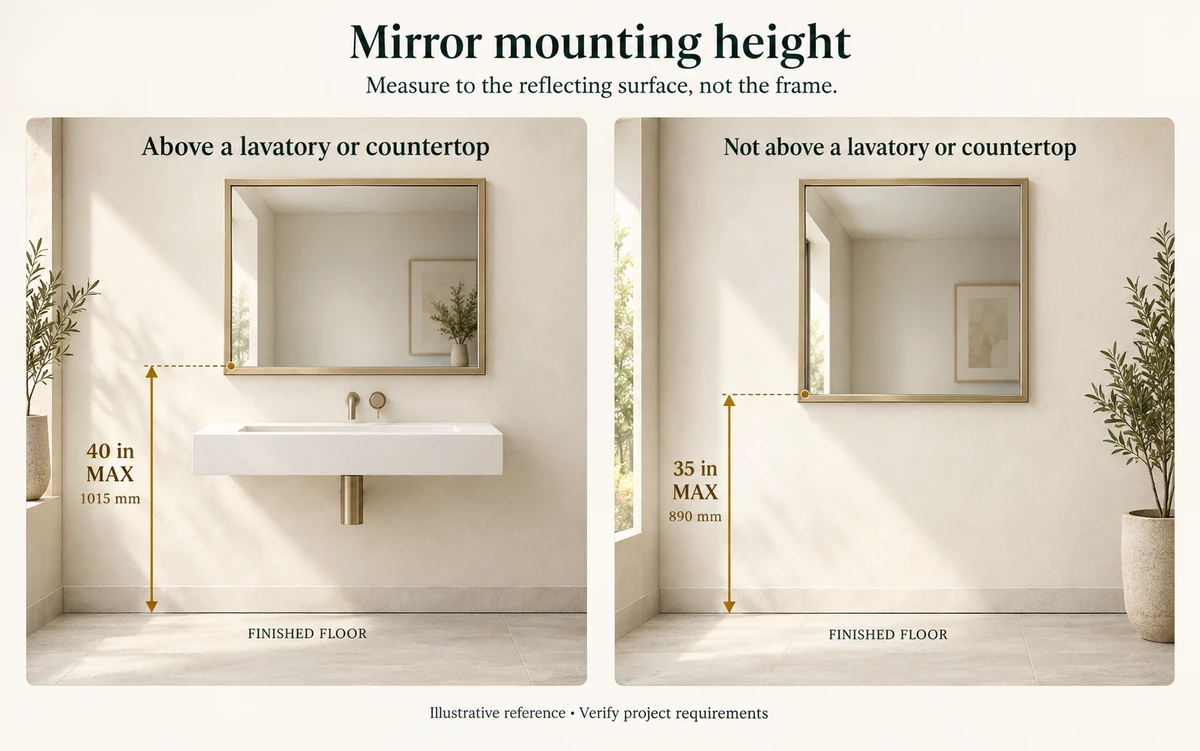
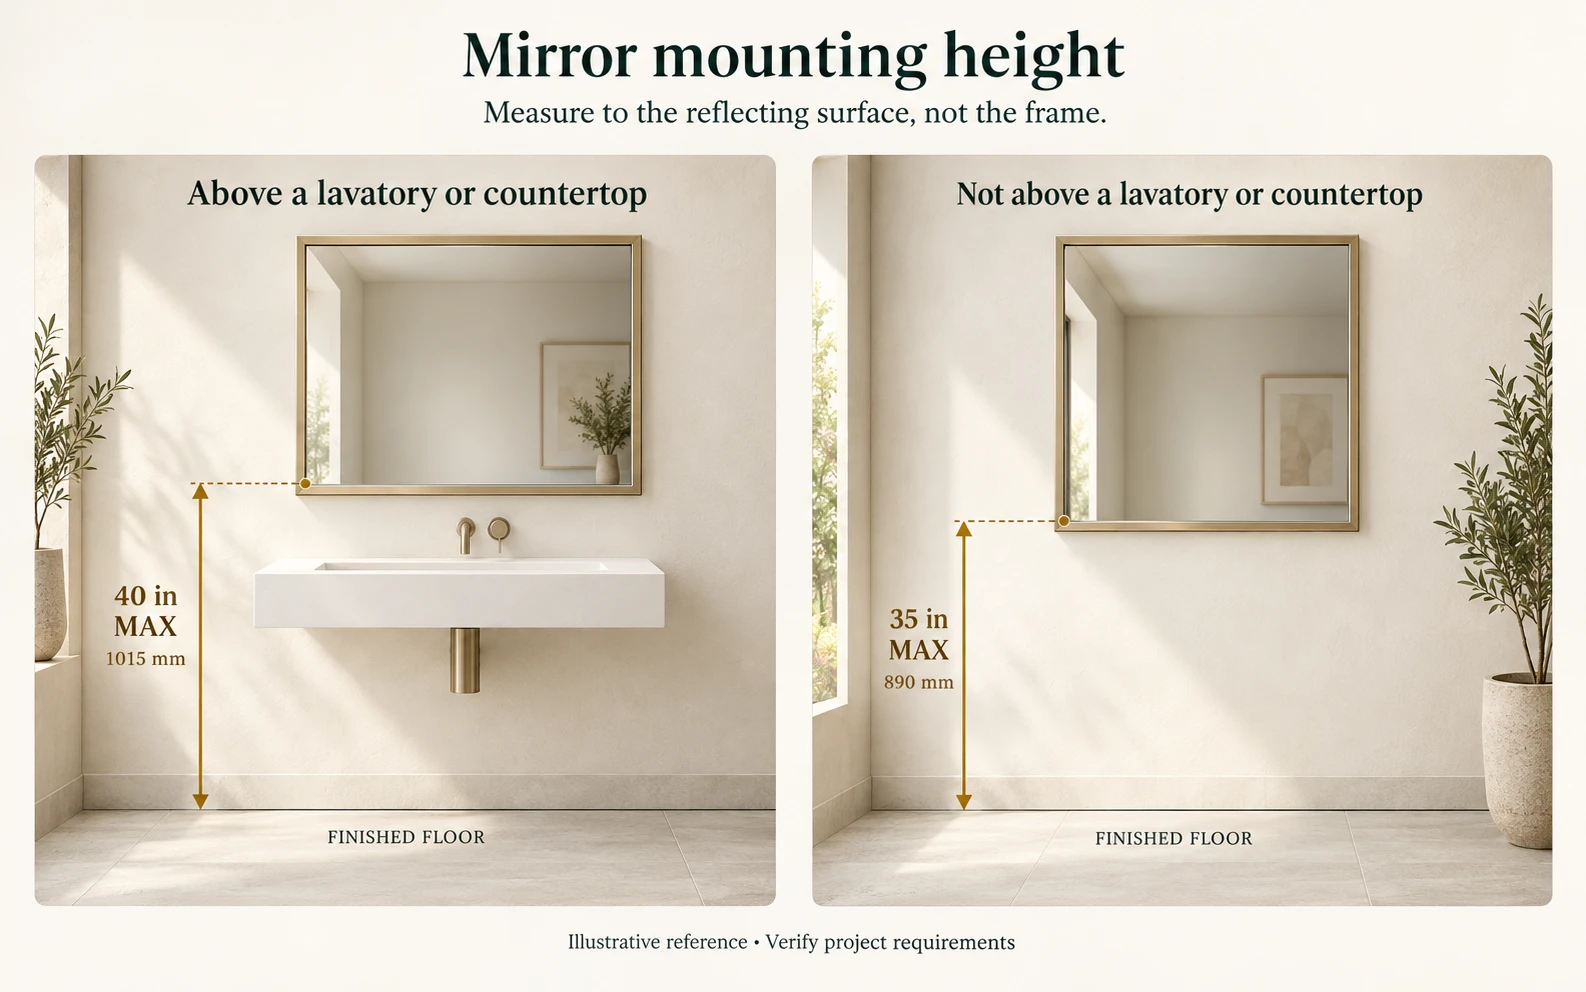
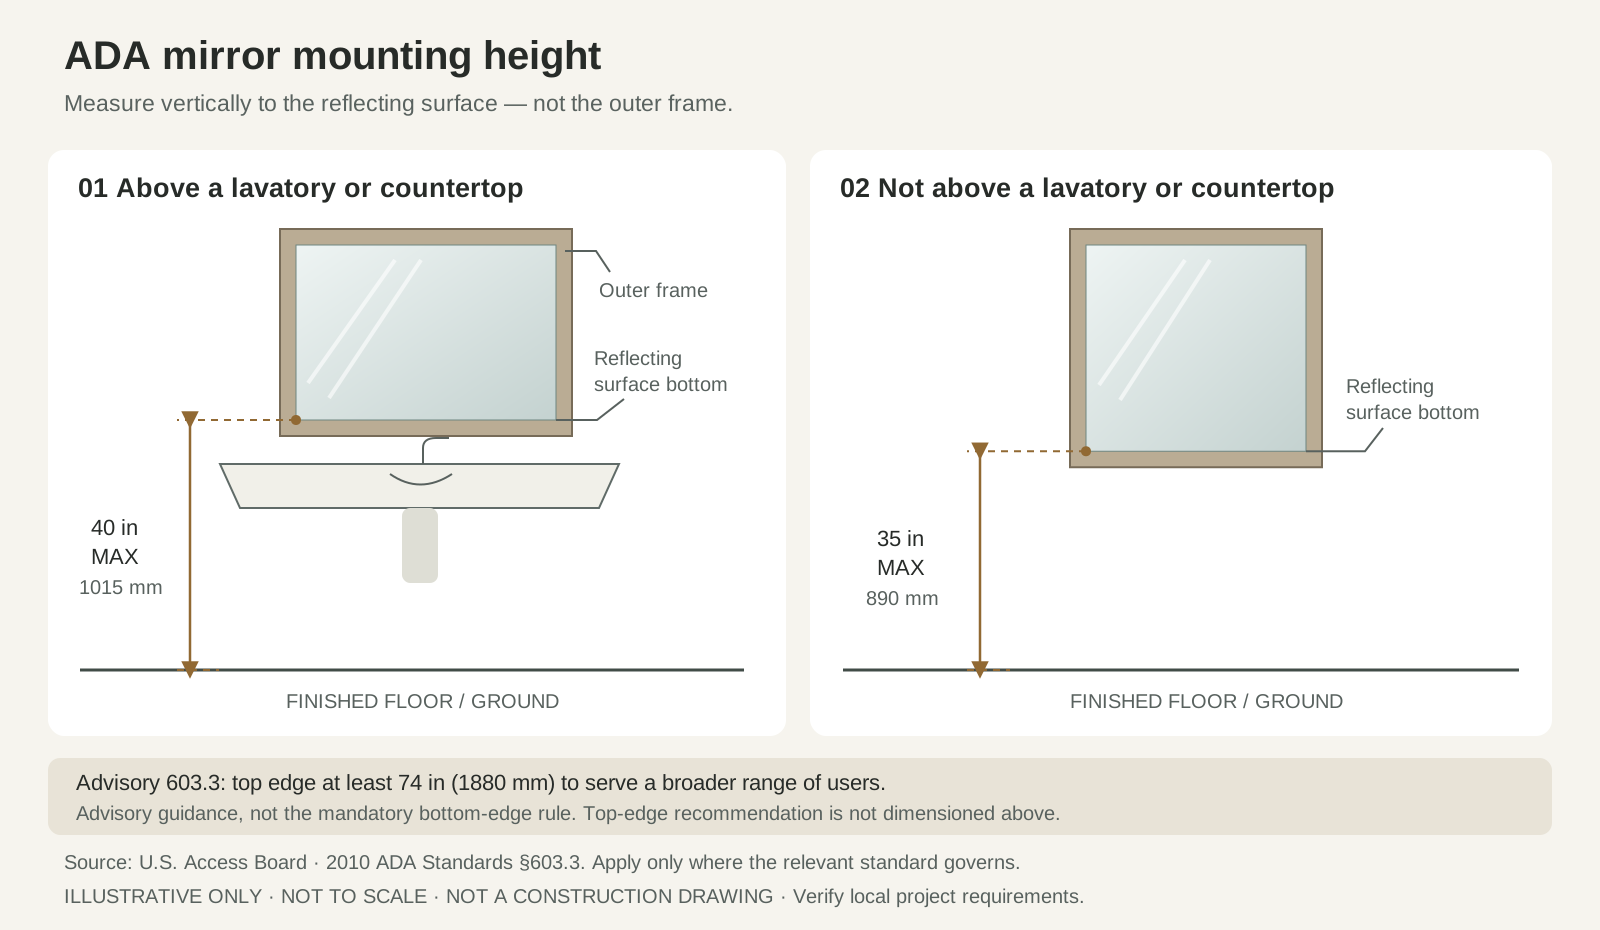
For U.S. projects governed by the relevant 2010 ADA provisions, §603.3 limits the height of the bottom of the reflecting surface to 40 in (1015 mm) above the finished floor over a lavatory or countertop, and 35 in (890 mm) elsewhere. The frame’s bottom is not the measurement point. Advisory 603.3 separately recommends a top edge of at least 74 in (1880 mm); this is advisory guidance, not the mandatory bottom-edge rule. Official U.S. Access Board standard.
Illustrative reference, not a construction drawing. Applicability depends on the facility and project. U.S. ADA guidance does not replace Canadian provincial or local requirements; the project designer must establish the applicable rules.
A compliant mounting height alone does not settle the whole room design. Review the actual basin, faucets, wall fittings, approach and control position together. A tilt mechanism should respond to a project need, not be assumed necessary merely because the room is described as accessible.
Review Seated and Standing Use in the Same Mock-Up
Mark the planned mirror position on the wall and inspect it with the intended basin and fittings in place. Ask the project team to assess the usable reflection from the relevant seated and standing positions. Record any blocked view, difficult control access or reflected light source before repeating the elevation across the room schedule.
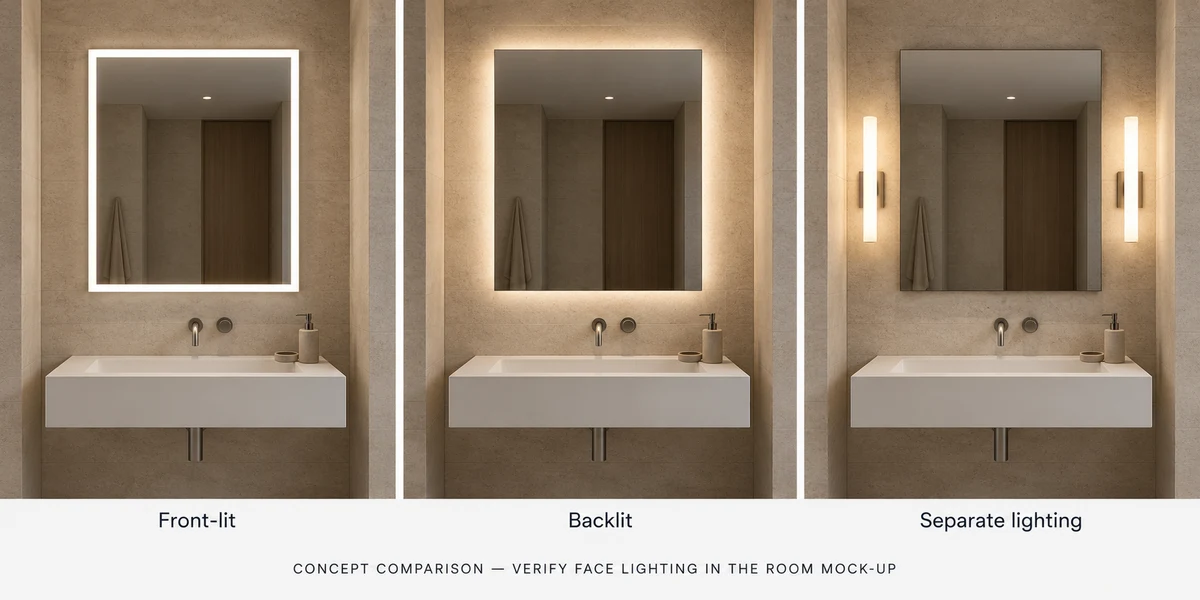
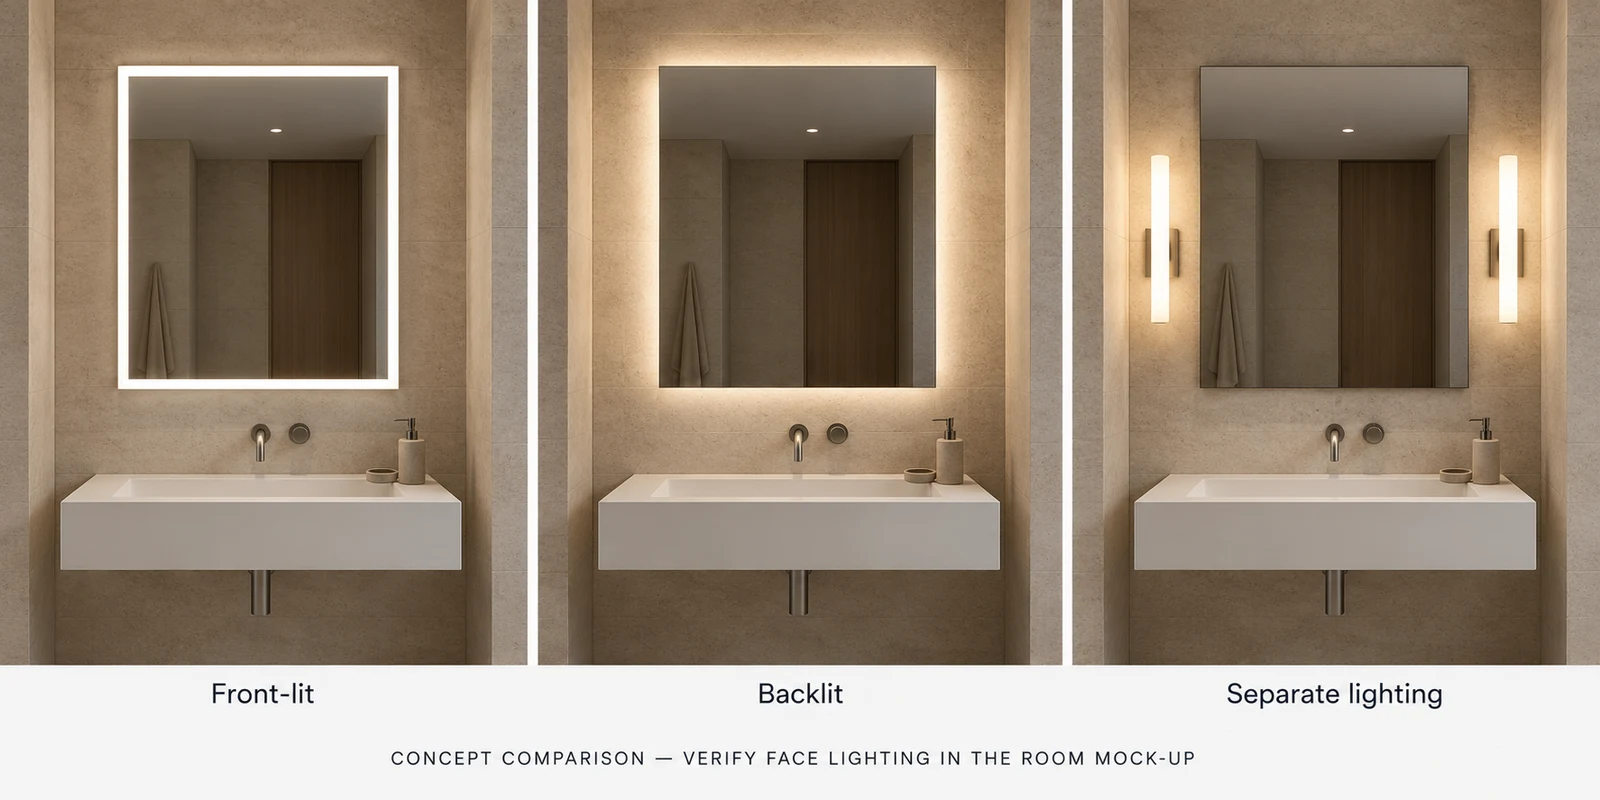
Light emitted through the front face around the reflecting area
Visibility at the face, apparent brightness and reflected glare with the room lighting
Backlit mirror
Light directed toward the wall behind the mirror
Whether separate task lighting is needed; do not approve face lighting from the wall halo alone
Non-lighted mirror with separate fittings
Mirror and light sources specified independently
Fitting positions, shadows, reflections and access for maintenance
Wall-Switch Operation and Lighting Controls
Write down the daily sequence before selecting the interface. Should the mirror light follow a wall switch? Should it remember a setting? What should happen after a power interruption? A control that is intuitive for one resident may not suit another resident or the facility’s routine.
Wall switching: identify the proposed switching circuit and the mirror’s required start-up behavior.
Touch controls: check visibility, location, recognition and operation on the actual sample.
Dimming: confirm the selected driver and control combination; do not assume compatibility with the room dimmer.
Sensors: review detection, timeout and unintended activation with the operator.
Defogging or other functions: request separately where needed; confirm control sequence and total electrical load.
Ask for Light Data, Not Just a Color Label
For each proposed illuminated model, request nominal color temperature, color-rendering data, input power, light-output information where available, and the conditions under which these values were established. Mark unverified values TBC. Compare the selected sample against actual wall finishes and room lighting before approving a multi-room order.
06 / PROJECT PLANNING
Custom Senior Living Mirrors — OEM & ODM
OJMIRROR’s custom mirror program provides a route to discuss dimensions, lighting, controls, finishes, branding and packaging. Feasibility, documentation, samples and commercial terms still need to be confirmed for the proposed configuration.
Separate the project brief into three groups:
Fixed requirements: room elevation, available wall area, destination, quantity and required documents.
Design preferences: shape, visible frame, finish direction and lighting appearance.
Items for technical review: mounting, electrical arrangement, service access, cabinet details or an unresolved control choice.
This distinction lets a proposal explain which requirements it meets and which need a change, rather than treating every item as already approved.
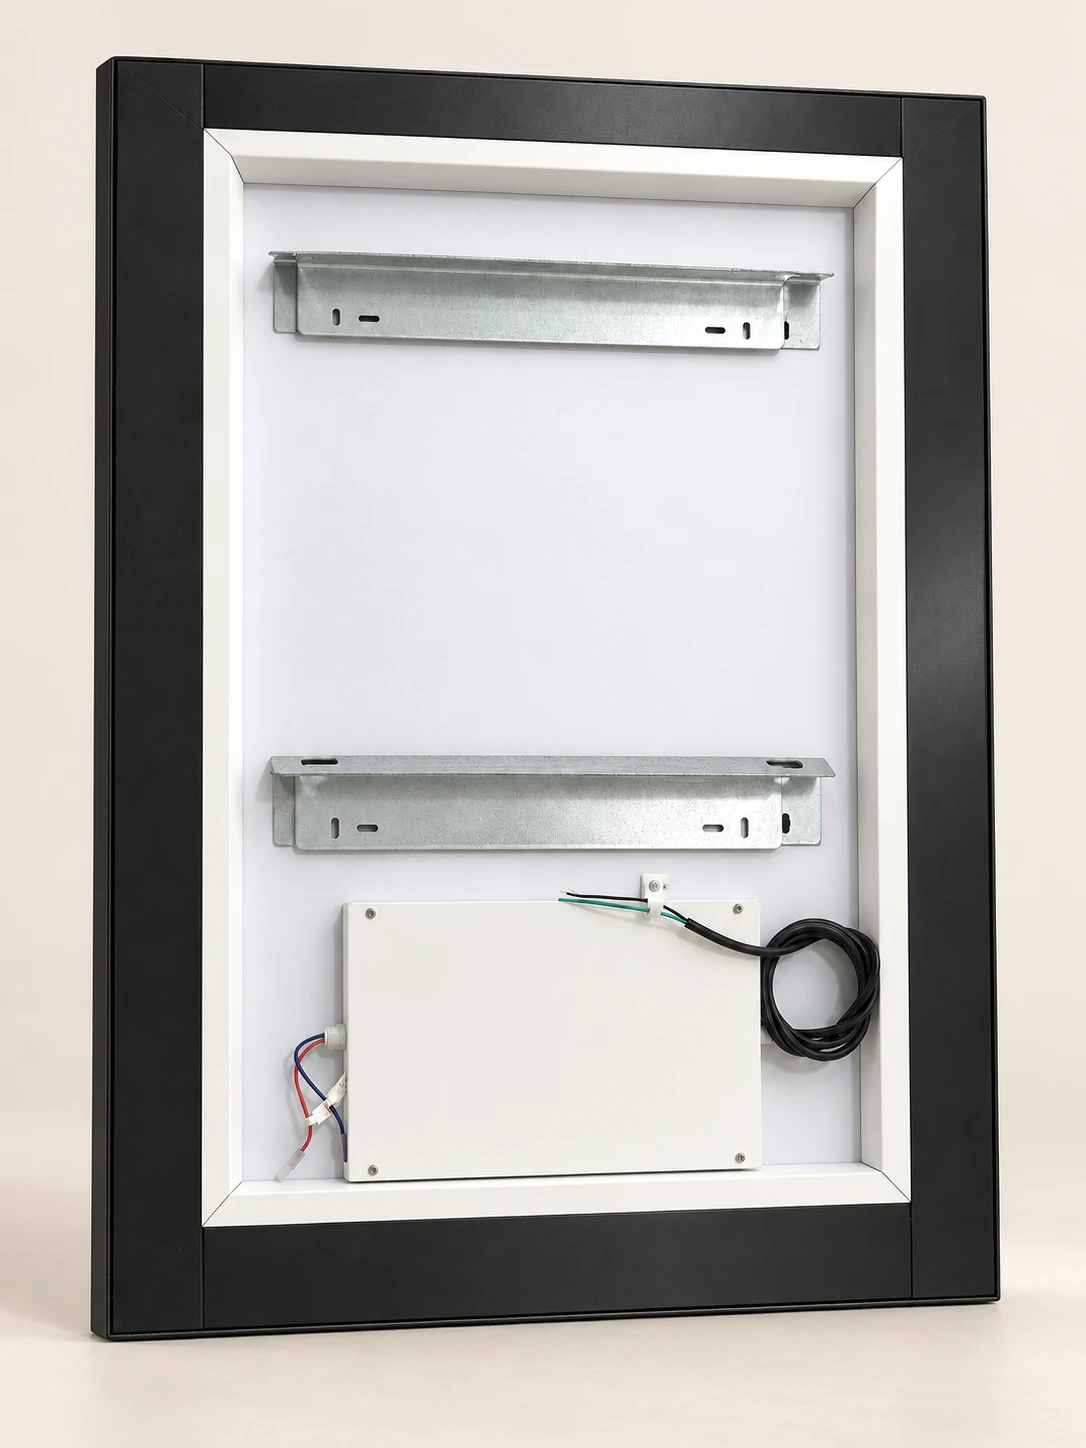
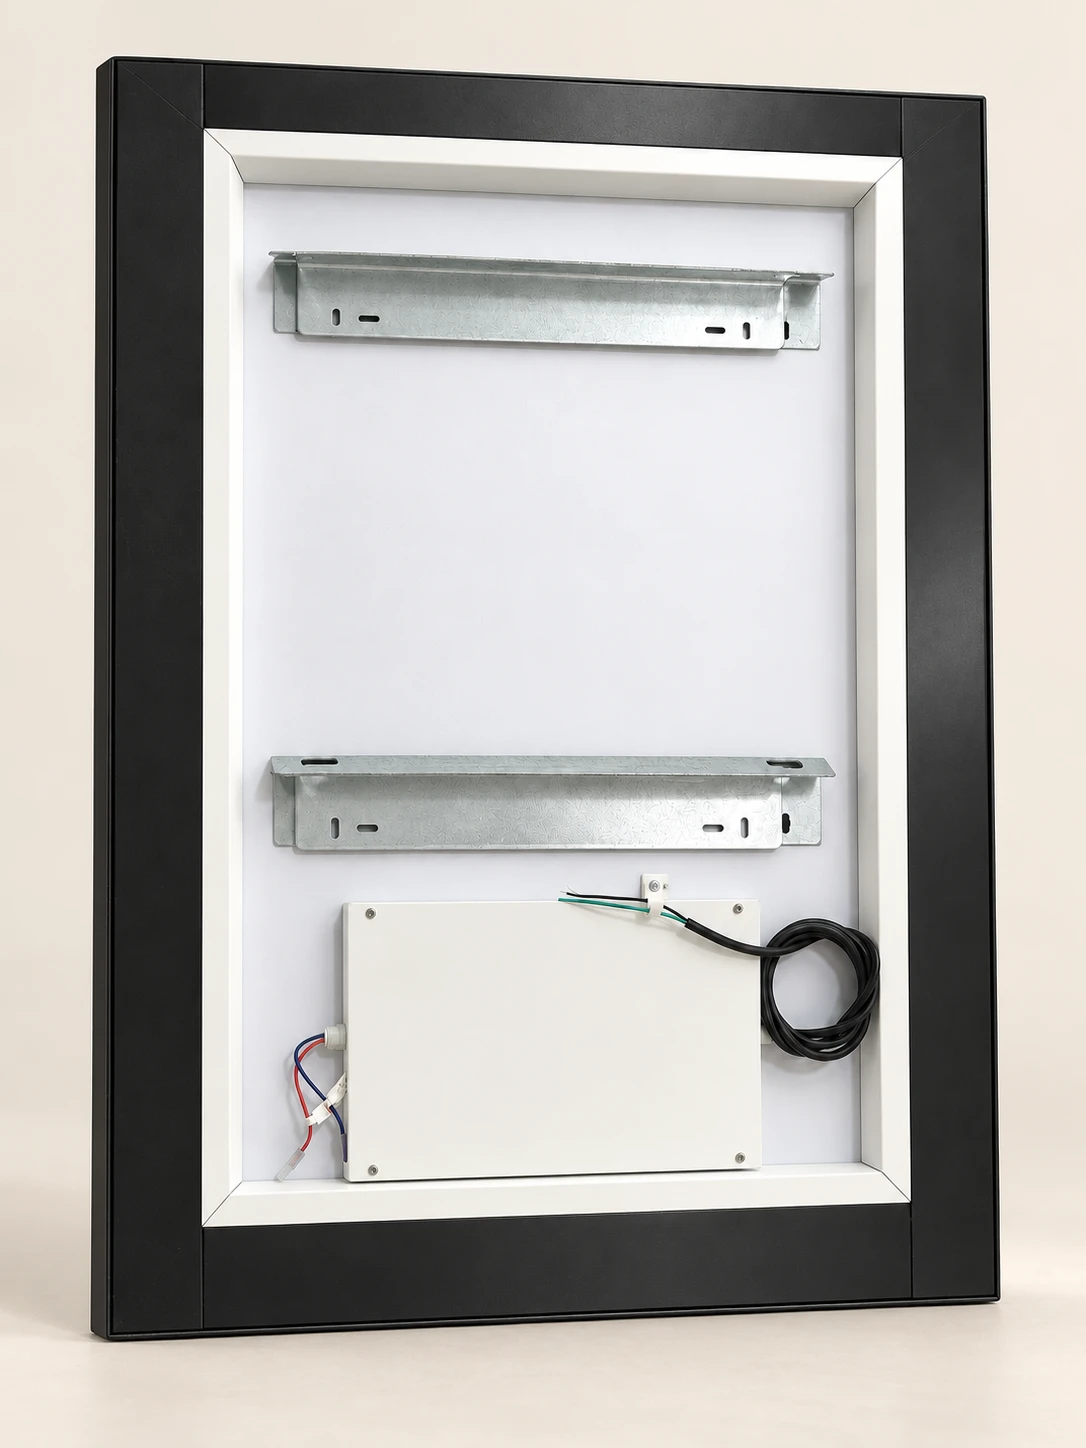
3D rear-view reference for component layout, not an installation drawing. Dimensions, hole spacing, mounting hardware and wiring details must follow approved project documentation.
The approved model drawing should resolve overall width and height, total depth, reflecting area, mounting positions, weight, wall support and service clearances. For powered products, the electrical documents should identify supply requirements, connection arrangements and the service method. Installation must follow the approved instructions and applicable project requirements.
Confirm the wall build-up before choosing fixings. Review the proposed cable exit against mounting hardware and the driver enclosure. Neither a generic image nor a finished front elevation establishes the hidden structure.
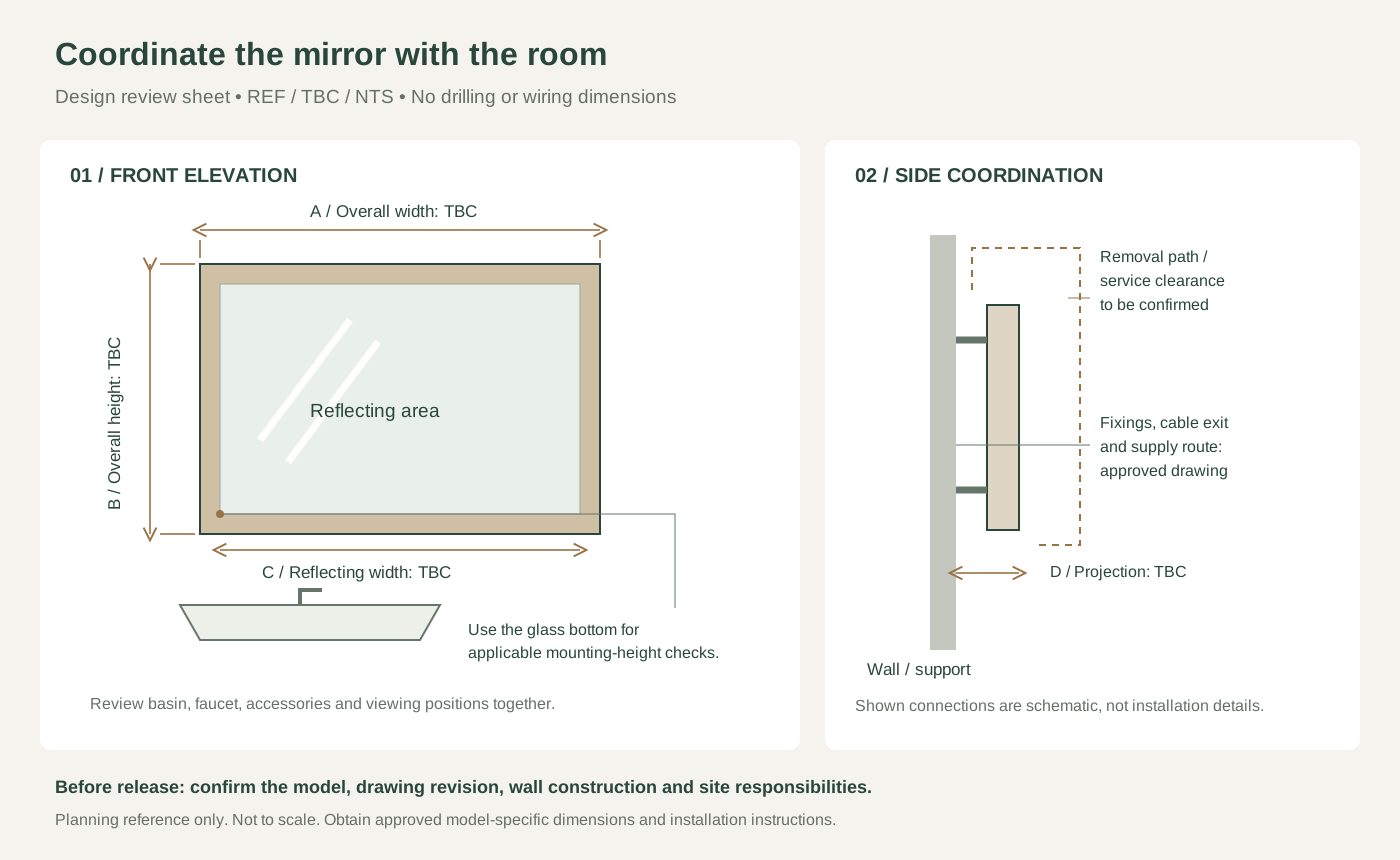
Review the wall, mirror and service space together
Separate overall dimensions from the reflecting area and wall projection. Mark the basin, faucet, accessories, supply location and removal path on the same elevation before approving the mounting arrangement.
Schematic design review only — REF / TBC / NTS. This is not a model drawing or drilling template.
New construction: coordinate support, rough-in and clearances while the wall assembly is still being designed. Release the mirror elevation with the relevant wall and electrical information.
Renovation: survey existing fixings, finish damage, wall conditions and electrical supply before repeating the old mirror size. Plan removal, protection and access with the operator, especially where residents remain in the building.
Record which work belongs to the mirror supply package and which belongs to the site contractor. Unassigned wall repair or electrical work can leave a technically suitable mirror waiting for a room that is not ready.
07 / TECHNICAL DOCUMENTS
Technical Drawings & Product Documentation
Start with the downloadable planning tools. Request product specifications, installation instructions and compliance documents against the actual model proposed for your project.
AVAILABLE NOW / FILLABLE PDF
Project brief
Two pages for dimensions, controls, destination and a technical review checklist.
Senior Living Design Concepts and Sample-Room Review
The 3D visuals on this page show design directions, not completed customer projects. Use them to explain preferences, then make the sample room the decision point for the actual product.
Review four things together:
Room fit: reflection, elevation, nearby fixtures and opening clearances.
Daily operation: lights, selected functions, controls and power-restoration behavior.
Visible finish: approved physical reference, edges, joints and cabinet hardware where relevant.
Service method: access, removal, care instructions and responsibility for future work.
Record the sample identifier, drawing revision, unresolved issues and named approvals. A photograph documents the review; it does not replace the approved specification or finish sample.
09 / SUPPLY & HANDOVER
Bulk Mirror Manufacturing & Project Delivery
Define the Acceptance Record Before Production
Build the inspection scope around the selected product. Depending on the order, this may include dimensions, visible finish, assembly, selected electrical functions, cabinet operation, labels and packaging. Agree the checks and required records in writing; do not infer that every test is included for every model.
Link the released order to the approved drawing and sample. If a specification changes, identify the affected types and quantities and request confirmation of the effects on price, work in progress, documents and timing.
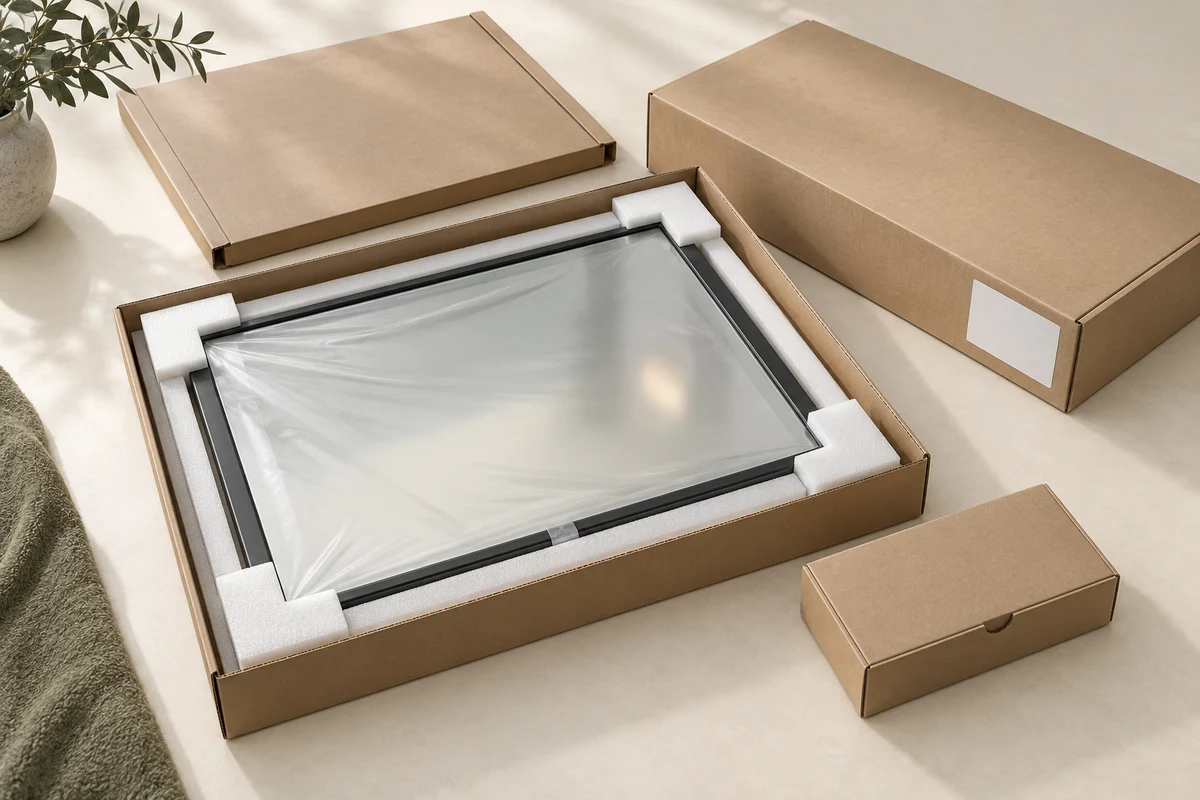
3D packaging planning concept, not a photograph of a shipment or evidence of packaging tests. Confirm materials, protection, carton labels and any testing requirements for the selected product and transport route.
Separate resident bathroom types, accessible-room variants and shared-space mirrors in the room schedule. For each phase, identify quantities, destination, receiving window and agreed packing references. Confirm whether spare units travel with the phase or as a separate allocation.
The carton schedule should connect a mirror type to its revision and destination zone. Where room numbers are used, freeze that mapping before labels are produced and document later changes. On receipt, check quantities and condition against the agreed packing list.
Keep the Facilities Team in the Loop
Request the product-specific care and service documents before handover. Keep replacement-unit and component references connected to the room schedule, and agree service terms for the selected product. A broad warranty statement does not establish component availability or a site service arrangement.
10 / COMMON QUESTIONS
Senior Living Bathroom Mirror FAQs
Which mirror is best for an assisted living bathroom?
Choose from the room requirements, not the facility label alone. An LED mirror is a candidate where integrated lighting is wanted; a non-lighted mirror may suit a room with separately specified task lights. Add a cabinet only when storage, wall depth and door access support it. Review the sample with the operator before repeating it across rooms.
Can the same mirror be specified throughout a community?
Use a common family or finish where it works, but schedule exceptions. An accessible-room elevation, deeper cabinet, different control or shared-space installation needs its own approved configuration and quantity.
What makes a mirror suitable for an accessible bathroom?
The selected mirror and its installation must work together. Use the reflecting-surface guidance above, then review the complete room under the project’s applicable requirements. A product name, LED feature or tilt mechanism does not by itself establish compliance.
What should we consider for mirrors in nursing homes or memory-care areas?
Start with the specific activity and the operator’s requirements. Review placement, privacy, cleanability, controls and supervision where relevant. In memory-care areas, ask the care team whether reflections are appropriate for the intended users; do not assume a general senior-living design can be copied unchanged.
What CCT, CRI and brightness should we specify?
Define the lighting task with the project team and request data for the proposed model. Review the actual sample in the intended room. This page does not assign an unverified universal color temperature, color-rendering value or light-output target to all residents or rooms.
Can the mirror use a wall switch instead of a touch button?
Include the desired sequence in the inquiry. Ask the supplier to confirm it for the selected configuration, including start-up behavior and compatibility with any dimming controls. Verify those behaviors on the sample.
Can we receive specifications, drawings, CAD/BIM or IES files?
List the required formats with the inquiry and request confirmation of what exists for the proposed model. A drawing can support coordination without being a BIM object or a photometric file. Do not treat those file types as interchangeable.
What are the minimum quantity and lead time?
Sample availability, MOQ and production lead times depend on the selected model, customization requirements and approved project scope. Provide quantities by type, destination and target dates. Confirm sample approval, production and transport milestones separately; general product-page timings are not a commitment for every senior living project.
Can we request replacement units or spare components?
Yes—include them as requested line items. Their availability, compatibility, quantities and service arrangements need written confirmation for the selected product. Keep the approved references with the facilities records.
What if dimensions or quantities are not final yet?
Send the available elevation, approximate scope and known constraints. Mark unresolved fields TBC and identify what you need help deciding. A preliminary discussion can start before the full room schedule is ready; a production release needs the approved details.
11 / START A PROJECT
Request a Senior Living Mirror Quote
Choose a starting point and share what you know. Your selections will be carried into the inquiry form for review before you send it.